Fixity Pro Documentation
A user guide, frequently asked questions, and other resources to help get the most out of Fixity Pro.
About Fixity Pro
Fixity Pro is a desktop application for Windows and Mac that provides simple automated monitoring and reporting on the data integrity of your files that are stored on your computer, removable storage devices, and mounted network storage locations. Use Fixity Pro to schedule routine scans that will tell you if your files have been changed and if any files have been added, removed, or moved/renamed since the last scan that was performed.
Fixity Pro was created by AVP, a premiere consulting and software company with clients including the Library of Congress, Smithsonian, Paramount Pictures, Harvard University, Museum of Modern Art, and more. Since 2025 Fixity Pro is maintained by the Open Preservation Foundation.
User Guide
Quick Start
Start using Fixity Pro in 9 steps.
- Download Fixity Pro for Mac or Windows.
- Watch the Getting Started video
- Name Your First Project and Select the Checksum Algorithm You Want to Use. Upon initial launch Fixity Pro will ask you to enter the name of your first project. The default checksum algorithm is SHA256. Change it to MD5 if you prefer. Don't know what any of this means? That's fine! Just leave it as is and move on.
- Choose the Directories You Want to Monitor. Drag and drop whatever directories you want Fixity Pro to scan for you in the Add Directories to Scan* Section. When you do this Fixity Pro will ask you to identify if the directory is located on the internal drive of your computer, an external drive (e.g., portable hard drive), or a network drive. Mix and match as you like.
- Create a Filter to Exclude Files You Want Fixity to Ignore. If you want Fixity Pro to ignore files fill out the Exclude Files from Scan.
- Schedule Routine Automated Scans. To have Fixity Pro perform scans on a schedule of your choosing fill out the Schedule the Scan section.
- Setup Email to Have Reports Emailed to Whoever You Like Want Fixity Pro to email reports to you? No problem. Just fill out the Email Reports To section. Before you hit Save Project go the Preferences menu and select Configure Sender Email. Fill out the SMTP or Google API info and save.
- Save the Project. Go ahead and save the project by hitting that big blue Save Project button.
- Can't Wait to Get Going? Run a Manual Scan. If you want to get your first scan done, or if you prefer not to schedule scans go ahead and press the big blue Scan Now button to get your scan going.
- View the Fixity Report. If you setup email you will get a summary report in the body of an email along with an attached Fixity report. Otherwise you can select View Report in the Last Scan section and the report will load in your default application for .tsv files. You can find all of your Fixity reports by going to Documents Fixity Fixity_Reports reports. Open these up to see the results of your scan. As you would probably guess, your first scan will always produce a list of all New Files.
Want more detail? Check out the full User Guide below.
Overview and Background
Fixity Pro is an application for monitoring and reporting on the data integrity of files. Fixity Pro scans a directory and reports on files that have changed or are new, missing, moved, or renamed.
- Checksum generation and validation are universally recognized as a primary mechanism for fulfilling the goal of fixity.
- Generating checksums without systematically and routinely validating them is of little or no use.
- Most organizations that "use" checksums only generate checksums but do not validate them routinely, if ever.
- The primary reason organizations do not systematically and routinely verify checksums is that there is no tool that allows simple scheduling and reporting of validation.
- Organizations that do routinely verify checksums do not typically monitor and report on information related to file attendance.
- Overcoming the lack of resources and/or access to IT expertise is a critical factor in enabling organizations to fulfill the goal of fixity. Organizations need a simple, low cost tool.
Fixity Pro was created with the sole focus of fulfilling the requirements of those concerned with monitoring and managing the fixity of a collection of files over the long term. There are many free and open-source checksum utilities out on the market, but they do not offer the feature set or simplicity necessary to fulfill the needs of many organizations.
Downloading Installing, and Activating
Download Fixity Pro for Windows or macOS Windows/macOS
Windows Installation
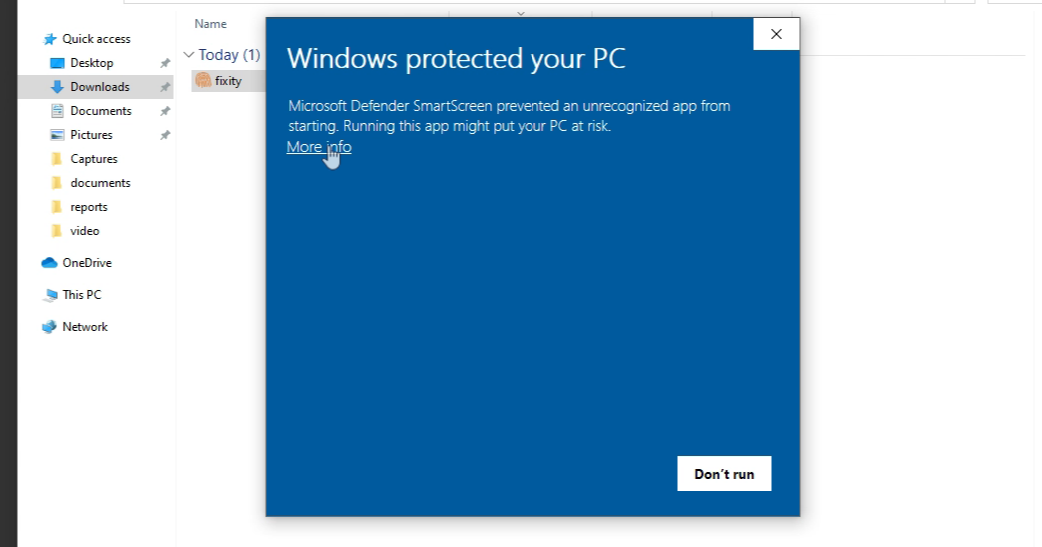
To install Fixity, simply double-click the .exe file that you have downloaded. This will result in the following window. When you see this window, click "More info"
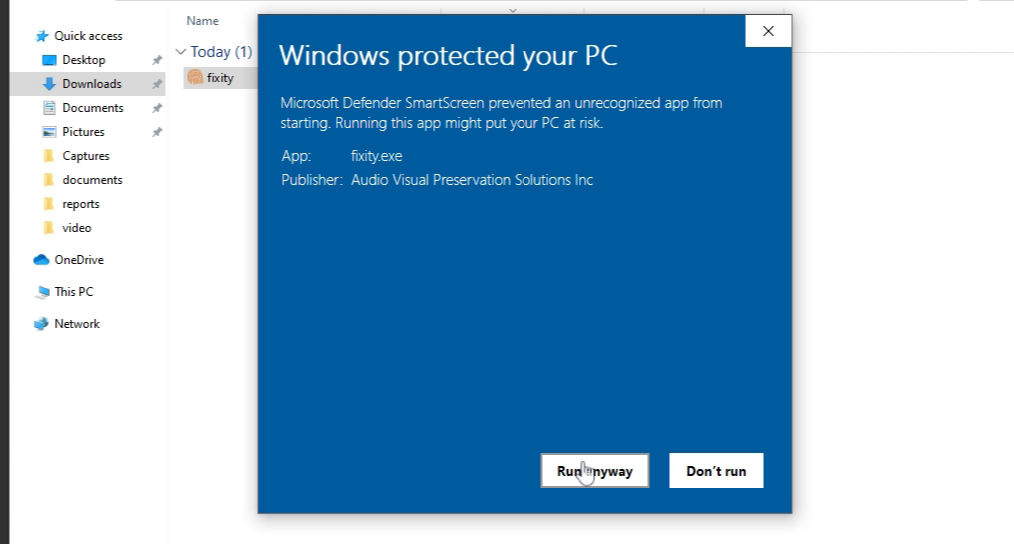
Clicking "More info" will present you with the following window. Select "Run anyway" to proceed.
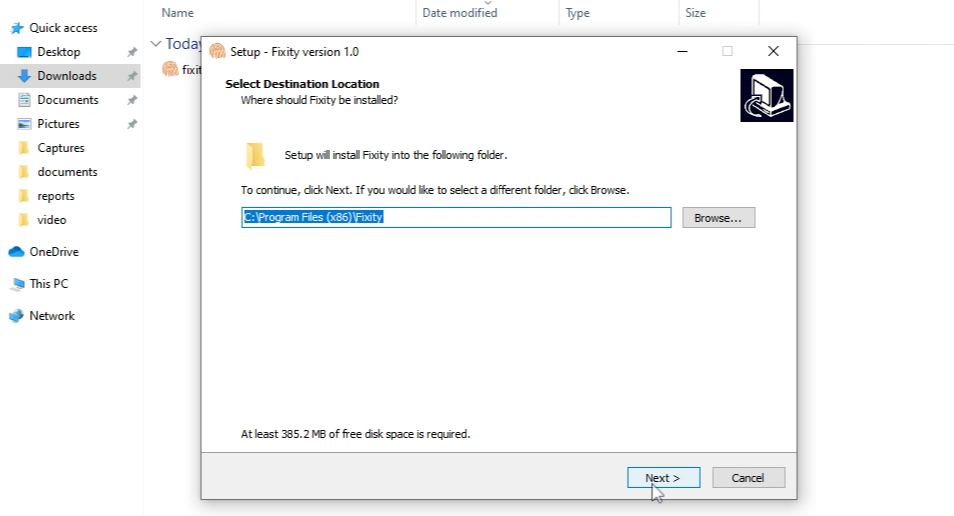
The next window will show the location where Fixity will be installed. Click "Next"
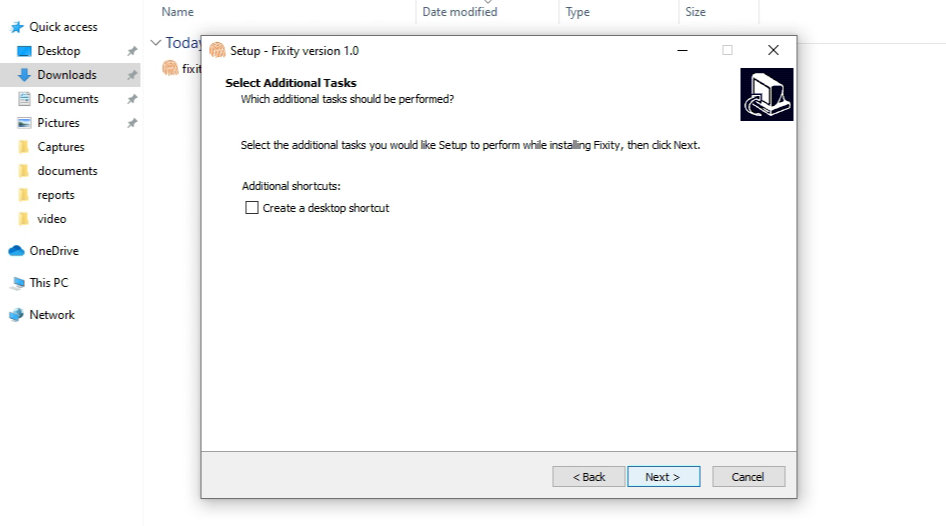
On the proceeding window, select the checkbox if you would like the installer to place a shortcut on the desktop. Select "Next".
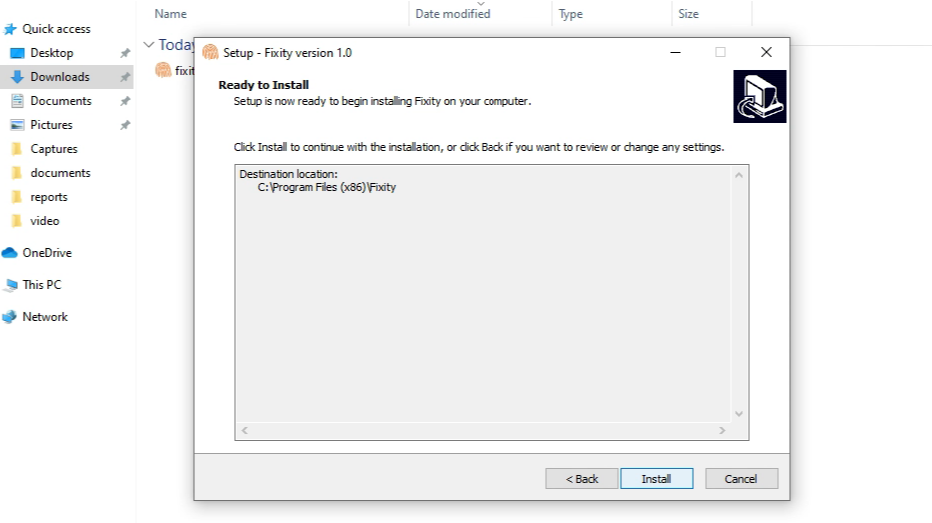
The next window is the final confirmation point to begin the installation process. Select "Install"
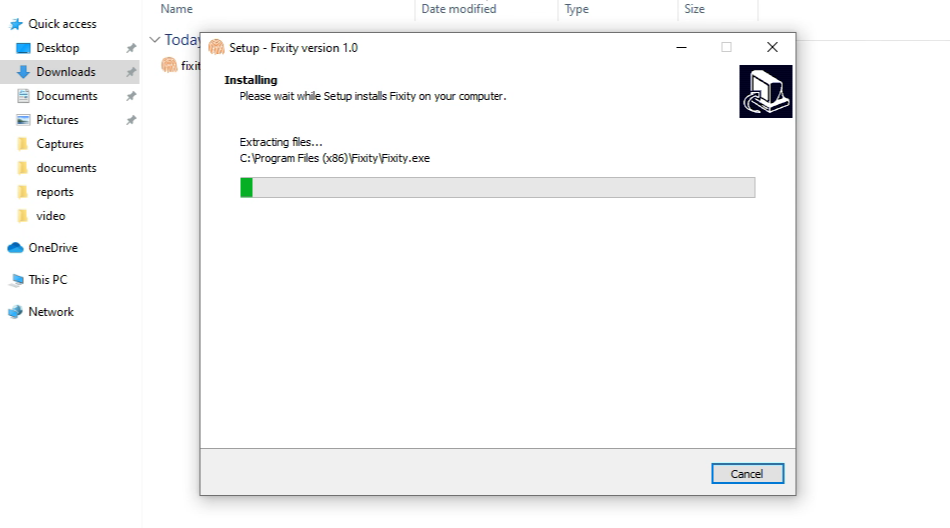
The installation progress bar will indicate how far along in the installation process you are. Installation should take less than 1 minute.
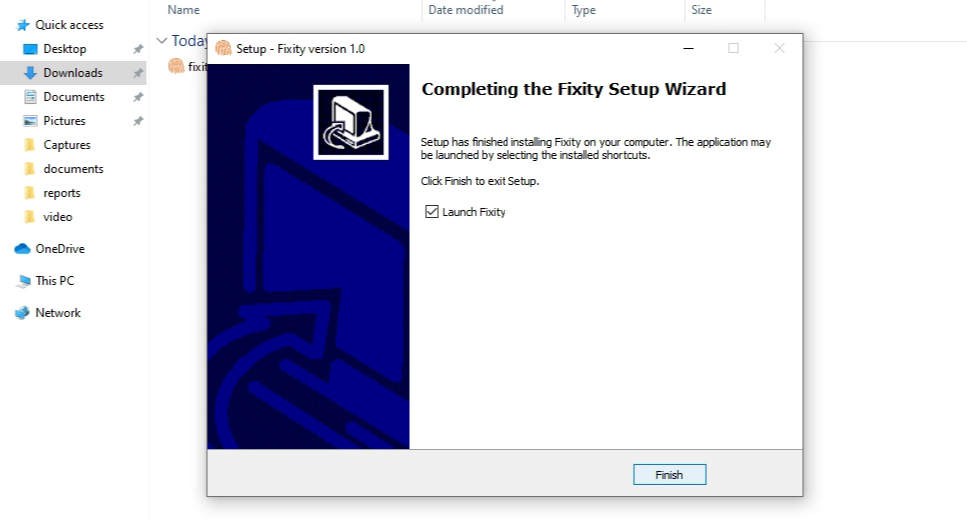
Once the installation process is completed, you will receive a success message. If the "Launch Fixity" checkbox is checked, once you select "Finish" Fixity will launch. Fixity may take 60 - 90 seconds to launch.
You will be able to find Fixity in your Start menu and with your programs.
Mac Installation
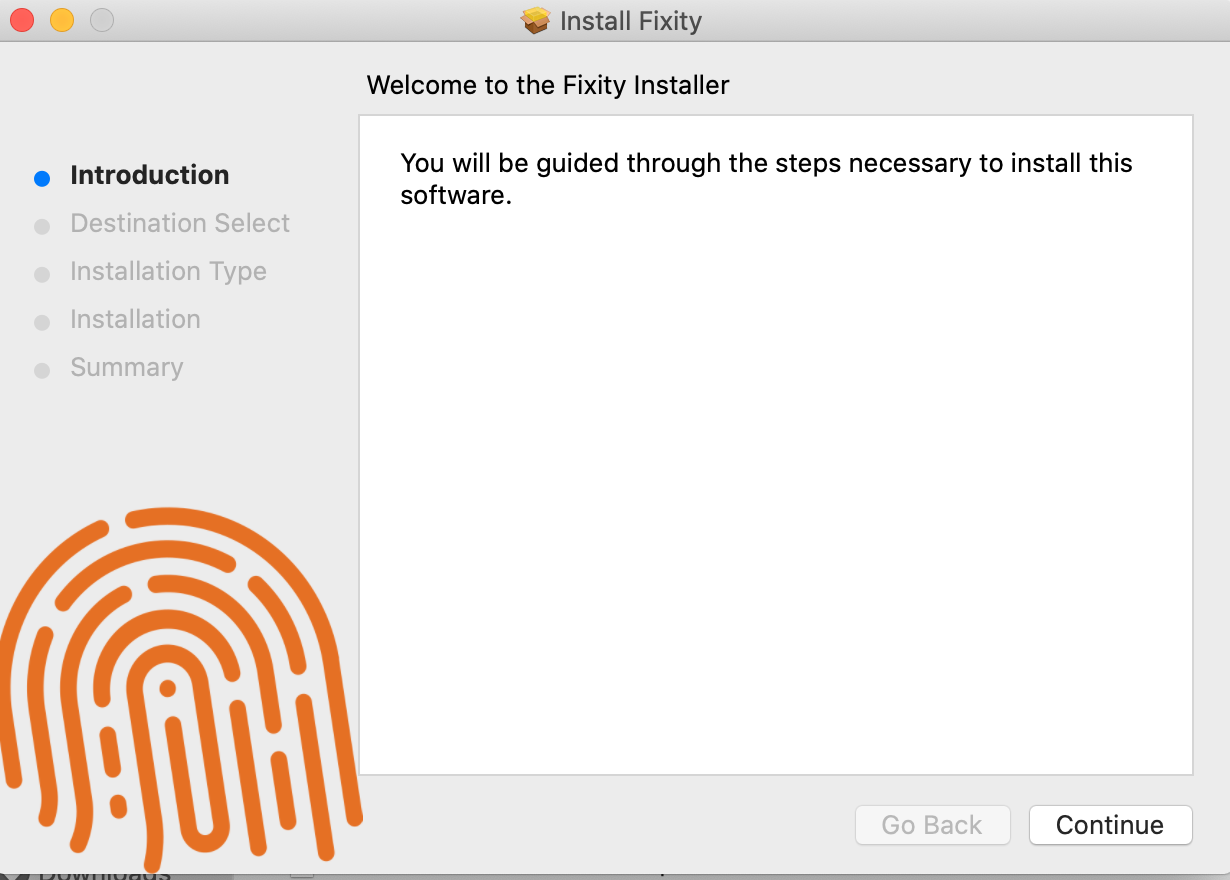
To install Fixity, simply double-click the .pkg file that you have downloaded. This will result in seeing the following window.
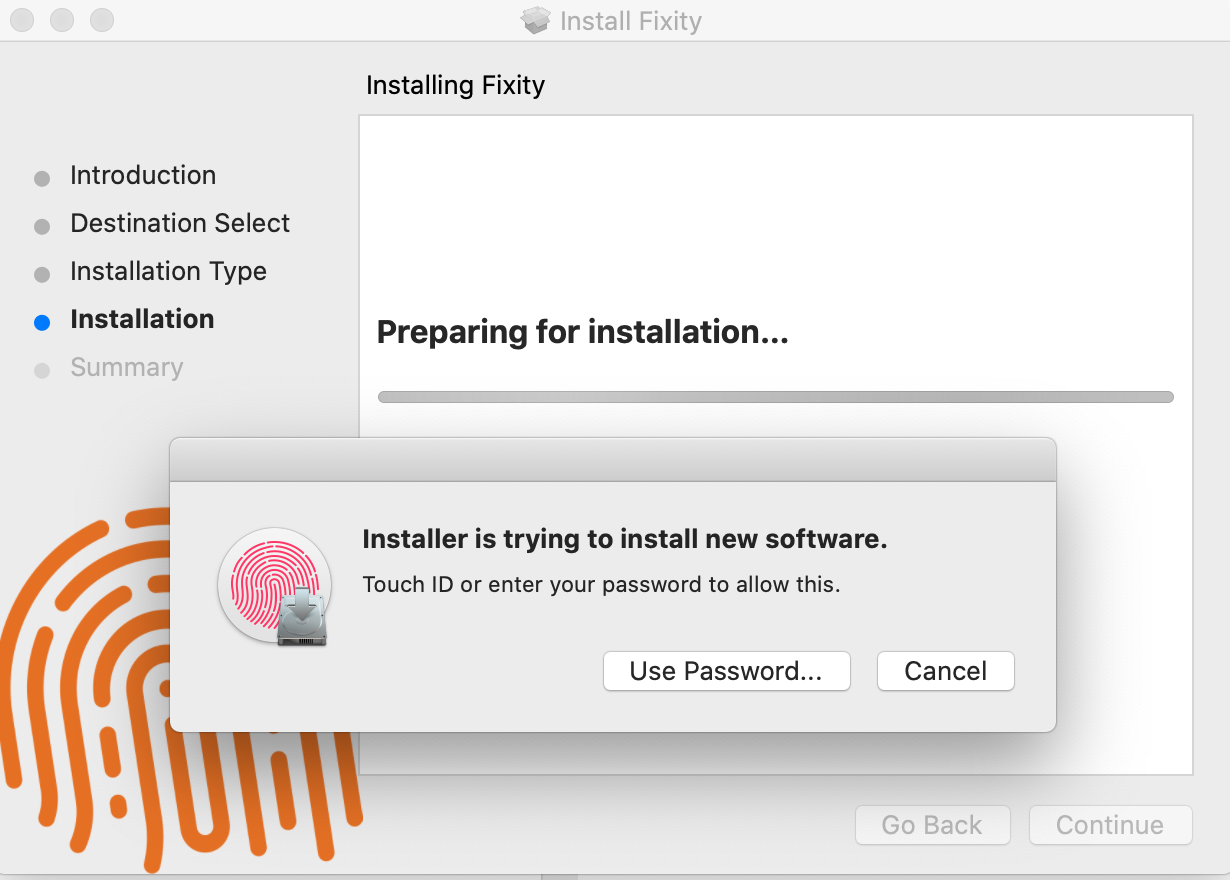
During the installation on the Mac you will be asked to provide your user credentials to install Fixity Pro.
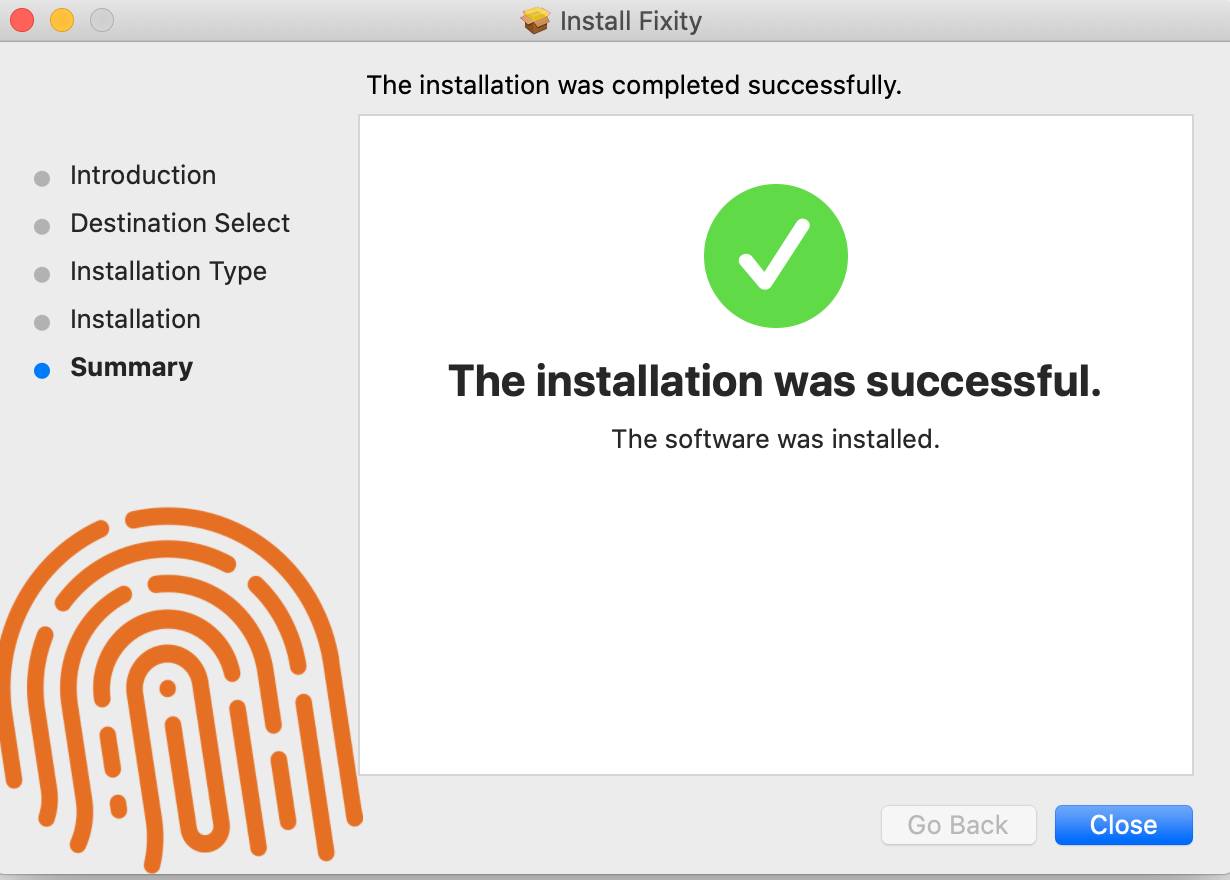
At the end of the process you will see the following success message.
Once the Installation window is closed you can launch the Fixity application from the Launchpad or from the Applications folder. Launching Fixity the first time may take between 60 and 90 seconds.
Activation
The first time you launch Fixity you will see the window below.
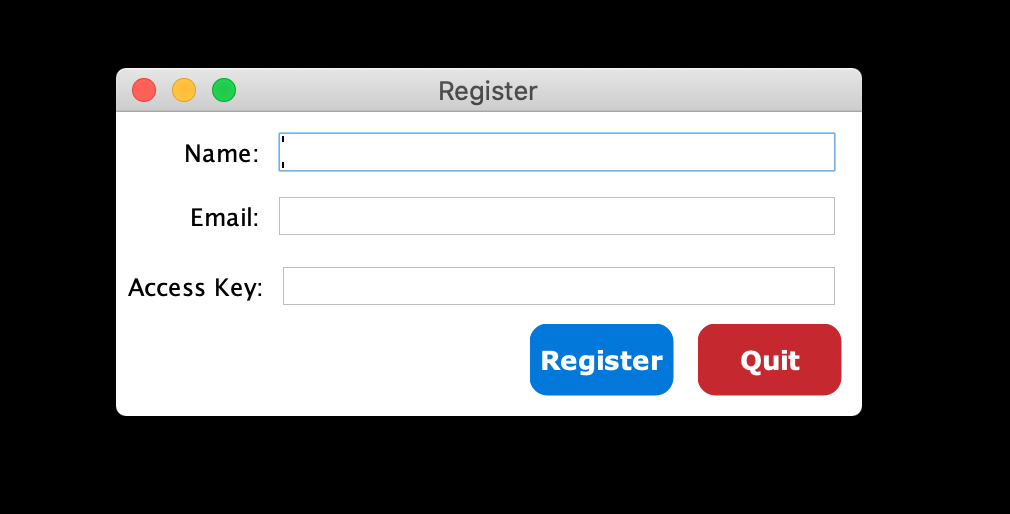
Fixity Pro no longer requires registration or a subscription. This step will be removed in the next version of
the software. For now it is enough to fill this dialog with dummy details. You can put anything in the
"Name" and "Access Key" fields, the "Email" field requires a string that matches
the pattern of an email address. An example of a legal value is name@example.org, feel free to use
the same address.
Select "Register" and upon successful registration, you will see the window below.

Congratulations! You have activated Fixity Pro. Read on in the user guide to find out more about how to use Fixity Pro.
General Setup and Configuration
General setup and configuration of Fixity Pro primarily resides in the Preferences menu seen below.
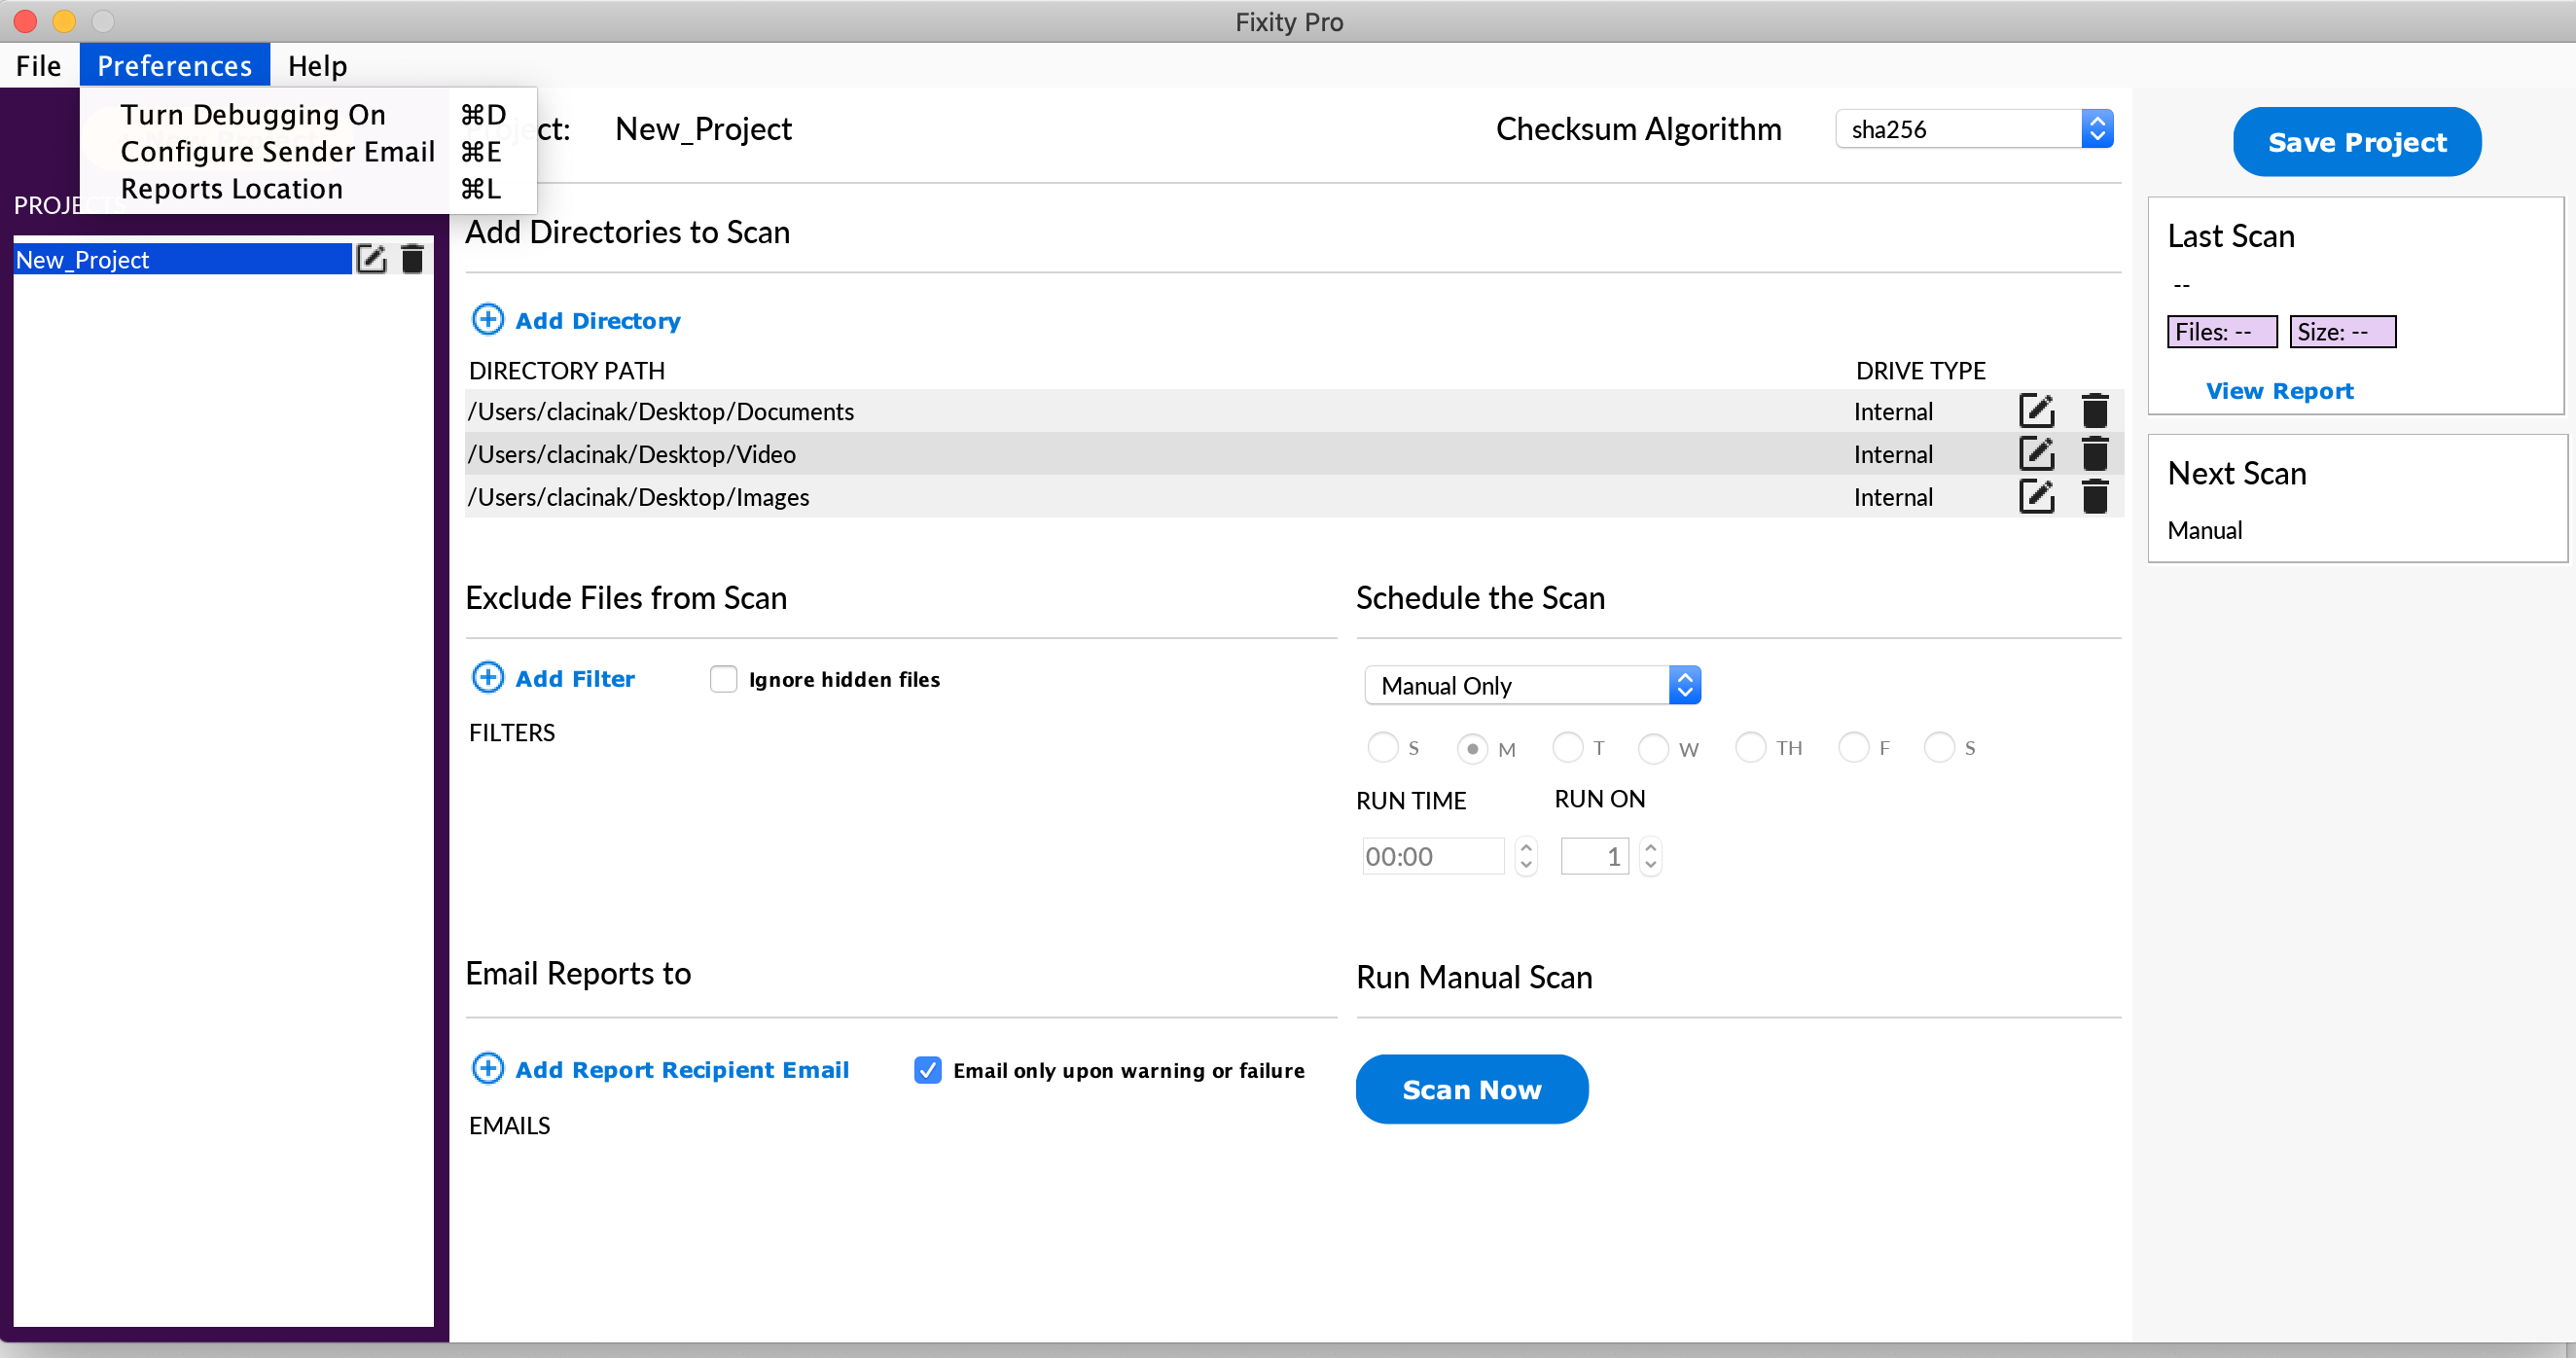
The first option, Turn Debugging On, is a preference that will help troubleshoot in the instance that you run into any issues. This will create a file named fixity.log in a directory named Fixity in your Documents directory.
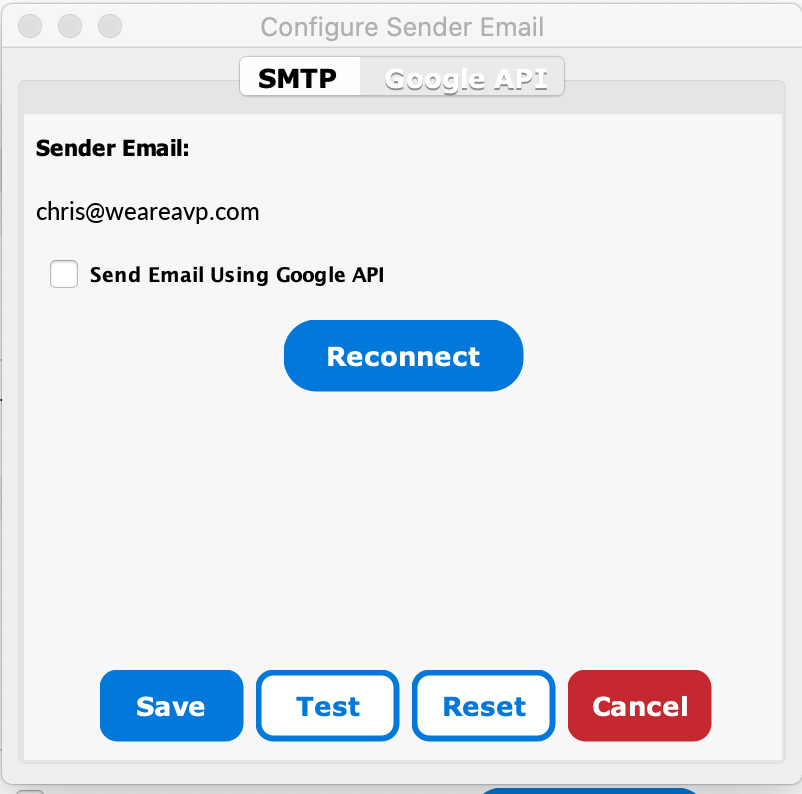
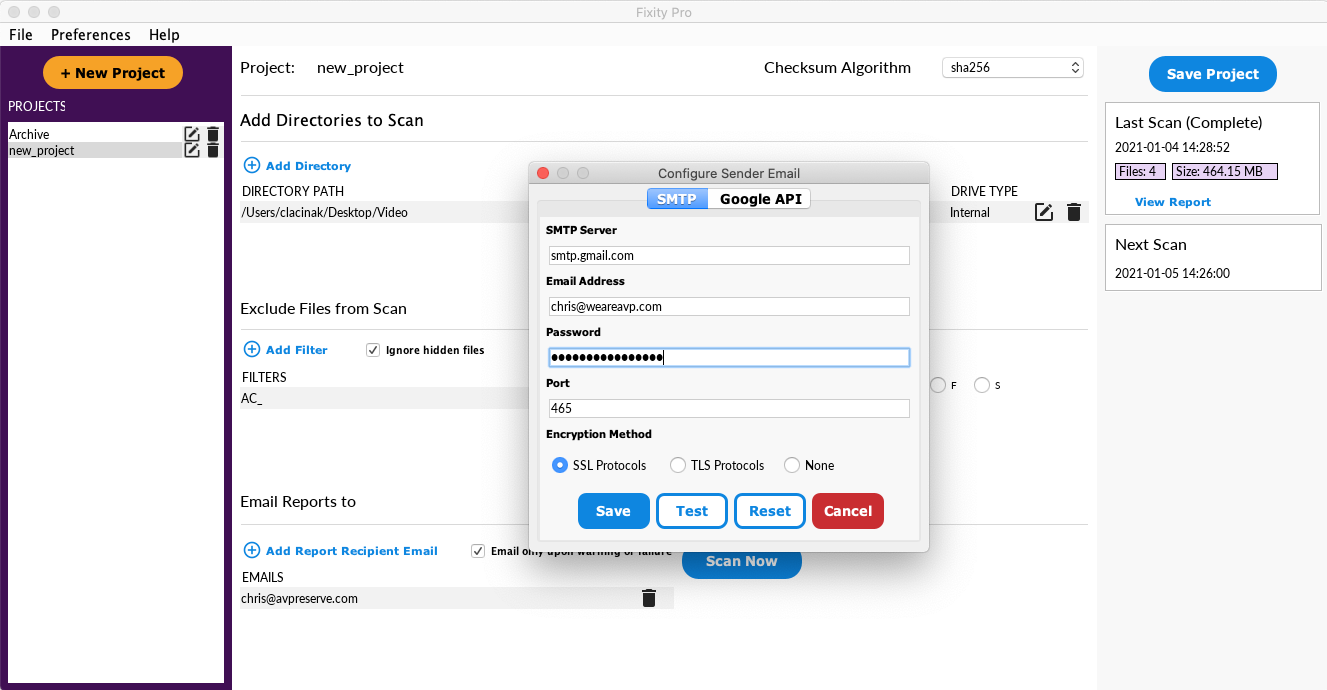
The second option is Configure Sender Email. Selecting this option will bring up the following window.
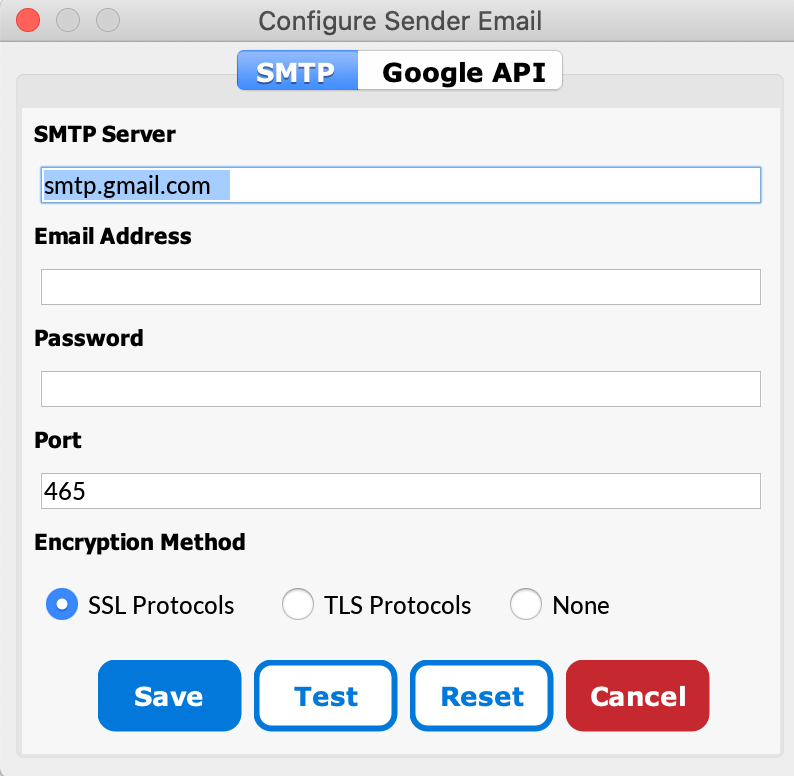
The first window is for configuring the SMTP settings for outgoing email. This is similar to the information you may use for configuring desktop versions of the Apple Mail or Outlook applications for example. Selecting Test will send a test email to ensure that your setting are functioning correctly. Reset will wipe all of the email setting data if you want to delete the existing information. If you are using Google you will want to use the Google API tab shown below for the simplest and most secure connection. If you do need to use SMTP to connect to a Google account see the section below titled Google App Specific Password.
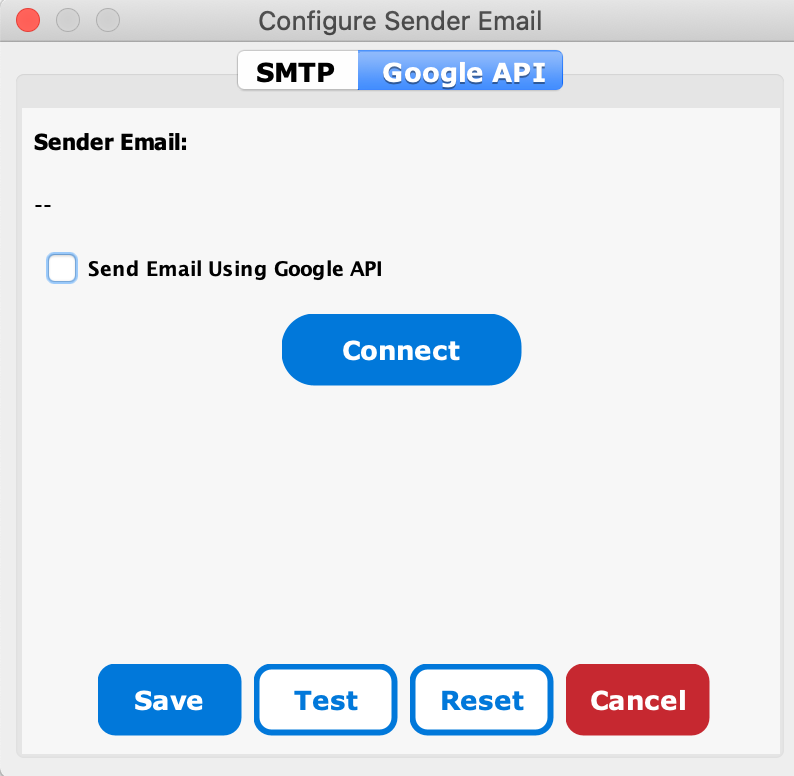
The Google API tab focuses on the Connect button. Pressing this button will open up the following window.
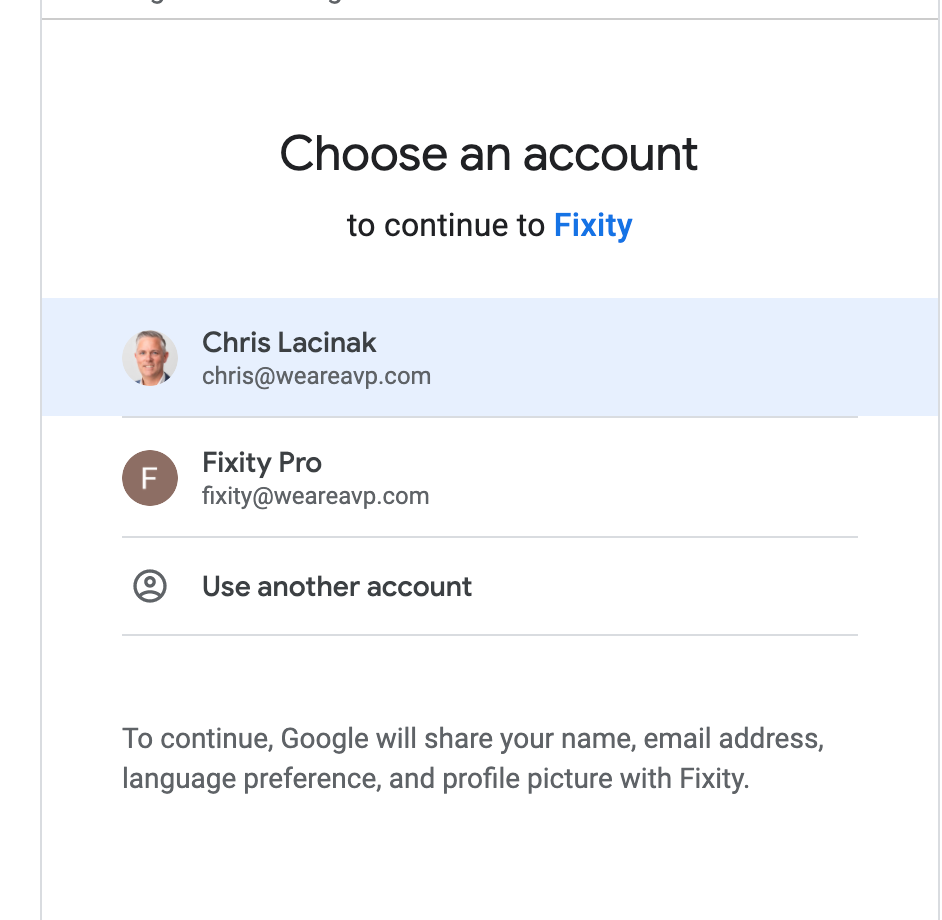
Select the appropriate account. This will bring up the following window.
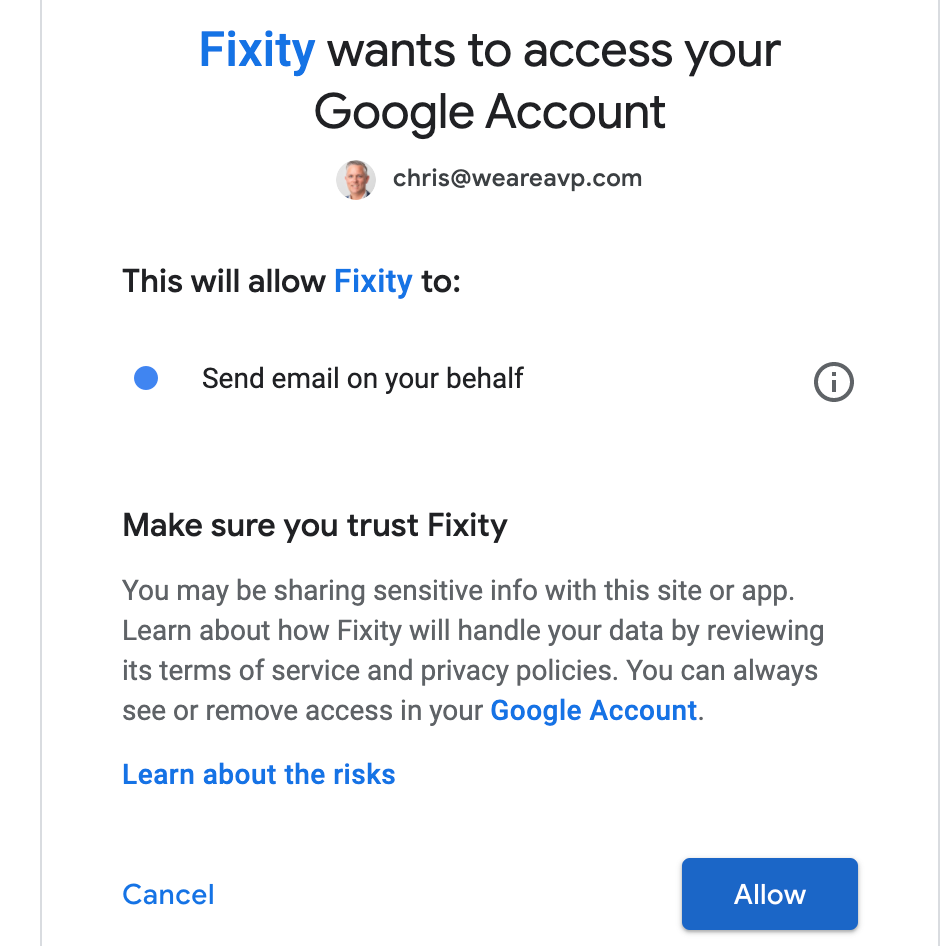
Select Allow, which will result in the following window.

Close this window and Fixity will now look like the following window indicating that the connection has been made. Be sure to select the checkbox next to Send Email Using Google API.
Google App Specific Password
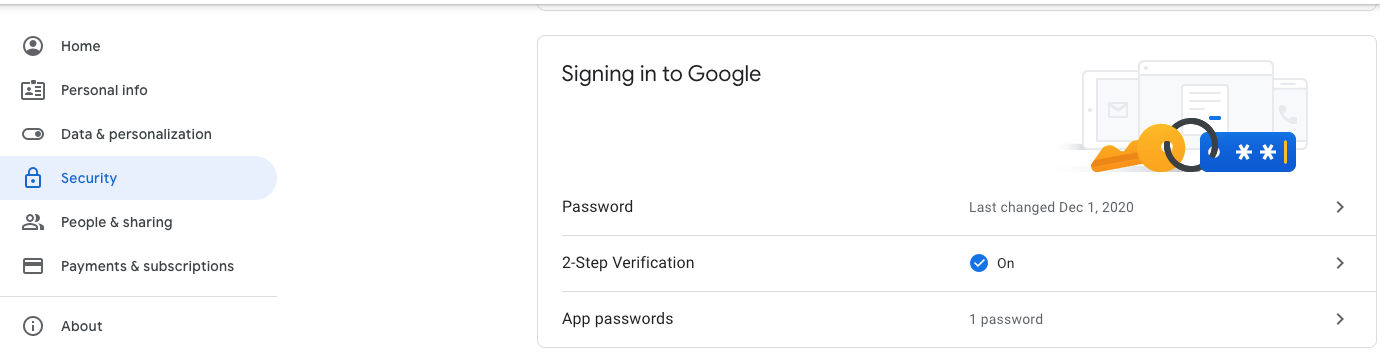
If you would like to use the SMTP settings with a Google account it is recommended that you setup an App Specific Password. To do this, go to your Google Account Security Settings and navigate to the section labeled Signing in to Google. Select App Passwords in this section.
This will bring you to the following window
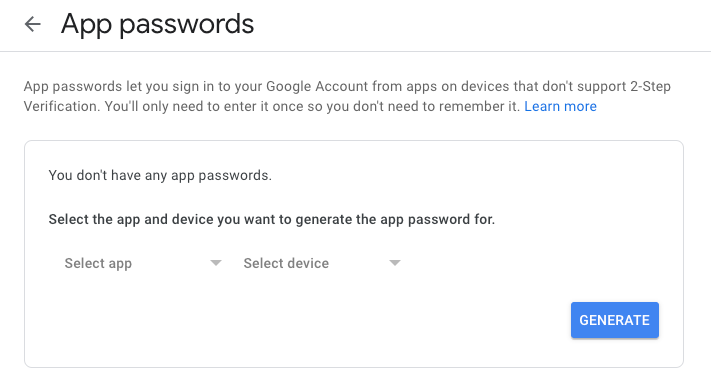
Under Select app choose Other and enter the name Fixity Pro as seen below.
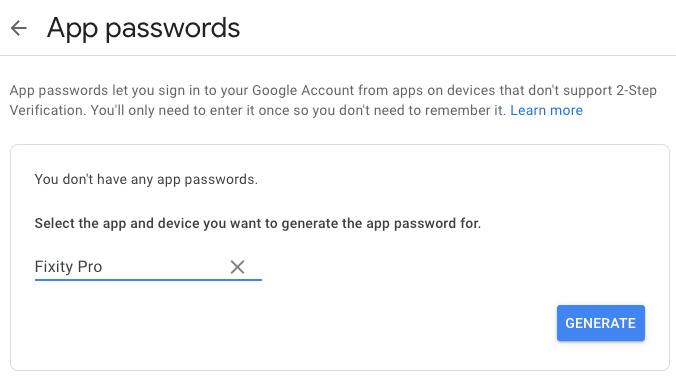
Select Generate and you will see the following window. Note that the password has been redacted in this screen grab. You will see a 16-digit password.
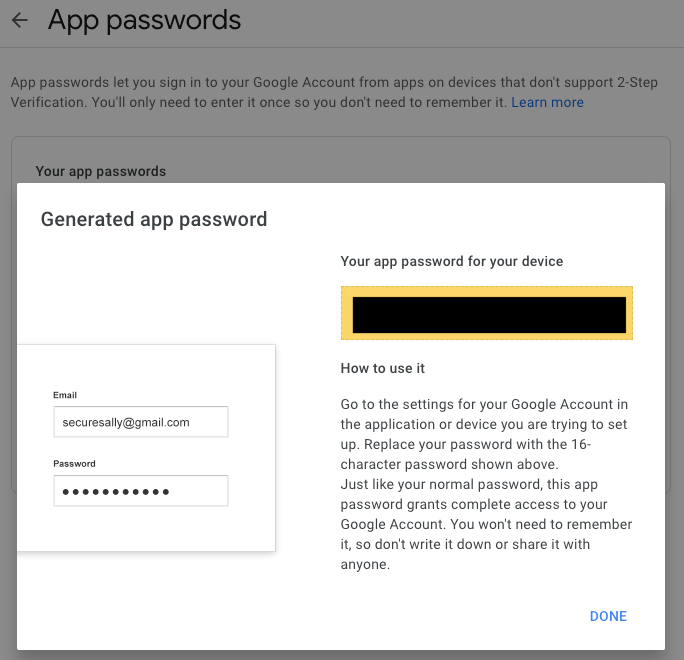
Copy the password generated and go to Fixity Pro Preferences Configure Sender Email. In the SMTP tab enter the settings as normal but replace the password with this one-time 16-digit password as seen below.
Select Save and you should receive a success message. For more information, read this Google support article:
An Overview of Fixity's Main Window
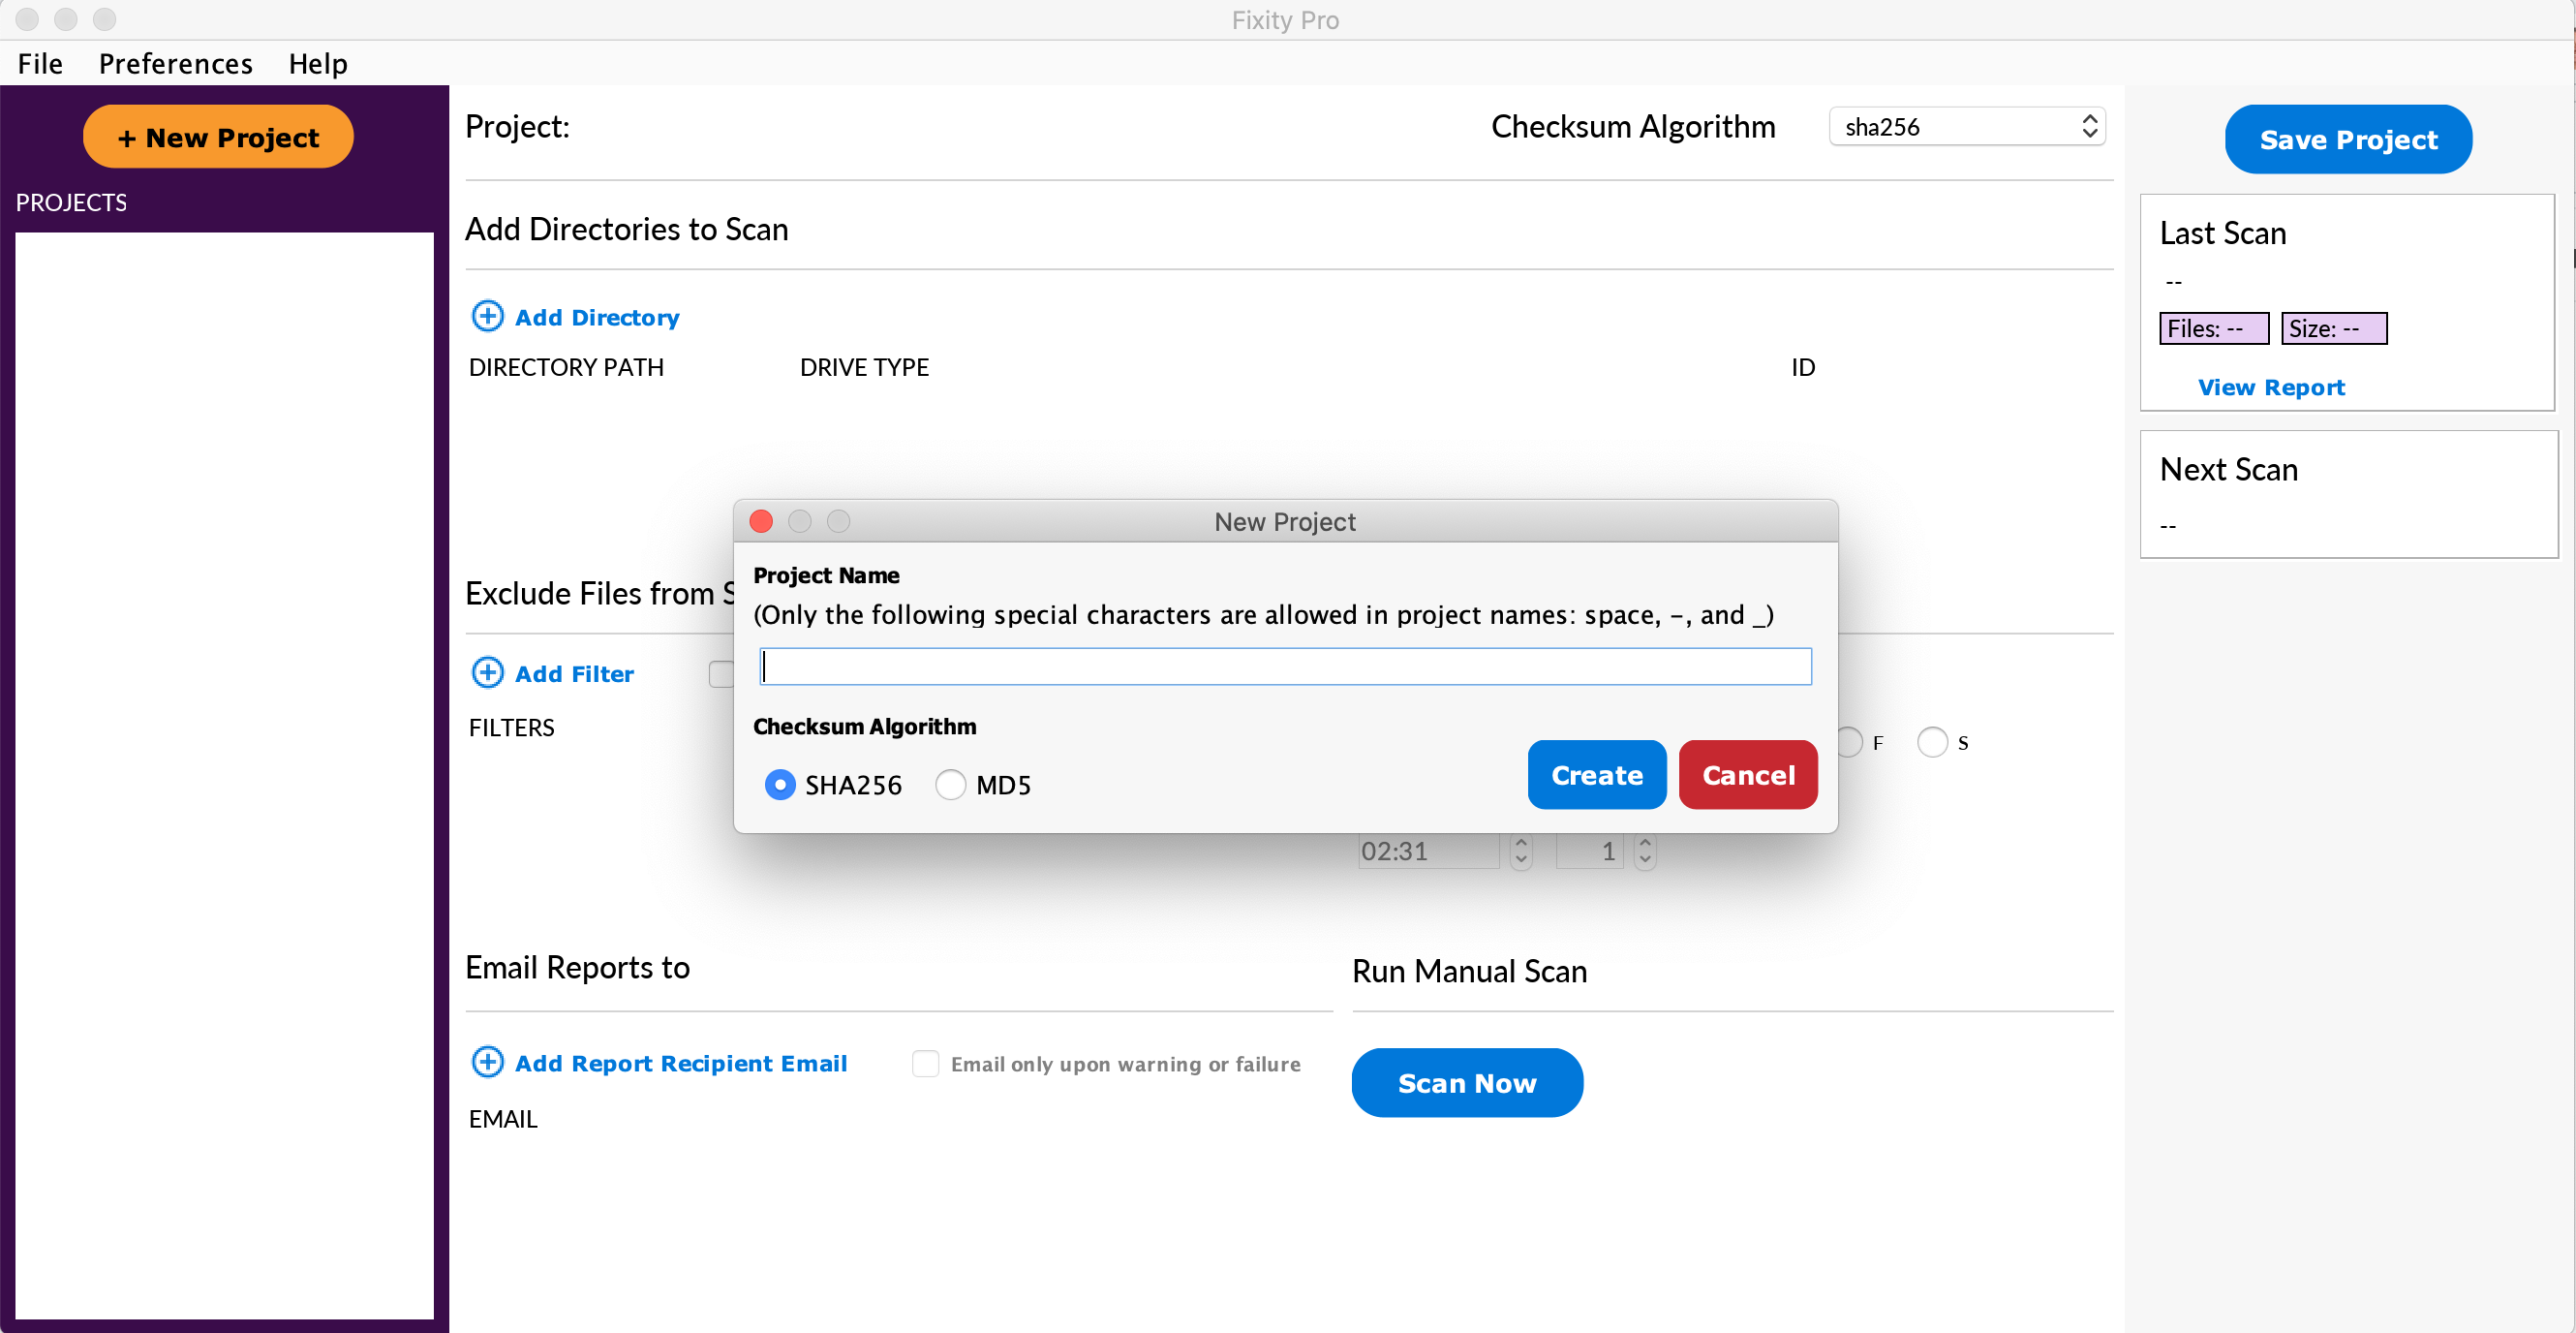
Upon the initial launch you will be asked to enter a project name for a new project. Note that the only special characters allowed are spaces( ), hyphens(-), and underscores (_). You will also be asked to choose the checksum algorithm you would like to use for your project. You can update this later if you like, although it can be time consuming for large projects, so picking the one you want to use up front is worthwhile.
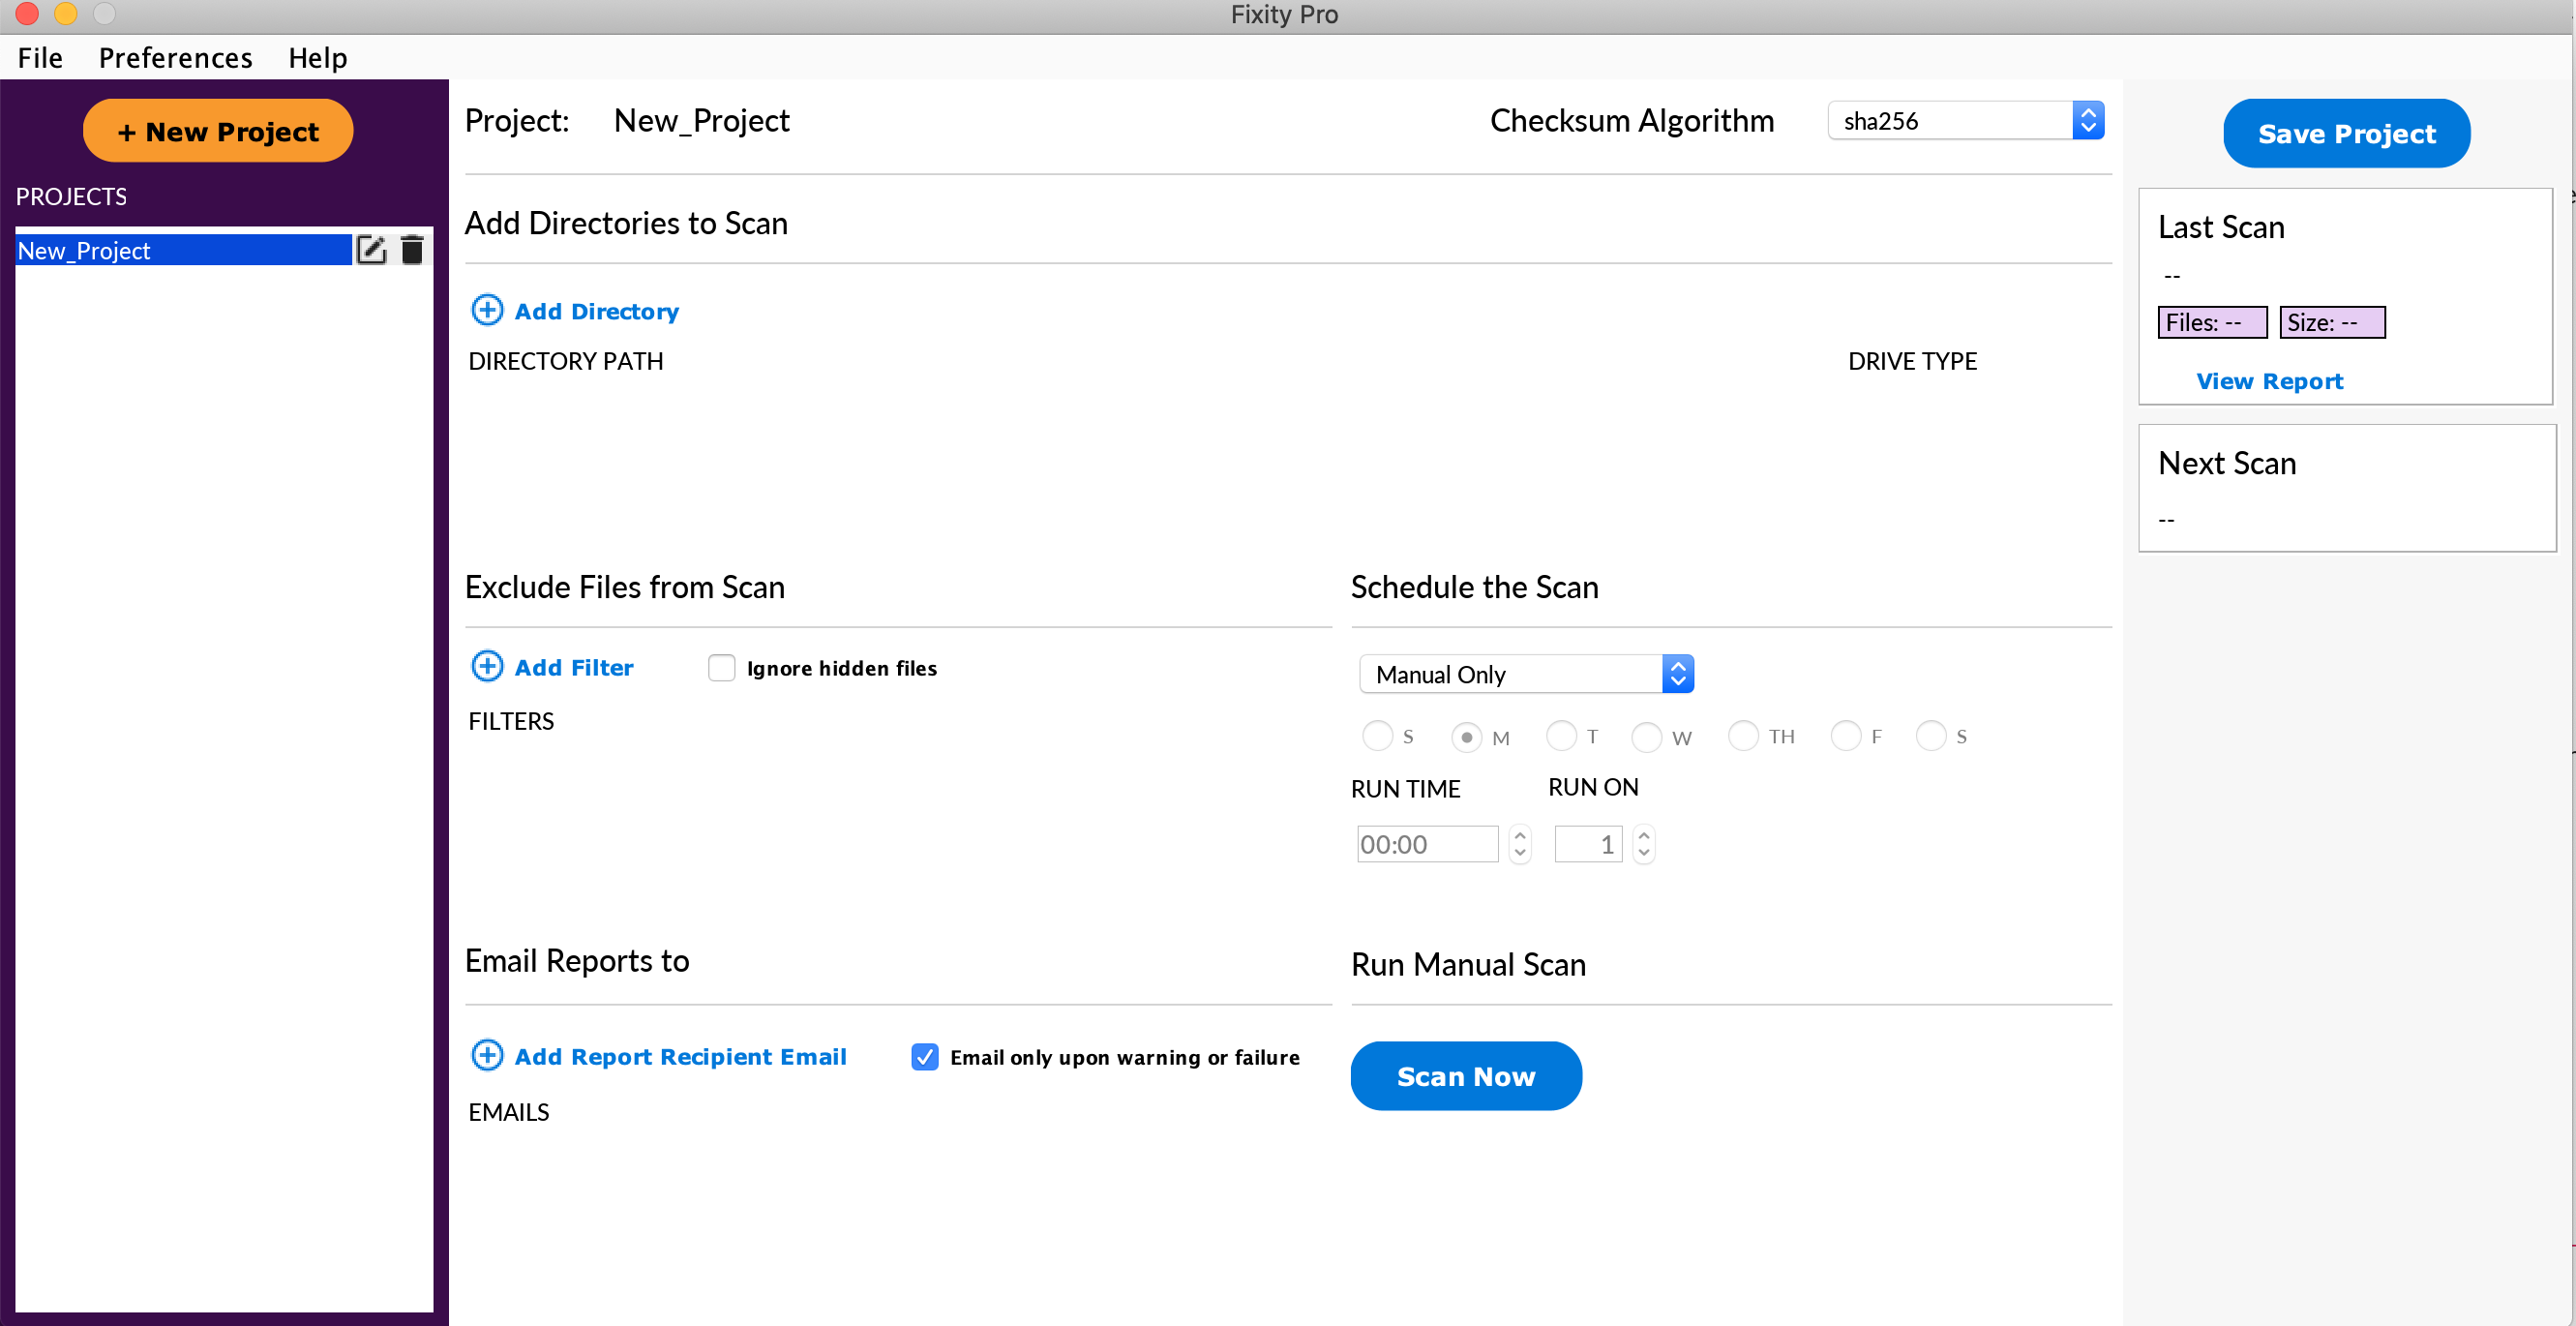
Once you enter a project name you will see a window that looks like the following window. The project created lives in the project list on the left hand side of the window under PROJECTS. The project name is also at the top of the window preceded by the text Project:. Also at the top of the window is Checksum Algorithm. This will represent what you chose when you entered the project name. If you would like to change this, you can do this here. Note that you can do this before performing any scans without implications. Once you perform a scan with a selected checksum algorithm and then want to change it there is a protocol in place to ensure the integrity of your files during the process of switching algorithms. This is covered further in the section of the user guide titled Checksum Algorithm Change.
The next step is to add the directories you would like to scan within this project. Note that this is directories and not files. You want to select the directory that contains the files you want to scan. You can either drag and drop the directories you would like to scan or select "Add Directory" and use the browser to select the directories. Once you do this you will see a window that looks like the following which shows the directories you added.
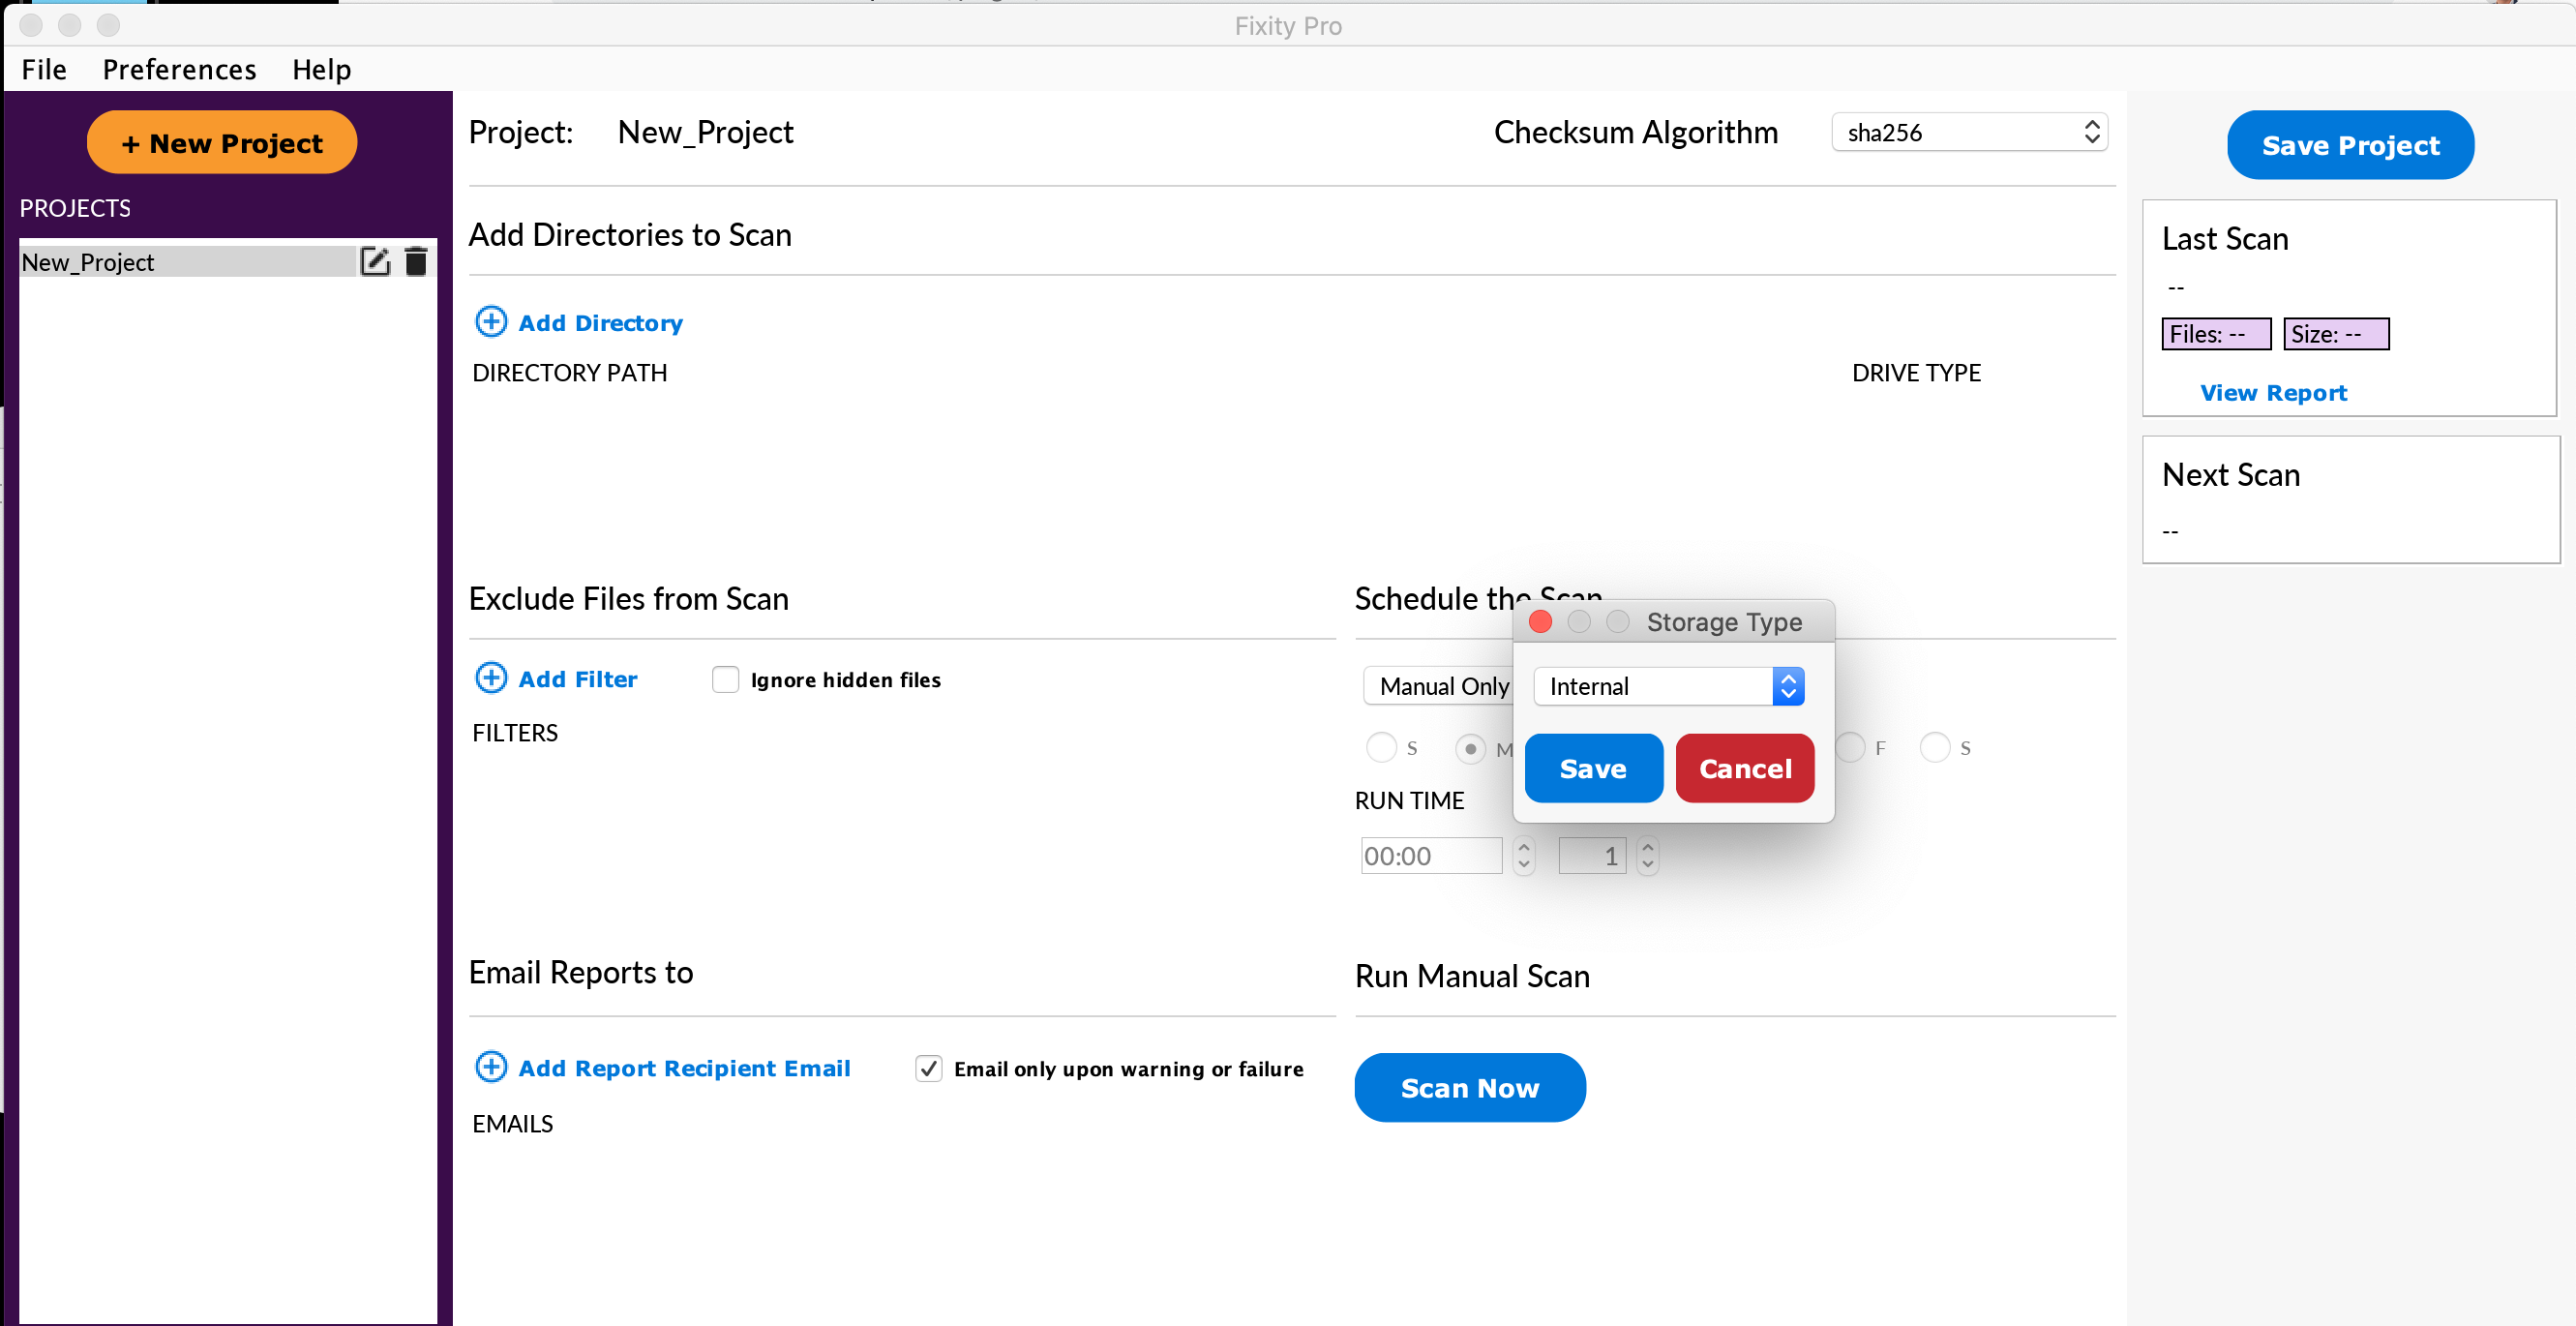
When you add directories you will see the following prompt asking what the storage type is. Select Internal if the directory is located on your local computer. Select External if the directory is located on a removable drive, such as a portable USB drive. Select Network if the directory is located on a network attached storage device that is mounted on your computer. Identifying the storage type helps Fixity to know how to manage the prospective absence of directories (e.g., portable drive not connected, NAS not powered on) when a scan is performed.
After you select the storage type you will see a window that looks like the following, showing the directories you have added and the storage type(s) you have selected.

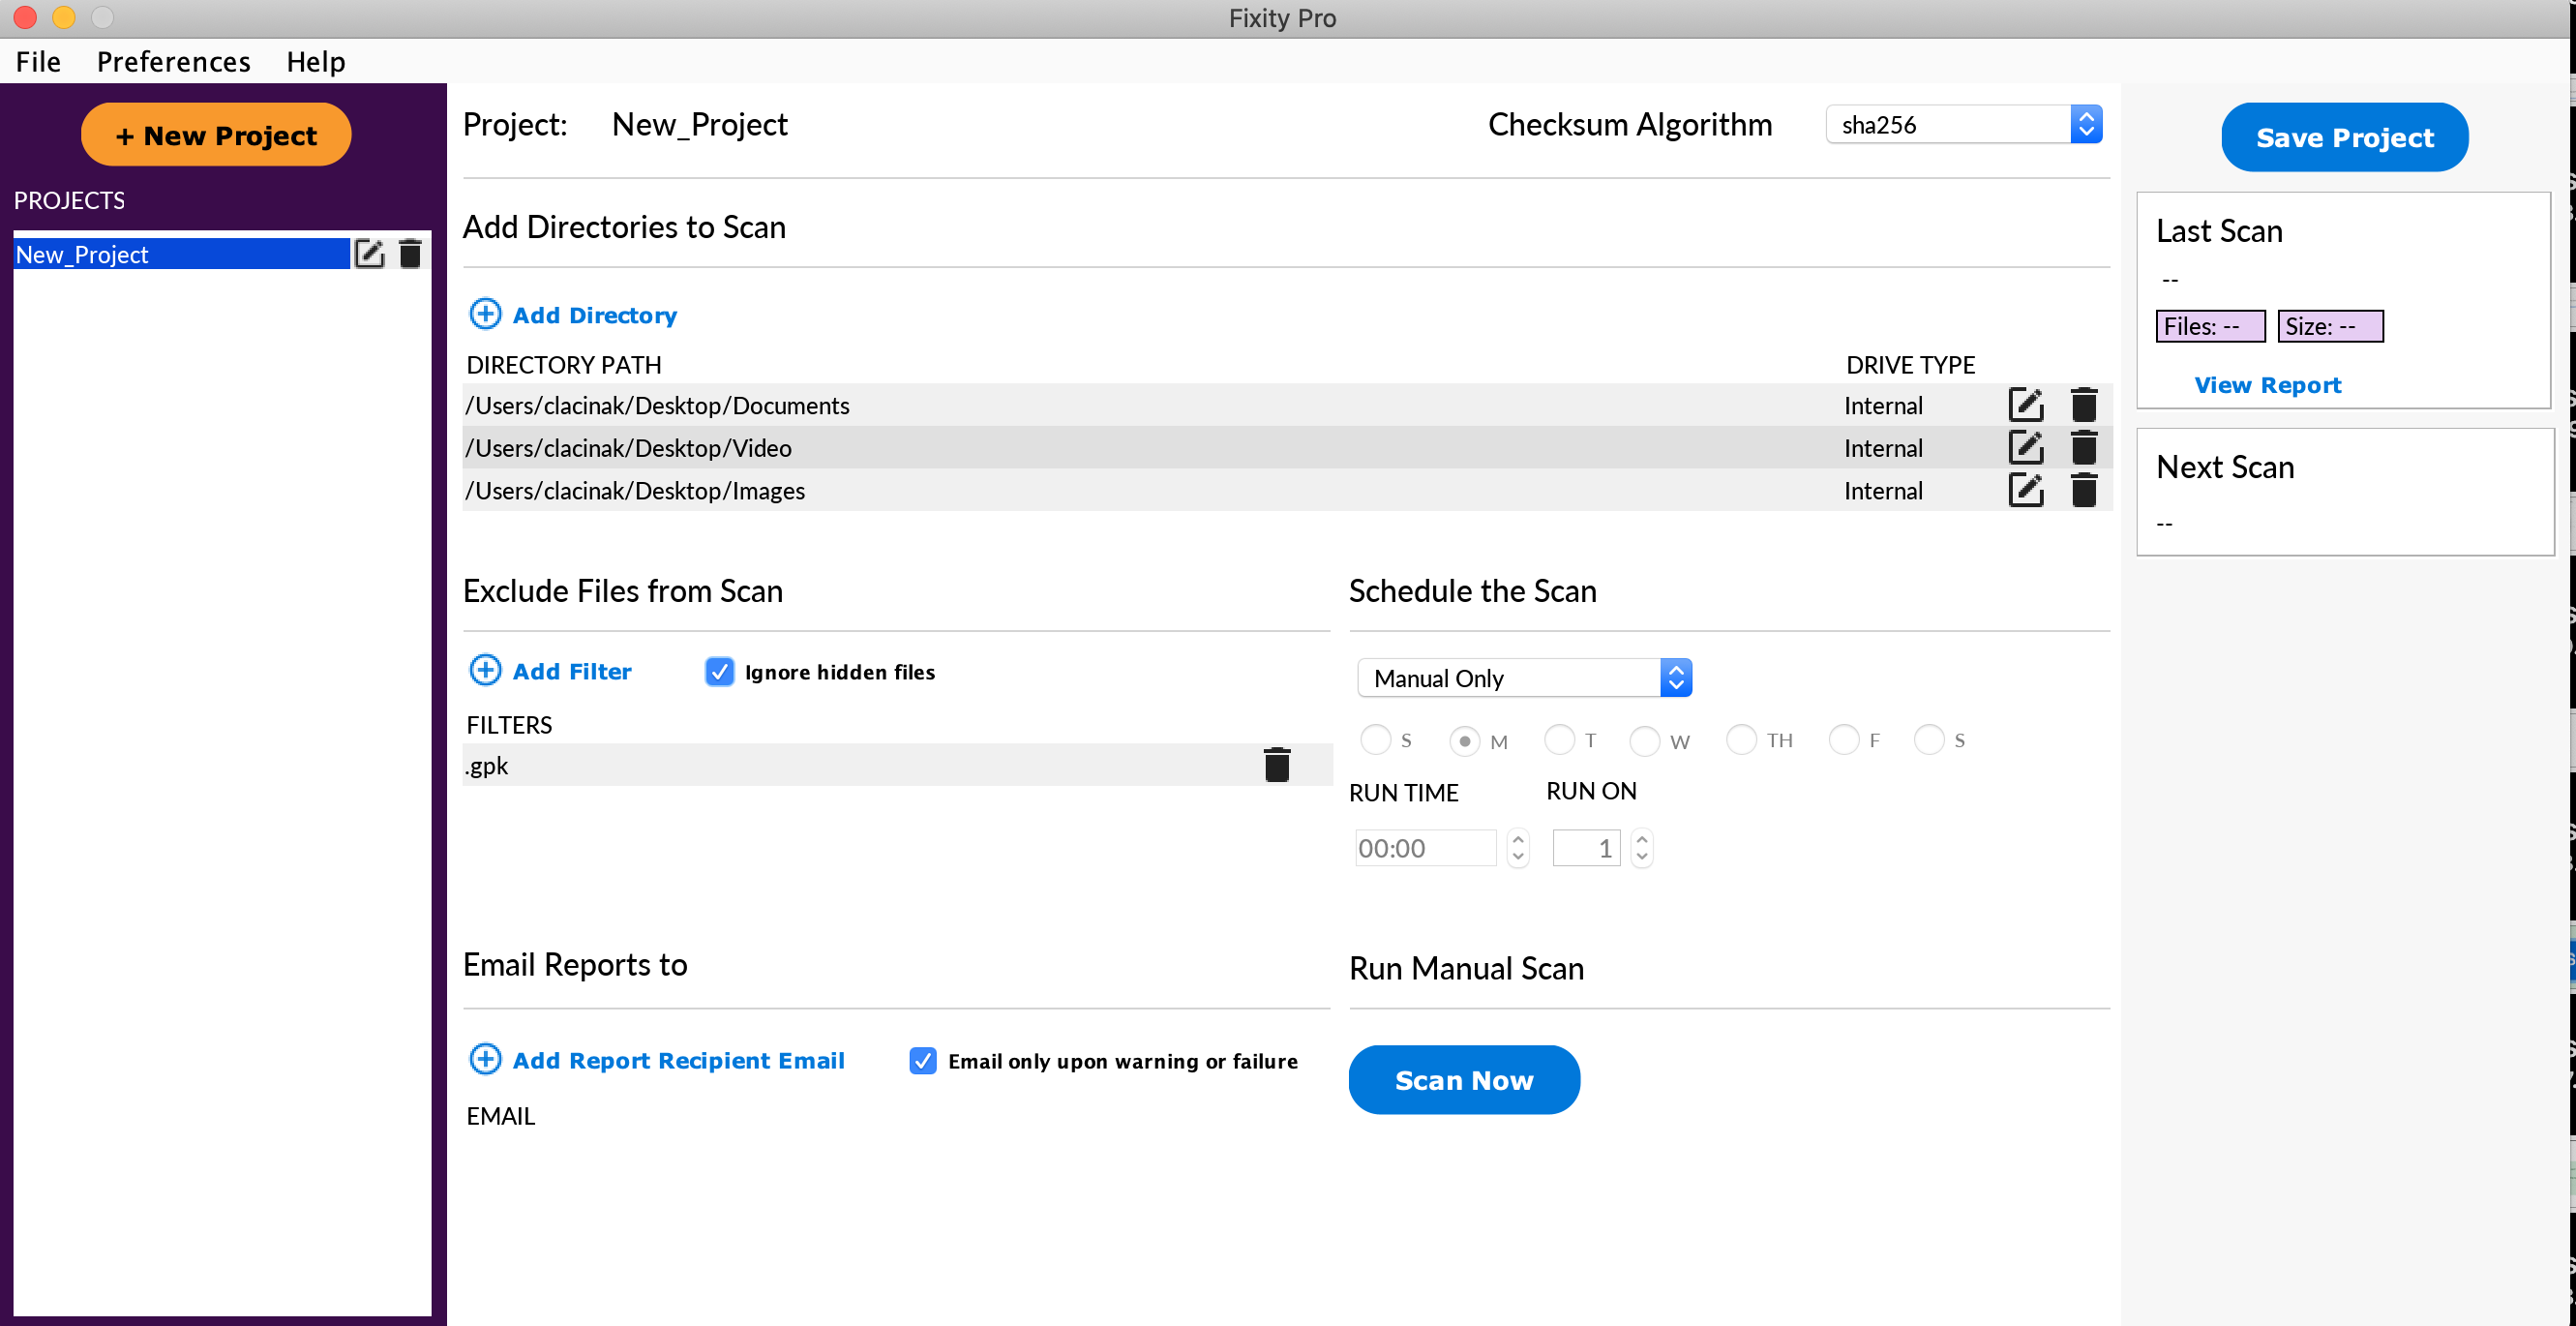
Next, let's look at the section labeled Exclude Files from Scan. This section is focused on telling Fixity which files you would like to ignore when performing a scan. There are a variety of reasons you may want to ignore files. Whatever the reason this section will let you do whatever you want to do. To add a filter select Add Filter. This will bring up the following prompt.

Type in the text string that you would like Fixity to look for in filenames as the basis for excluding files from the scan. The example shown here would exclude any file with .gpk in the filename, and is an example of excluding files with a certain file extension. Another example might be if you want to exclude files that have certain file naming conventions. For instance, if you want to exclude every file that has _AC in the file name (e.g., 4582_AC.txt) you can do this as well. This is case sensitive and will only exclude files that have the exact text that you enter, including capitalization. The other option is to tell Fixity to ignore all hidden files on a file system. The following image shows one added filter and Ignore hidden files selected. You can add as many filters as you like.
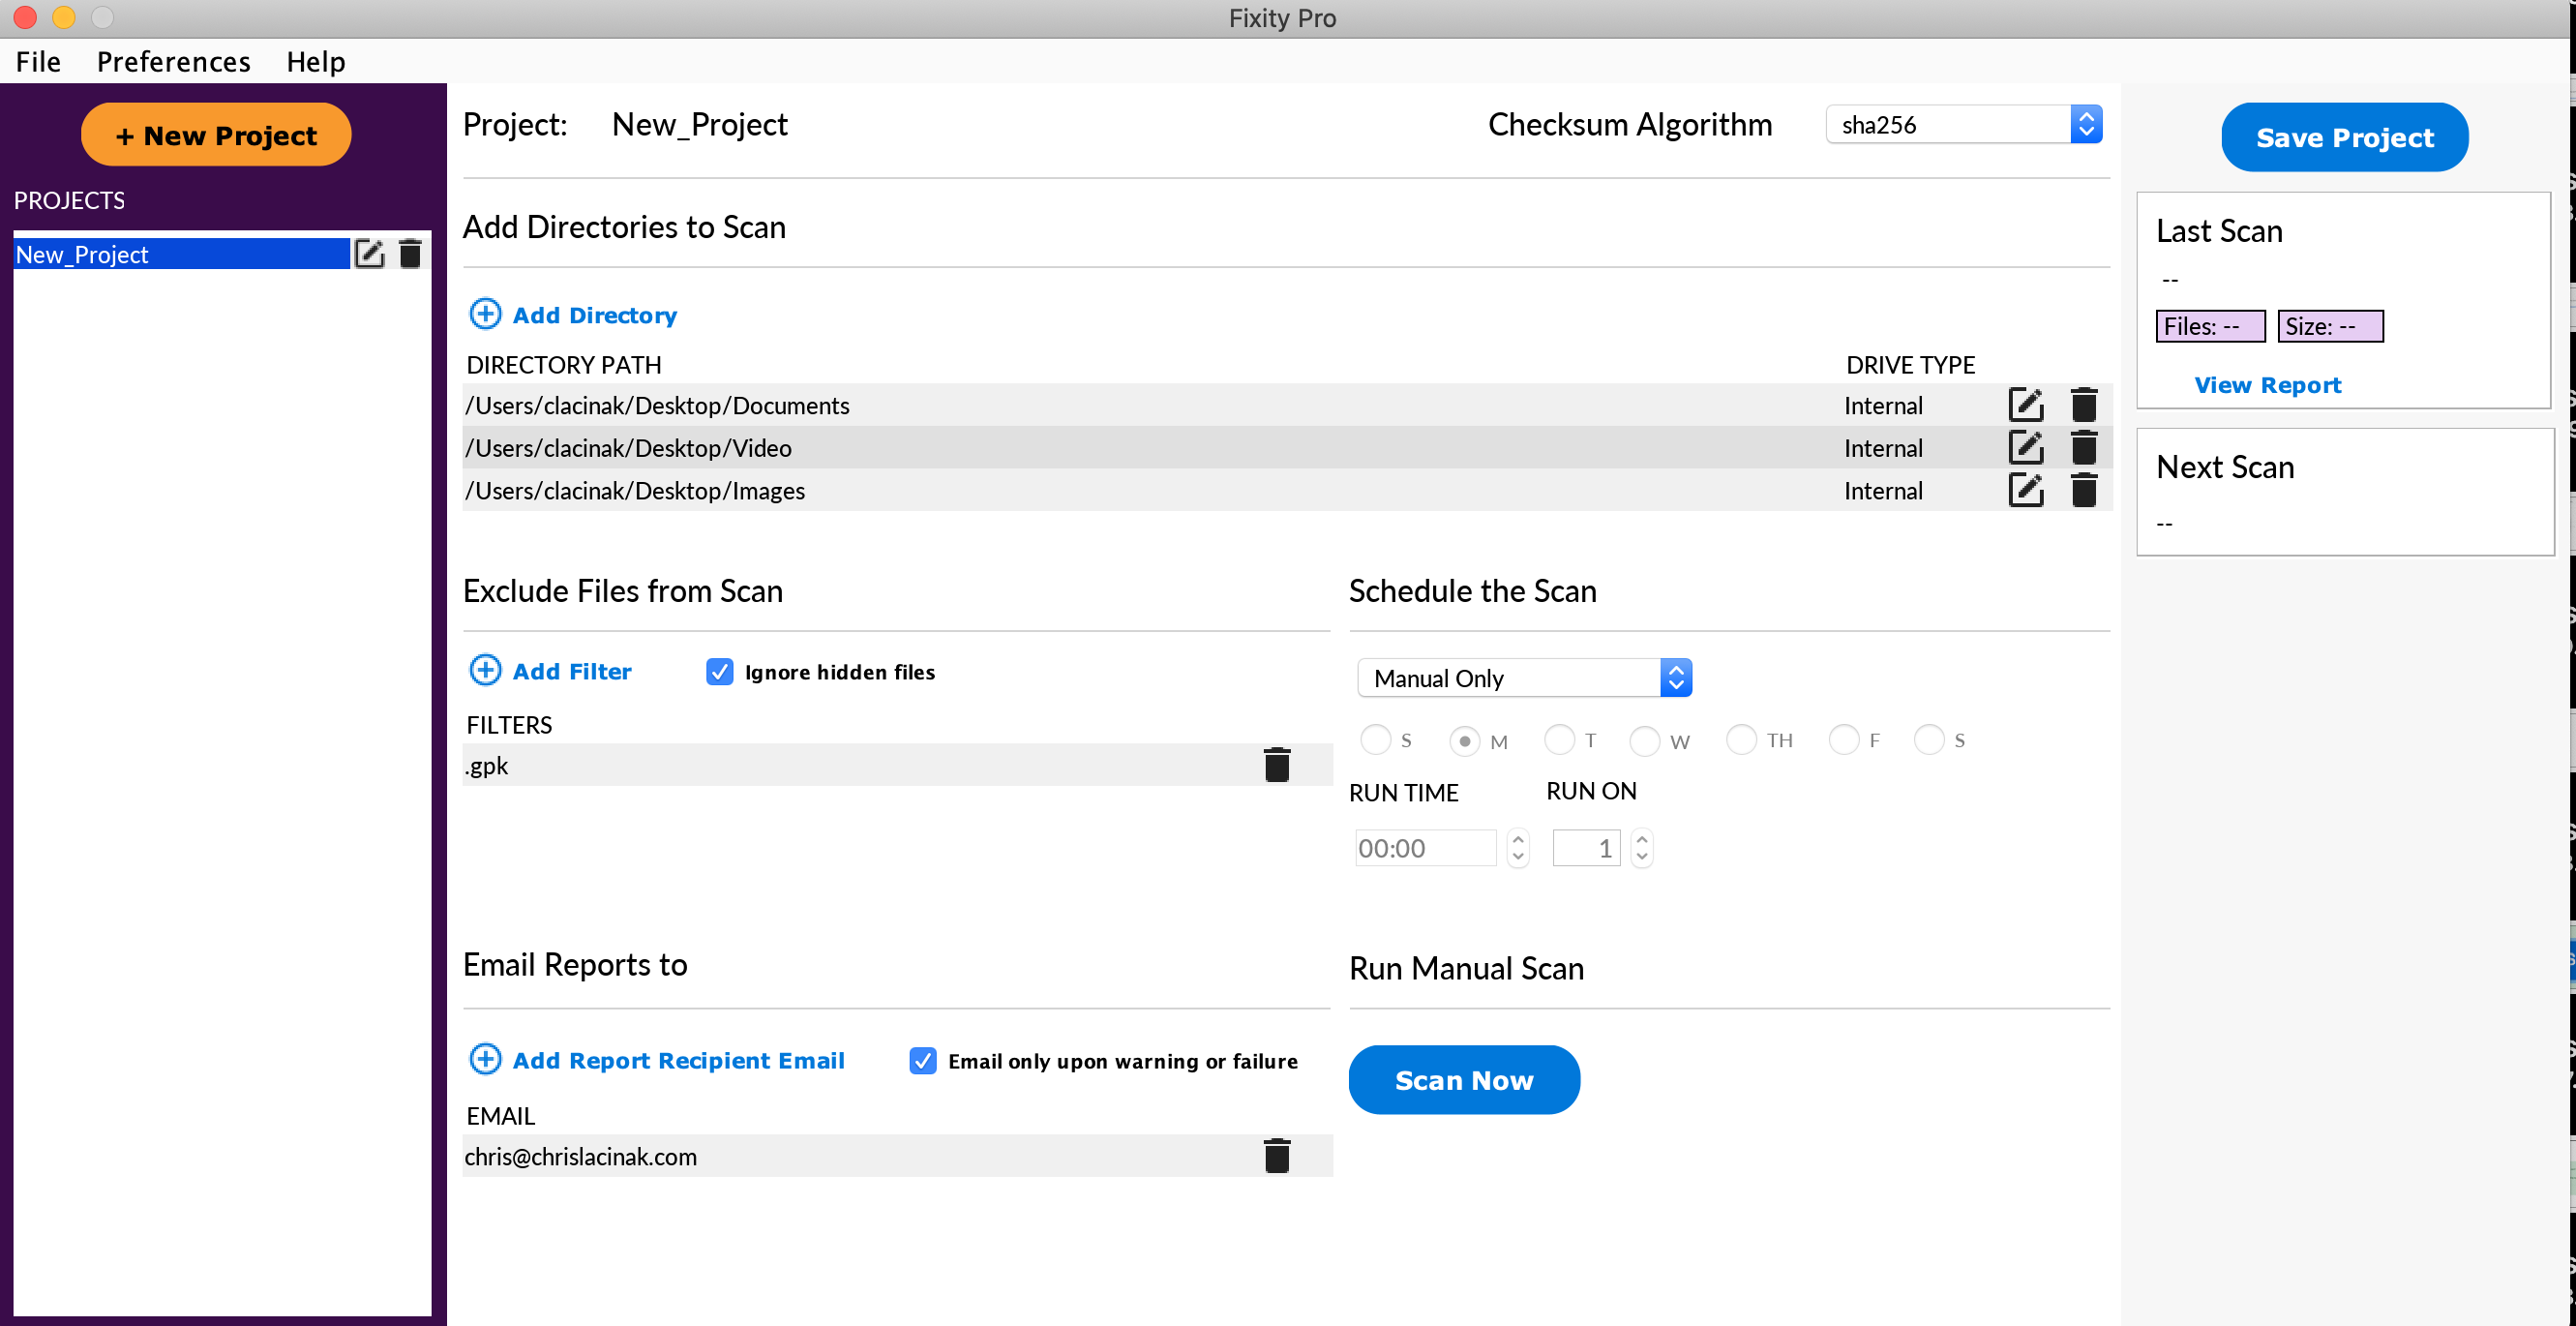
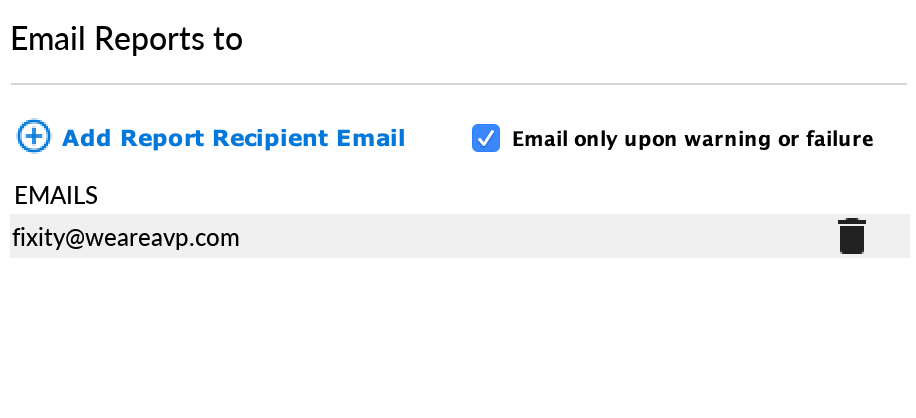
Next let's look at the section labeled Emailed Reports to. This section is focused on telling Fixity who to email reports to, and under what circumstance to email those reports, following a scan. To add a recipient select Add Report Recipient Email. This will bring up the following window.
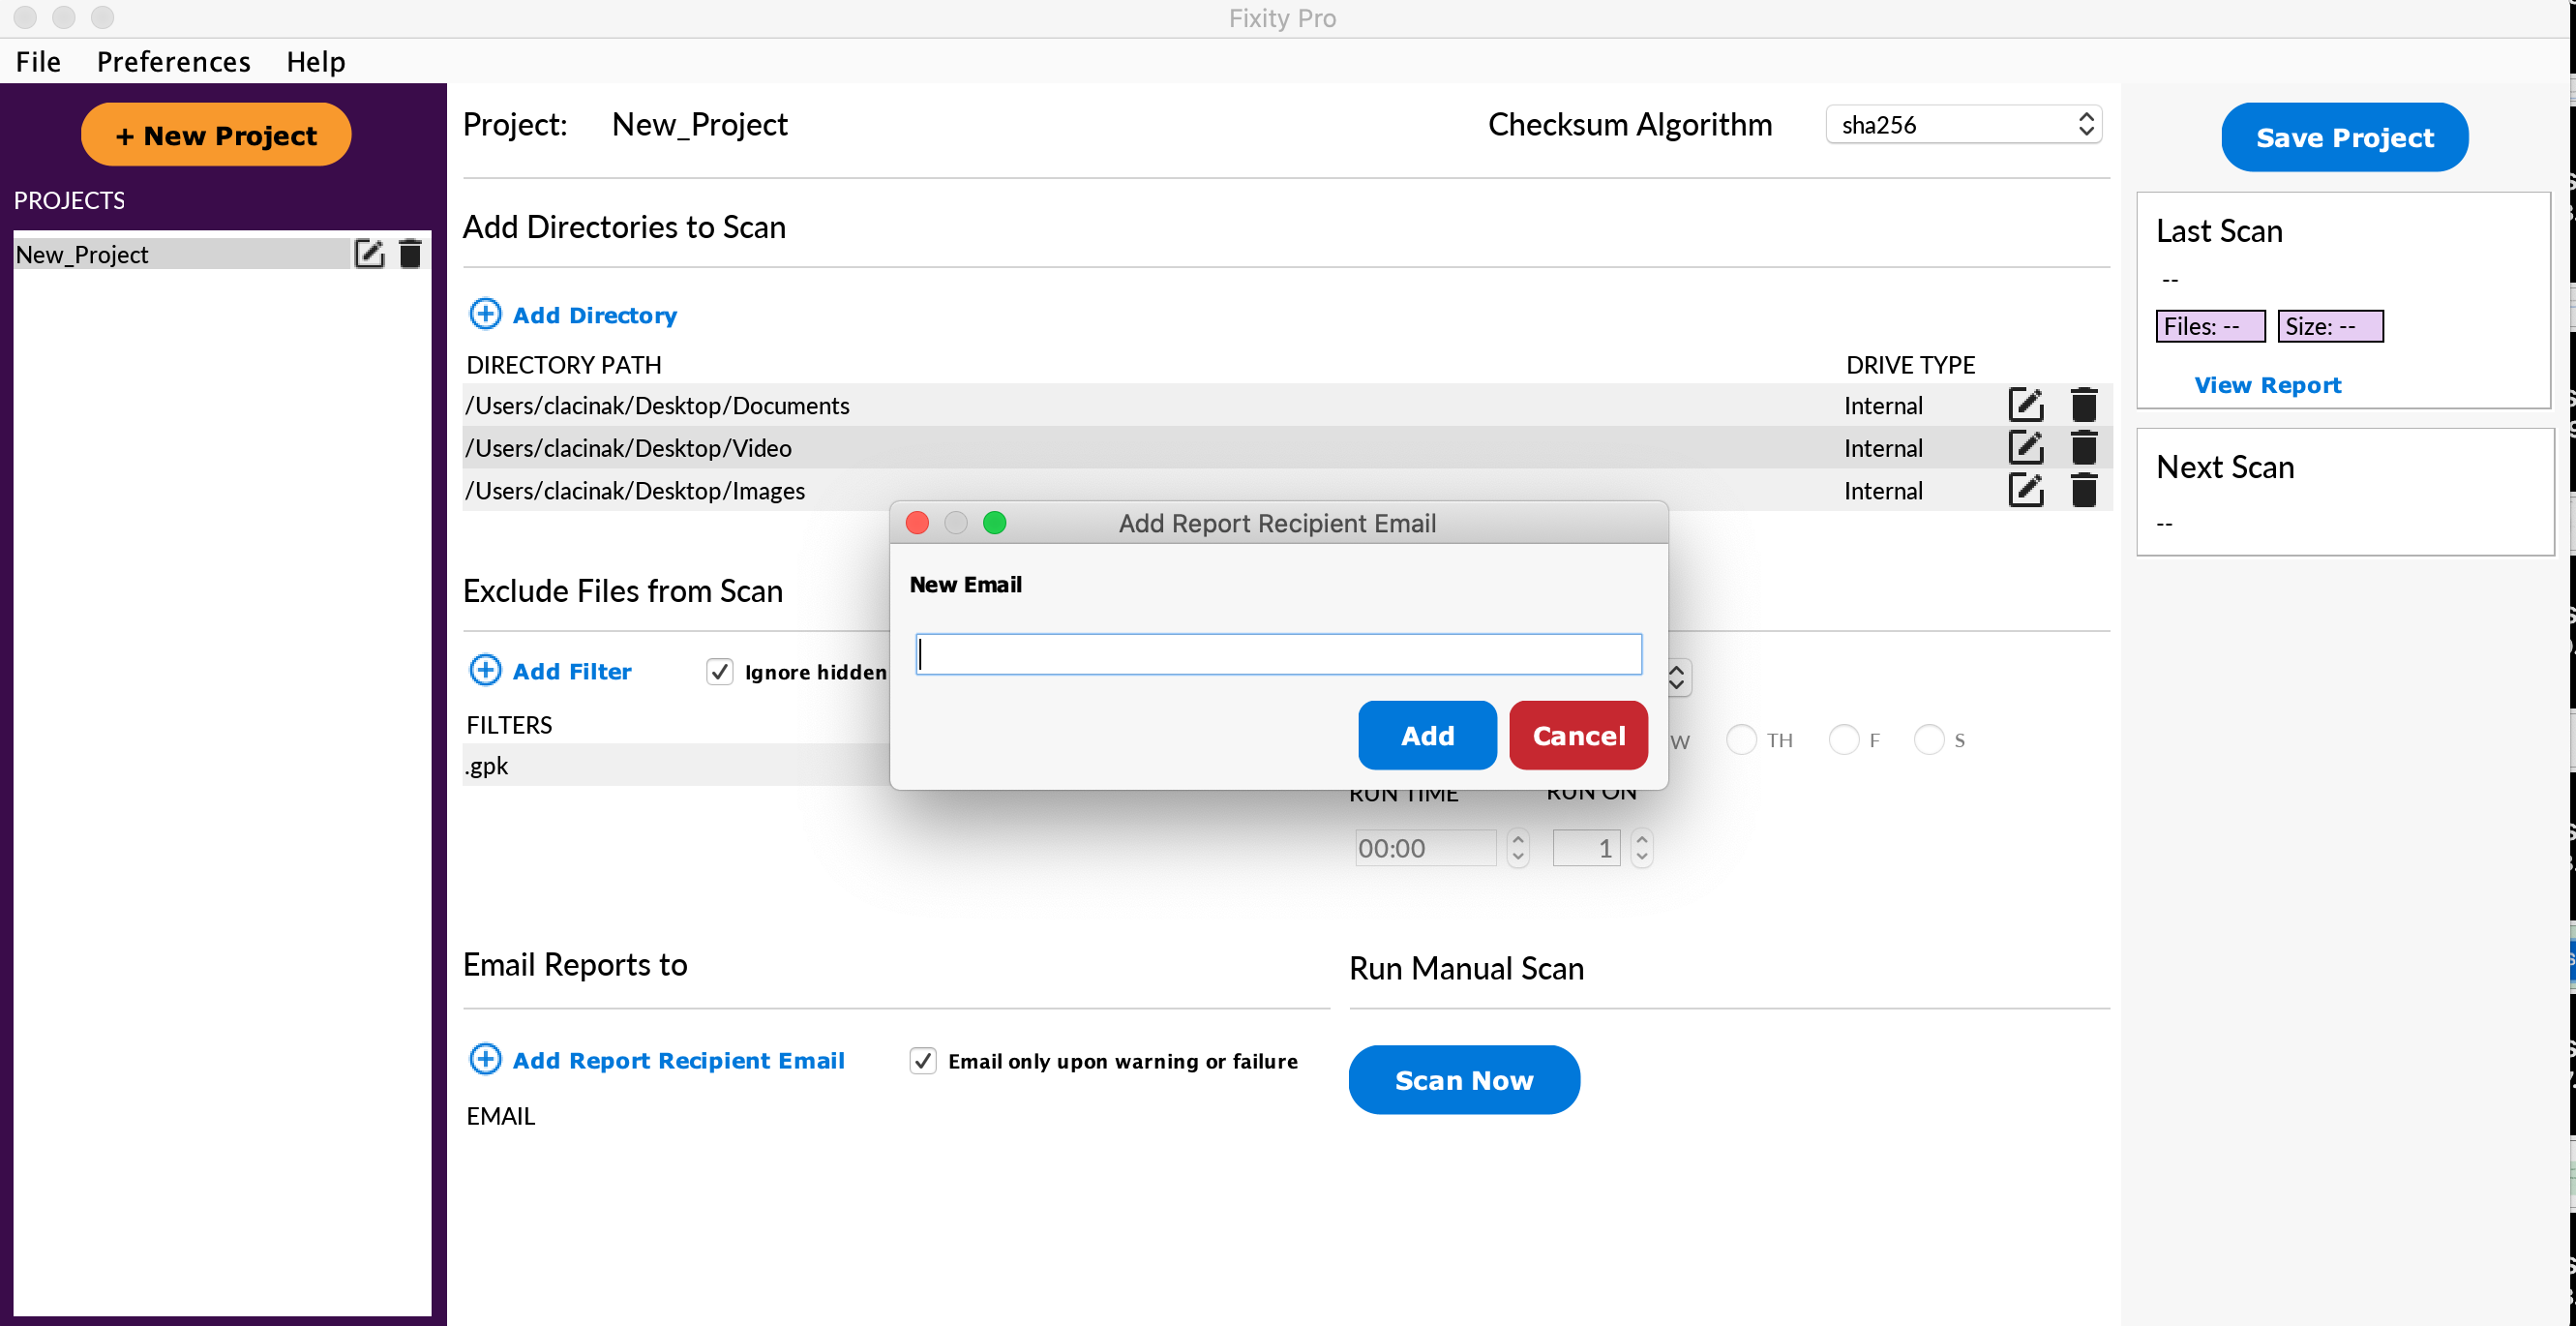
Enter the email address you would like Fixity to send reports. You can enter as many email addresses as you would like. There is also the option of selecting Email only upon warning or failure. This will result in Fixity only sending reports when scans result in partial or incomplete scans, or files are any status other than confirmed. In other words, if all files are scanned and confirmed then no report will be sent. Note that in any circumstance, reports will be generated and stored on the local machine. This only determines when reports are emailed.
If you add report recipient emails you will also need to configure sender email under preferences. This is covered in the Setup and Configuration section of the user guide.
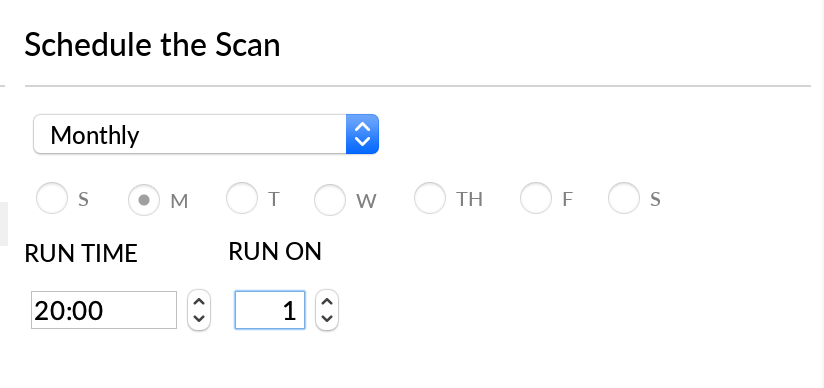
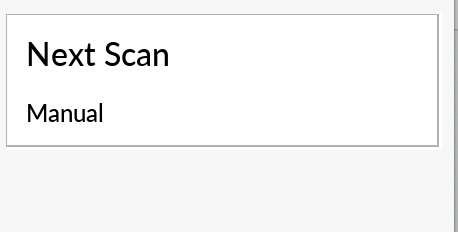
Next let's turn to the section labeled Schedule the Scan. The default option here is Manual Only which means that scan will only be run when the Scan Now button is pressed under the Run Manual Scan section. If you want to schedule scans to run automatically on a schedule you will want to select one of the other options in the dropdown menu.

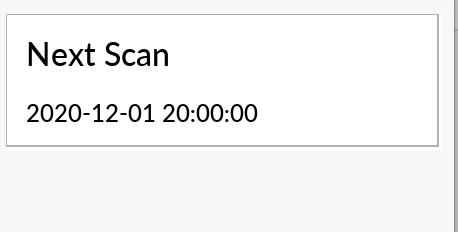
Selecting one of these options will activate the appropriate options below. For instance, if Monthly is selected Run Time and Run On will be activated. If Weekly is activated the days of the week and Run Time will be activated. If Daily is selected, then only Run Time will be selected. In the example shown below, a monthly scan is scheduled to run on the 1st day of every month at 8:00 PM. The date and time is based on the date and time that your computer is utilizing. Once the project is saved a scheduled task will be created. Updating the Schedule the Scan section and re-saving the project will update the scheduled task accordingly.
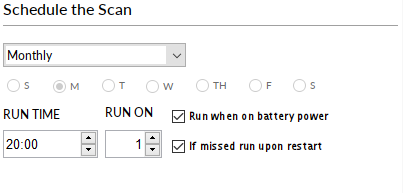
Notes on Windows versions of Fixity
On Windows you will see two additional options. These are shown below and consist of Run when on battery power and If missed run upon restart. Run when on battery power will run the scheduled scan whether or not the computer is plugged in. If missed run upon restart will run a scheduled scan when the computer is started if it was not turned on at the time the scan was supposed to take place.
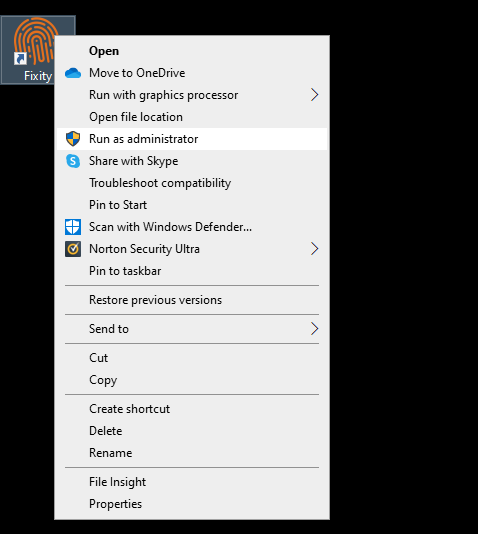
If you want Fixity to run when you are logged off (but still powered on) you will need to right-click Fixity and select Run as administrator t launch the application. When you launch the application this way it will create a scheduled scan that will run when you are logged off. Your logged in user will need the appropriate permissions to do this in order for it to work. If you don't see this option or it doesn't work you likely don't have the permissions to do this.
The next section in the Fixity user interface is Run Manual Scan. This section contains the button Scan Now which, when pressed, will begin the scanning process (prompting you to save the project first before scanning if there are unsaved changes). You can use this if you would like to operate Fixity in manual only mode or if you want to run manual scans in addition to scheduled scans.

Selecting the Scan Now button will result in the presence of a progress bar window, as seen below, reporting throughout the scan on the number of files processed, the total number of files to be processed, the amount of data processed, the total amount of data to be processed (including filtered files and excluding removed files), and the estimated time remaining. The remaining time will update on an ongoing basis depending on the resources being utilized on the computer throughout the scan process.

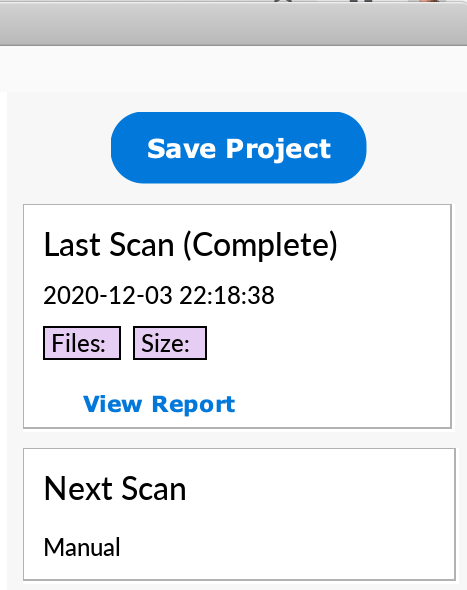
The section furthest to the right contains the Save Project button at the top. Press this whenever you have made changes that you want to save. Beneath this is the Last Scan section.
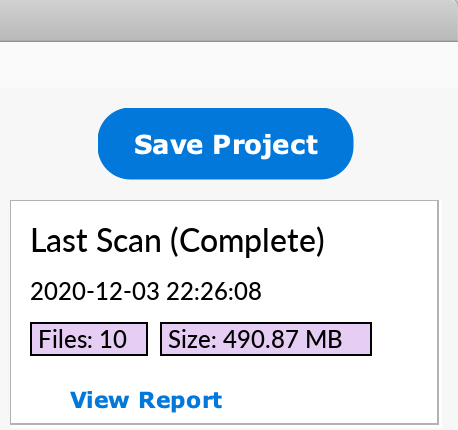
The Last Scan section provides reporting on the details of the most recent scan. This includes the date (yyyy-mm-dd) and time (military time HH:MM:SS) of the last scan, the number of files scanned (not including filtered or removed files), and the total size of the files scanned. You will also find a a View Report link which will open up the Fixity report from the most recent scan. To read more about Fixity reporting see the section of the user guide titled Fixity Analysis and Reporting
Beneath the Last Scan section is the Next Scan section. This will provide the date and time of the next scheduled scan. If Fixity is being run in manual only mode then this will read Manual.
Furthest to the left is where projects can be created, renamed and deleted.
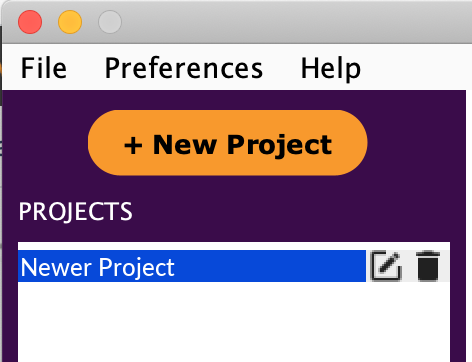
Selecting the + New Project button will allow you to create additional projects. Selecting the edit icon next to each project will allow you to rename the project. Selecting the trash icon will allow you to delete the project.
Fixity Analysis and Reporting
General
Location
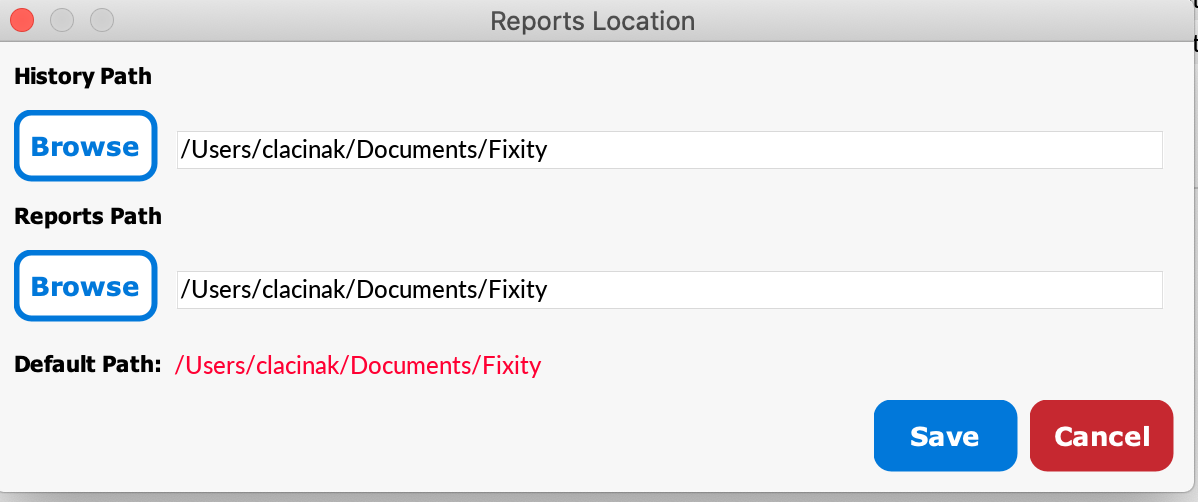
Fixity Pro generates two types of reports: Fixity Reports and History Reports. The location of these reports is in the Documents folder by default. The location is able to be changed by selecting Preferences Reports Location. This will bring up to the Reports Location window seen below where a new location can be selected.
Emailing
Fixity Reports can be emailed to specified email addresses each time a scan is performed. You can specify the email addresses of the report recipients in the main Fixity Pro window under the section labeled Email Reports to. If Email only upon warning or failure is selected reports will only be emailed if scans are partial or incomplete, or if there any files have a status other than confirmed. If the checkbox is not checked a report will be sent to the identified email addresses every time a scan is conducted. Note that in order for Fixity Pro to be able to send emails the sender email must be configured by selecting Preferences Configure Sender Email. Read more about configuring sender email under the user guide section titled General Setup and Configuration.
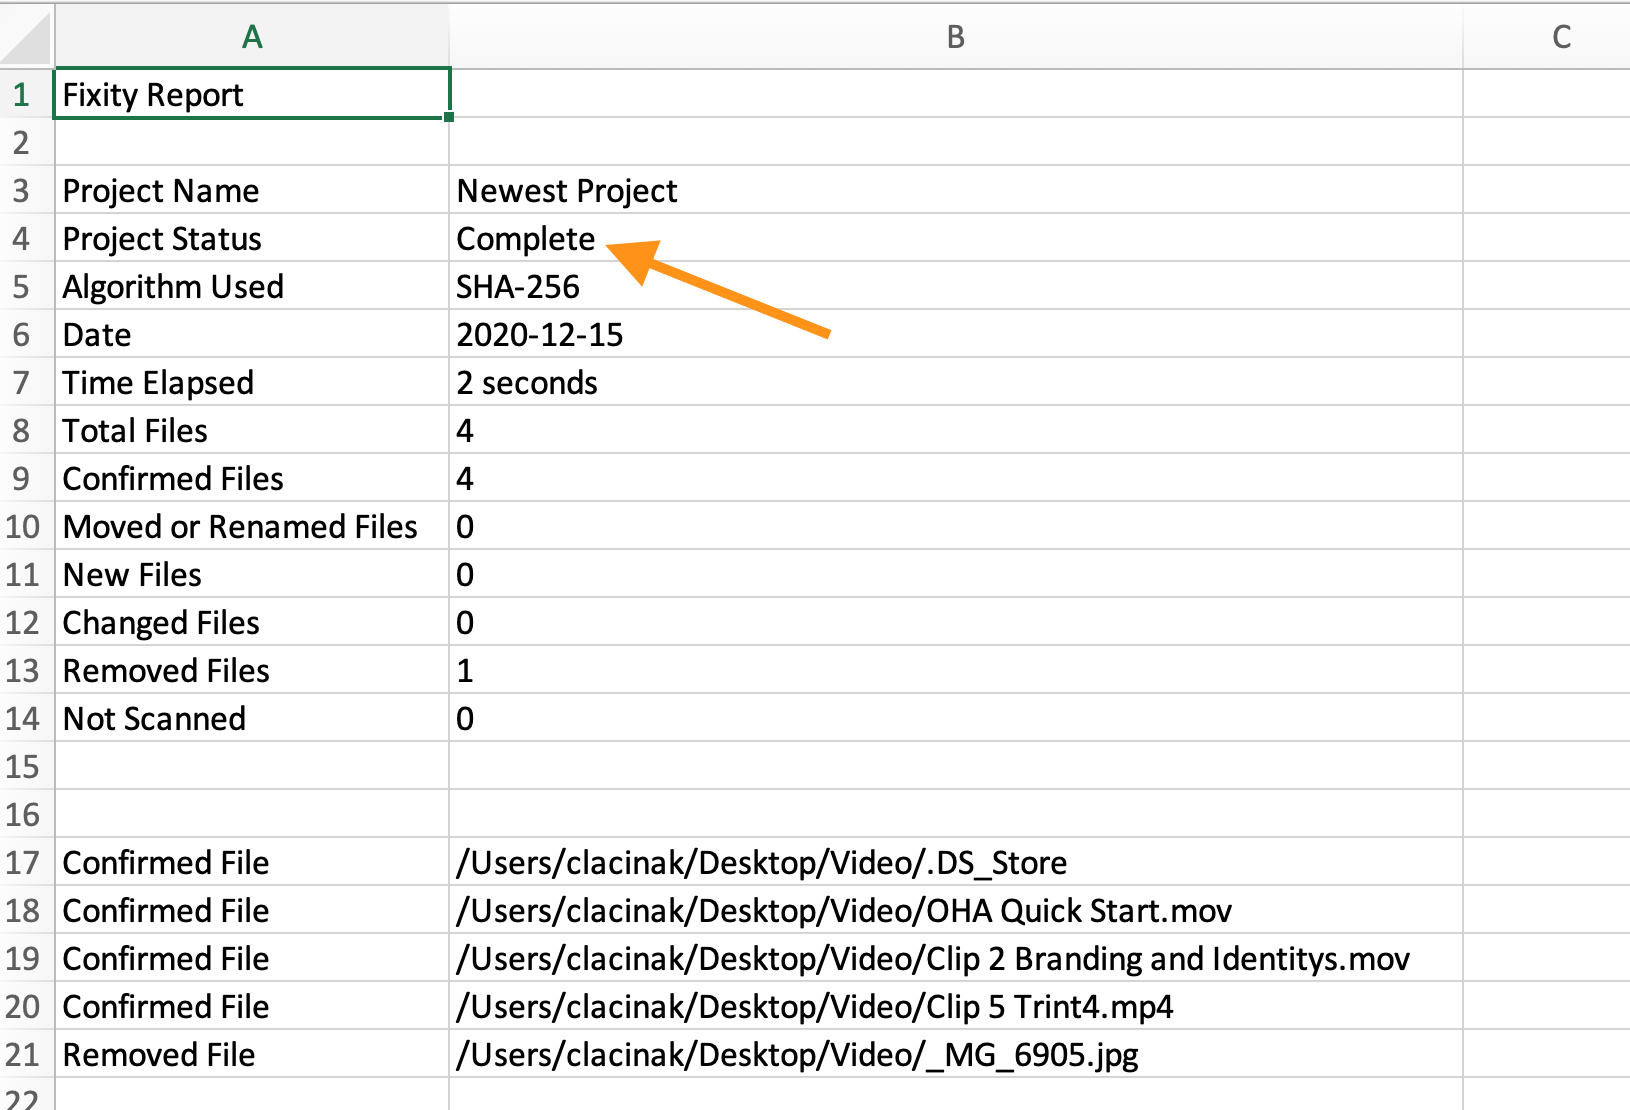
Fixity Reports
Fixity Reports are saved to the reports folder and emailed to the recipient email addresses identified in the project each time a scan is performed (except when Email Only Upon Warning or Failure is selected). Each Fixity report is named fixity_yyyy-mm-dd-hhmmss_projectname.tsv.
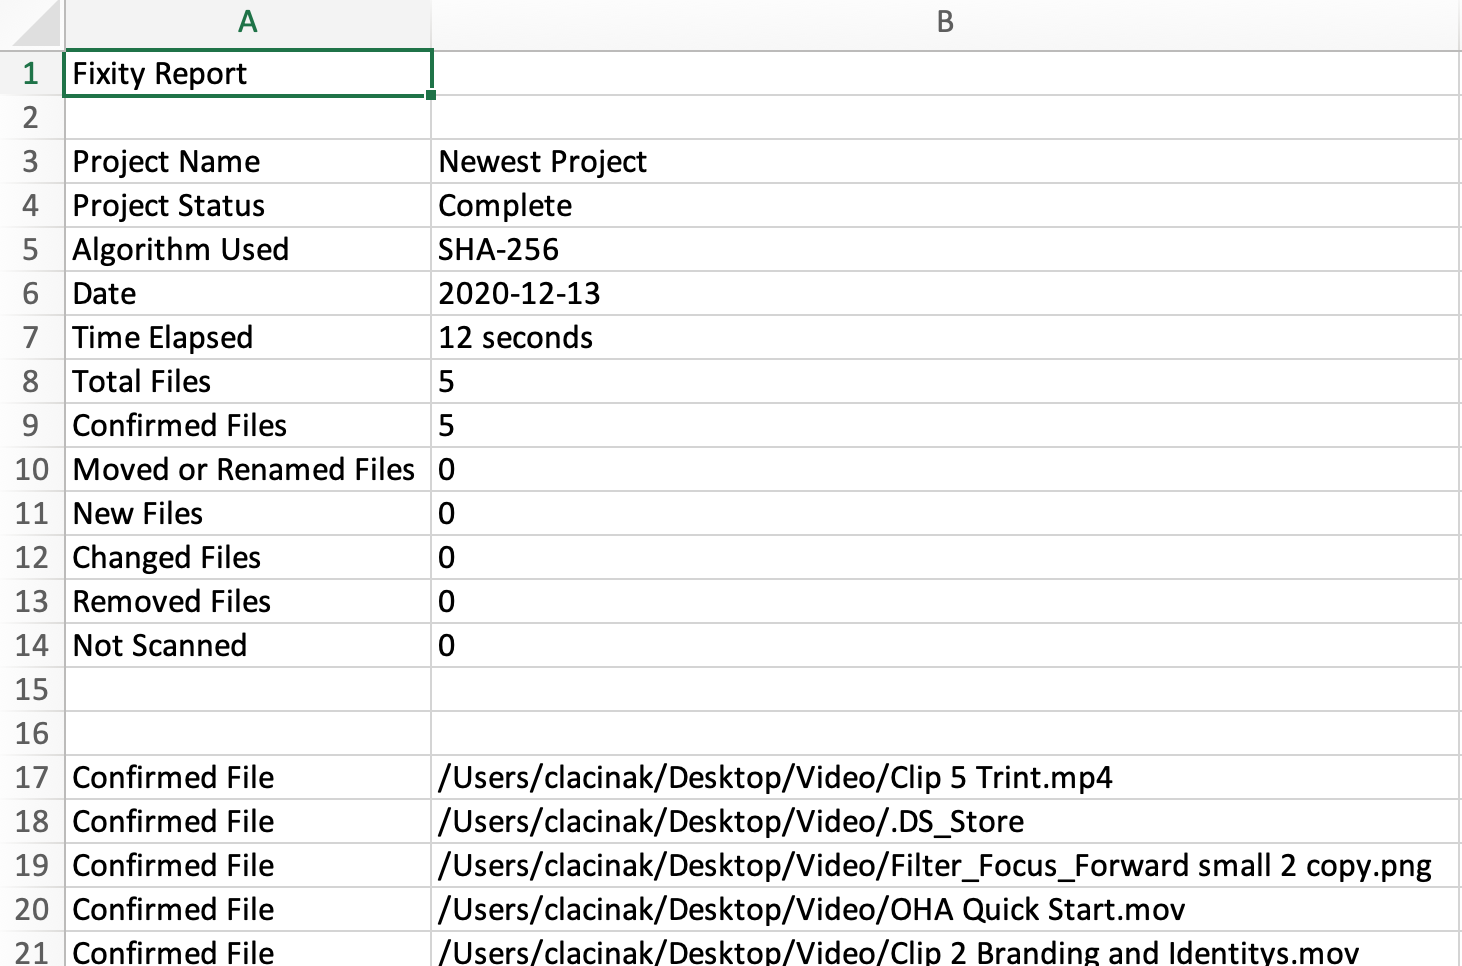
Note: When opening Fixity reports in spreadsheet applications, it is important to open them by importing the .tsv file, identifying the delimiter as a Tab, and treating all data as text (see FAQ for details). This will ensure maximum functionality and keep spreadsheet applications from altering the data in unintended ways. If you do double-click to open the files be sure not to save in case the spreadsheet application has altered your data
Fixity reports contain the following information:
- Fixity Report: Identifies the report as a Fixity Report.
- Project Name: Provides the name of the project for which the report was generated.
- Project Status: Identifies if the the project scan was completed, partially completed, or incomplete.
- Algorithm Used: Identifies the hash algorithm used to compute the checksums for the files scanned.
- Date: The date that the report was generated in yyyy-mm-dd format
- Total Files: Total files scanned not including Removed Files. It is the sum of all files present at the time of the scan.
- Confirmed Files: A file is confirmed if nothing has changed since the last scan.
- Moved or Renamed Files: A file has been renamed and/or moved to another location being scanned within the same Fixity Pro project. When files are moved or renamed they will usually have a different file path but retain the same hash value and index location. If a file is copied and pasted to a new location and the original one is deleted this will result in the hash value remaining the same but the filesystem index location and file path changing, resulting in a report that identifies the copy as a new file and the original file as a removed file.
- New Files: The number of files detected that did not exist the lat time a scan was performed.
- Changed Files: The number of files that have been modified since the last scan.
- Removed Files: The number of files that were present in the previous scan and not present in this scan.
- Not Scanned: Files that were present in the previous scan but were unable to be scanned because the external drive or network drive where the files were located was unavailable to Fixity Pro at the time the scan was performed. This will only be populated when the status is Partial or Incomplete.
- Each row beneath Not Scanned provides a file path and the associated status of the identified file for all files scanned and/or removed in a project. Files that have been filtered out using the "Filter File" preference will not appear.
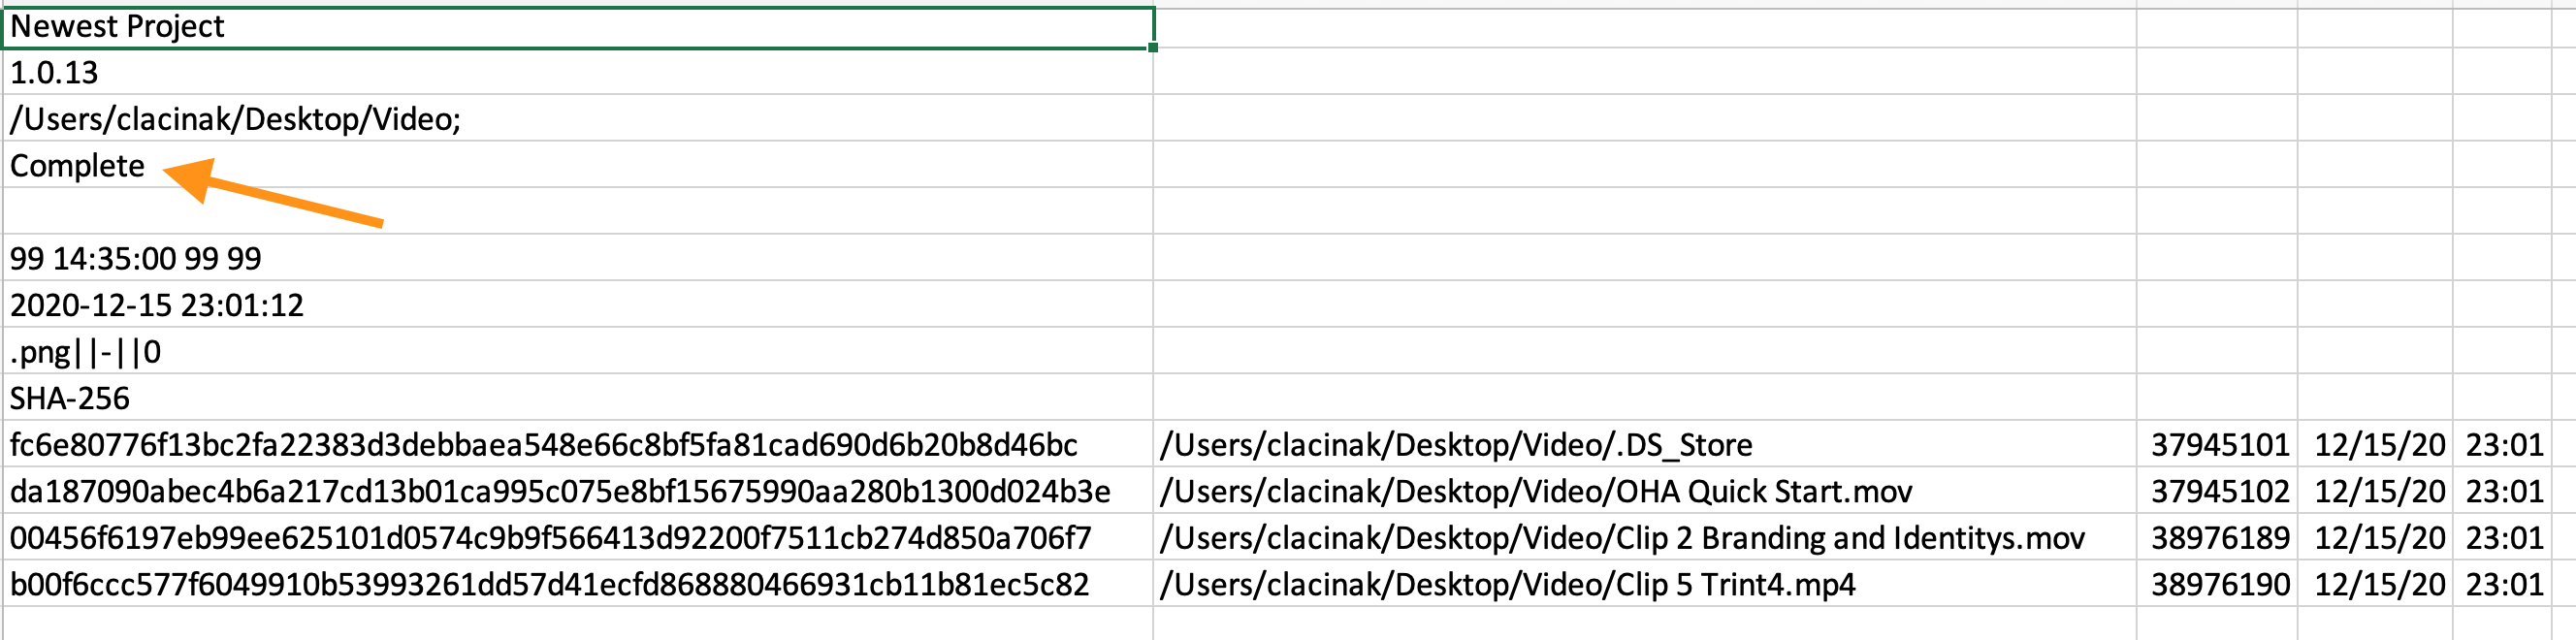
History Report
History reports are saved to the history folder each time a scan is performed. Each History report is named projectname_yyyy-mm-dd-hhmmss.tsv The History report provides an audit trail over time, provides insights into why a given file status was reported in a Fixity report, and serves as the file used for importing projects in Fixity, offering the ability to migrate projects to new computers and/or regress a project to a previous scan if necessary. A Fixity report represents the differences/similarities between two history snapshots.
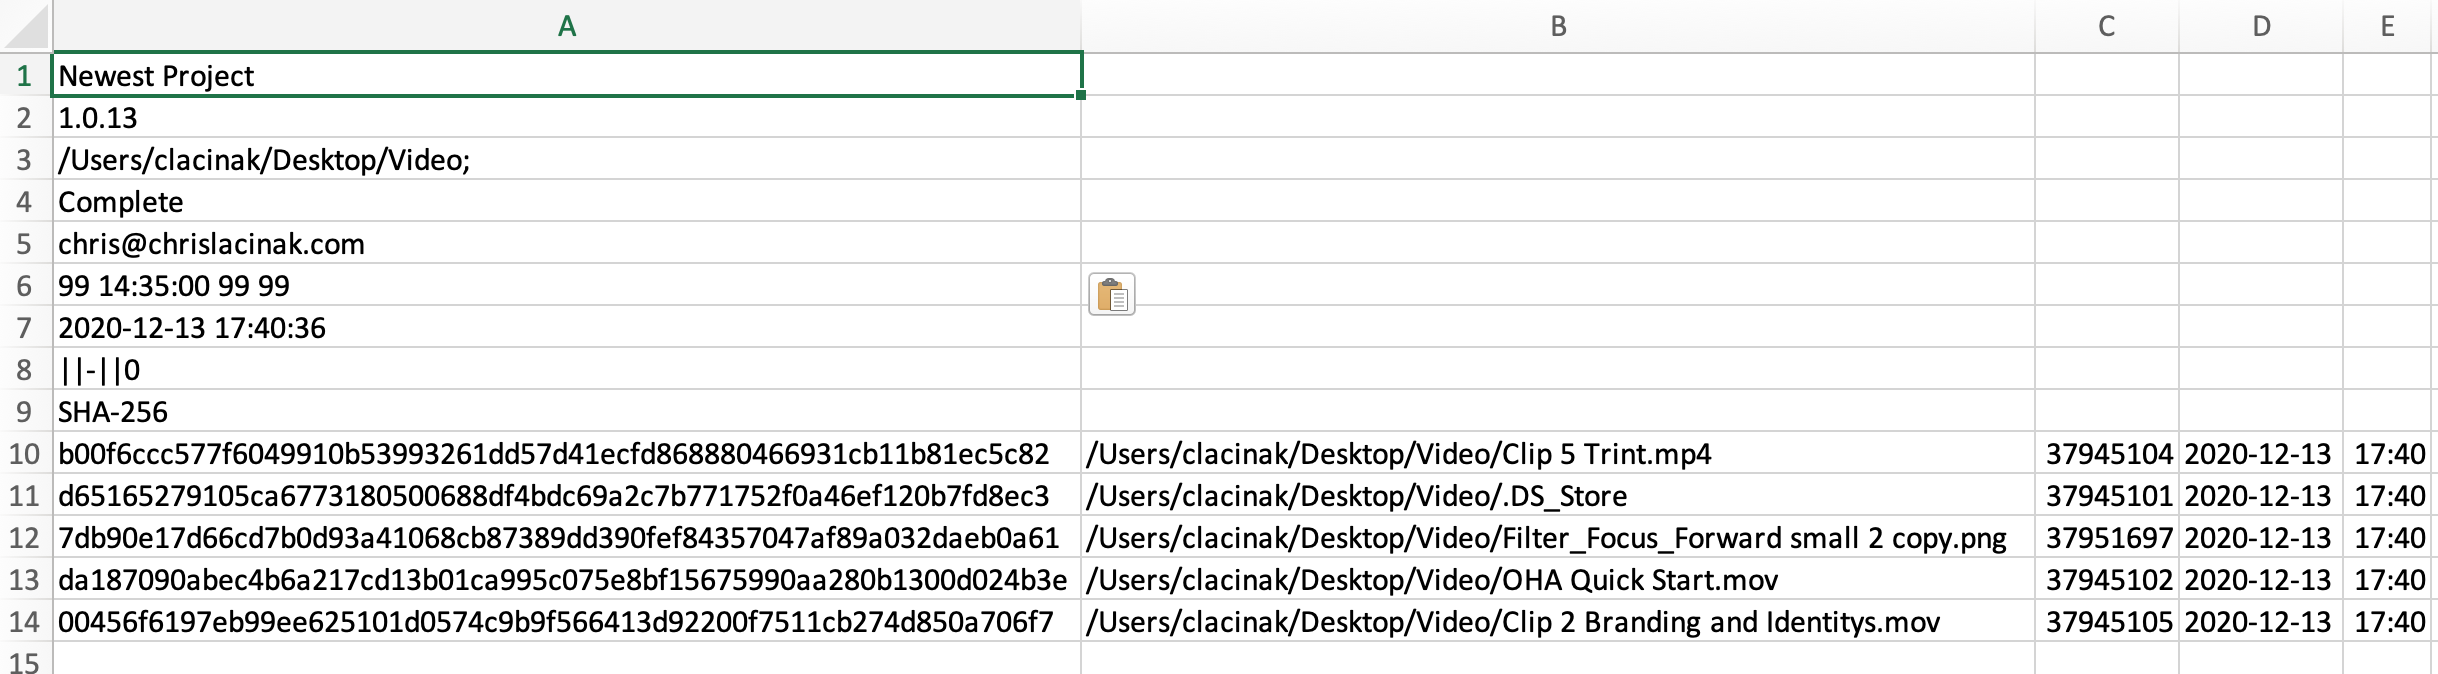
Note: When opening History reports in spreadsheet applications, it is important to open them by importing the .tsv file, identifying the delimiter as a Tab, and treating all data as text (see FAQ for details). This will ensure maximum functionality and keep spreadsheet applications from altering the data in unintended ways. If you do double-click to open the files be sure not to save in case the spreadsheet application has altered your data.
History reports contain the following information:
- The project name.
- The version of Fixity Pro used to generate this report.
- The file path of each directory included in the project separated by ;
- The status of the project that generated this report.
- Email addresses identified as report recipients within the project.
- The scheduled scan data for the project.
- The date and time stamp of when the report was generated, where hh:mm:ss is in military time.
- The preferences selected for this project.
- The checksum algorithm used for this scan.
- Beneath the checksum algorithm each row contains the following for every file that was scanned or not
scanned (i.e., inaccessible on an external
or network drive).
- Checksum value for the file
- File path for the file
- Index value for the file
- Date that the file was last scanned (yyyy-mm-dd). If a file was not scanned because it was on an external and/or network drive at the time of the scan, the date will be the last date that the file was scanned.
- Time that the file was last scanned (hh:mm in military time). If a file was not scanned because it was on an external and/or network drive at the time of the scan, the time will be the last date that the file was scanned.
Analysis and reporting logic
Project Status
When a project scan is performed there are three possible outcomes, each with its own status:
- Complete: Fixity Pro scanned all directories identified in the project and generated reports.
- Partial: Fixity Pro was able to scan some of the directories identified in the project but was not able to access directories in the project that were located on external or network drives.
- Incomplete: This status can occur for two reasons. The first is if the application or computer crashes during a scan. The second is if none of the directories in the project are able to be accessed because they are located on external and/or network drives and unavailable to Fixity Pro at the time of the scan.
External and Network Drive Management
When adding directories to Fixity Pro you are asked to identify the storage type that the directory lives on. This can be seen in the following image.

Identifying the storage type impacts how Fixity Pro manages the scanning and reporting process. There are multiple scenarios that may lead to Fixity Pro being unable to access external and network drives. This may be that the external drive is not connected to the computer or is turned off at the time of the scan. Network drives may be inaccessible because the network is down, the drive is powered off, or it requires credentials to be entered in order to authenticate and provide access. When these types of events occur, Fixity Pro does the following:
- If a project contains a mixture of directories located on internal, external, and network locations, and the external or network storage location is inaccessible to Fixity Pro, the application will scan the files it has access to first.
- Once Fixity Pro has scanned all of the files it has access to, or if there are no files it has access to, it will wait 5 minutes and then try to connect again. It will try for a total of 6 times, or 30 minutes. If it is successful in accessing the files on any of these attempts (for instance, if the network was down and comes back up) it will continue the scanning process. If Fixity Pro is unsuccessful in accessing the fils after 6 attempts, or 30 minutes, it will close the project down, assign the project a status of partial (if some files have been scanned and some have not) or incomplete (if no files were scanned), and generate and save/emails reports.
- Files that were not scanned will be identified in the Fixity report as not scanned. In the History report these files will have the last date and time that they were scanned documented.
- The next time a scan is performed where Fixity has access to the files, it will use the last available data to perform its analysis and reporting.
Regarding point #2 above, Fixity Pro has different behavior if the scan is being conducted manually with the user interface open than it does with a scheduled scan. During a scheduled scan, which happens in the background without presenting the Fixity Pro user interface, everything described happens in the background without any notification appearing on the computer screen. The project status and reports will indicate that there was an issue after the fact. If the user is manually running a scan and has the user interface open they will see the prompt seen in the image below.
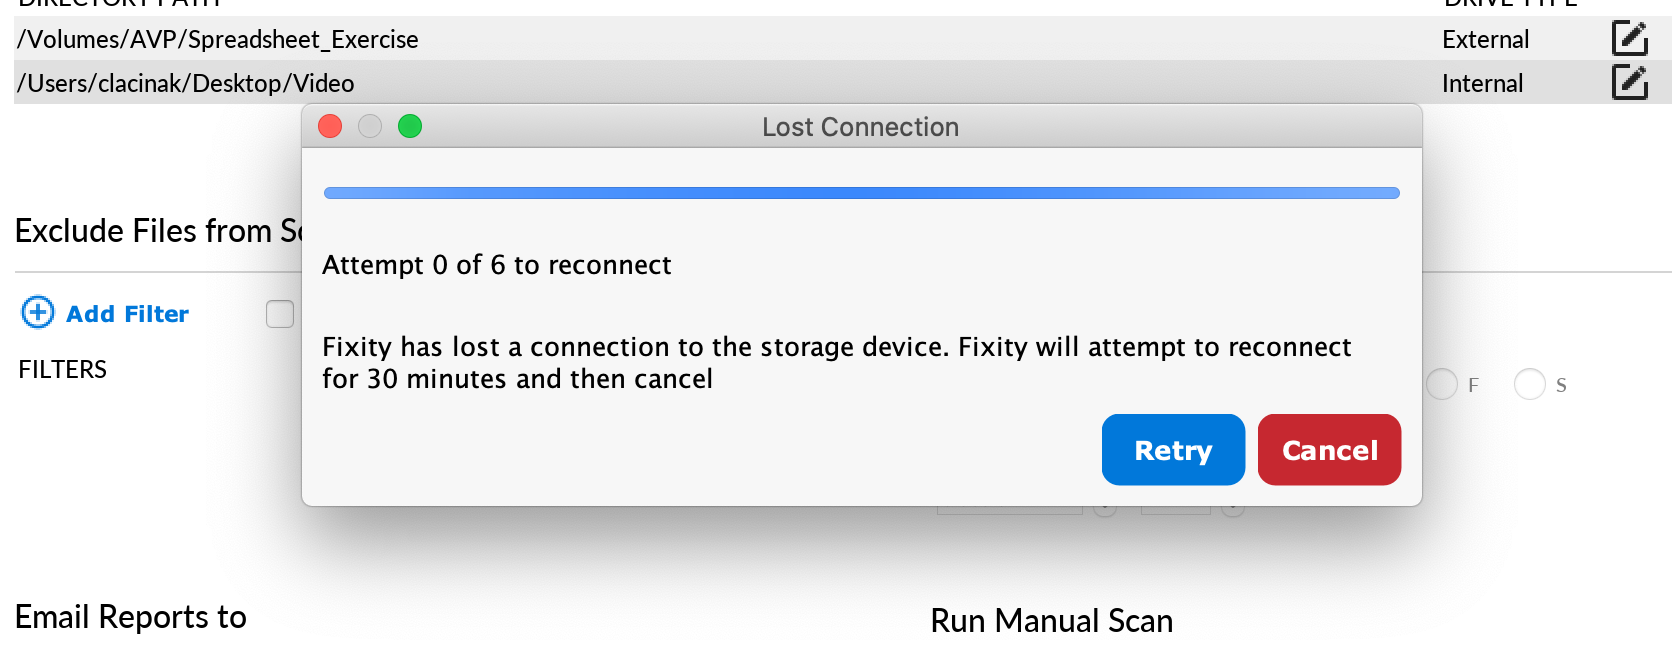
In this scenario the user can resolve the issue (e.g., connect the external drive or enter the appropriate credentials to access the network storage location) and then select Retry to avoid waiting for the next automatic connection attempt.
Project Status
Rationale
Fixity Pro projects are assigned a project status each time a scan is performed. There are three different possibilities: Complete, Partial, and Incomplete.
A status of Complete is the result of all directories in the project being scanned and reported on. This means that all storage locations were accessible to Fixity Pro and there were no application crashes or computer crashes/shutdowns mid-scan.
A status of Partial means that some or all directories in the project were not scanned because they were on an inaccessible external and/or network storage location. Fixity closed the project, generated and saved/emailed reports.
A status of Incomplete means that application or computer crashed mid-scan. In this case Fixity Pro will not have had an opportunity to generate and save /email reports before it shut down. When Fixity Pro is launched following an application or computer crash it will generate and save/email the reports.
Reporting
The project status shows up in multiple places so that you are always aware and in the know. The places the project status shows up can be seen in the examples below.
The first example is where this appears in the Fixity Pro main window. You will find it all the way to the right of the window in the Last Scan section in parentheses.
The second example is in the Fixity report as seen below.
The third example is in the History report as seen below.
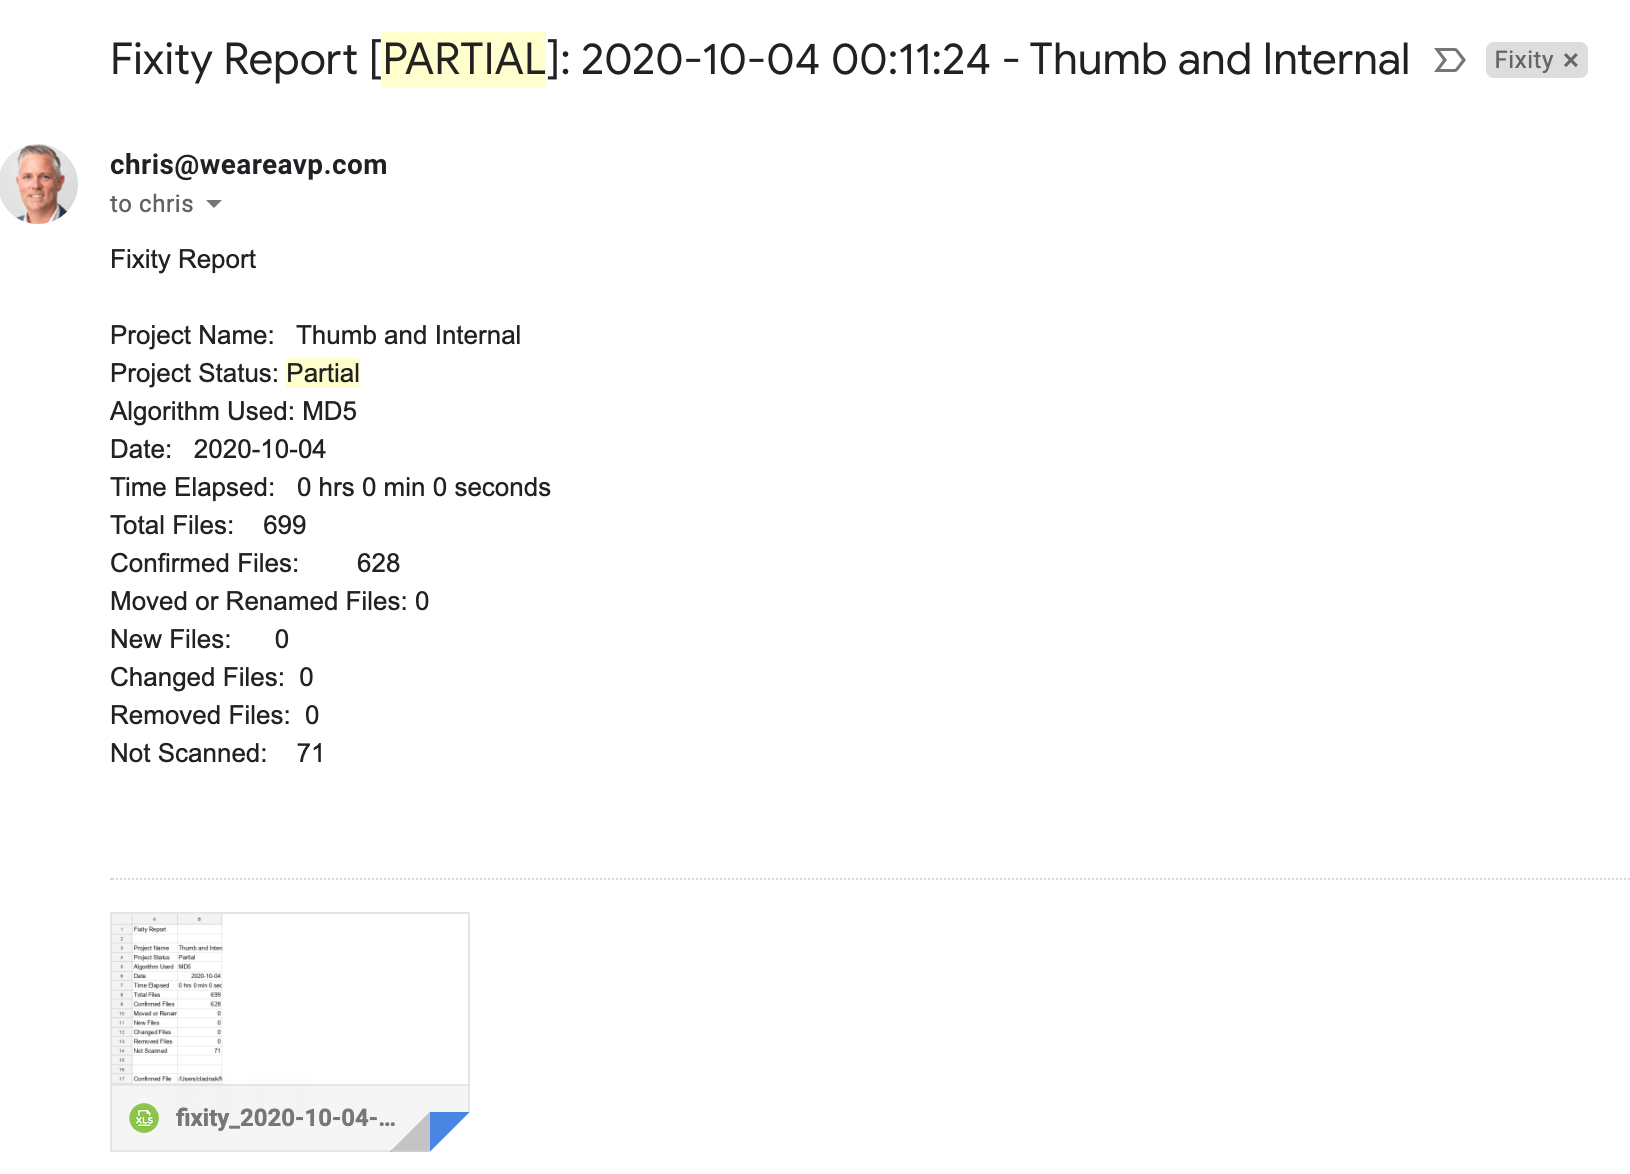
And finally, in emailed reports as seen below. If scans are partial or incomplete an email will be sent when the Email only upon warning or failure checkbox is selected in the Email Reports to section of the Fixity Pro user interface. In these circumstances [PARTIAL] or [INCOMPLETE] will show up in the subject line of the email to indicate that there was an issue.
Regardless of the project status, any email received will contain the status in the body of the email.
Partial and Incomplete Status Behavior
When a project is given a partial or incomplete status an option is presented when pressing the Scan Now button. Normally pressing Scan Now would initiate the scanning process. In partial and incomplete circumstances the user is presented with the option to Resume Scan or Scan Now as seen below.
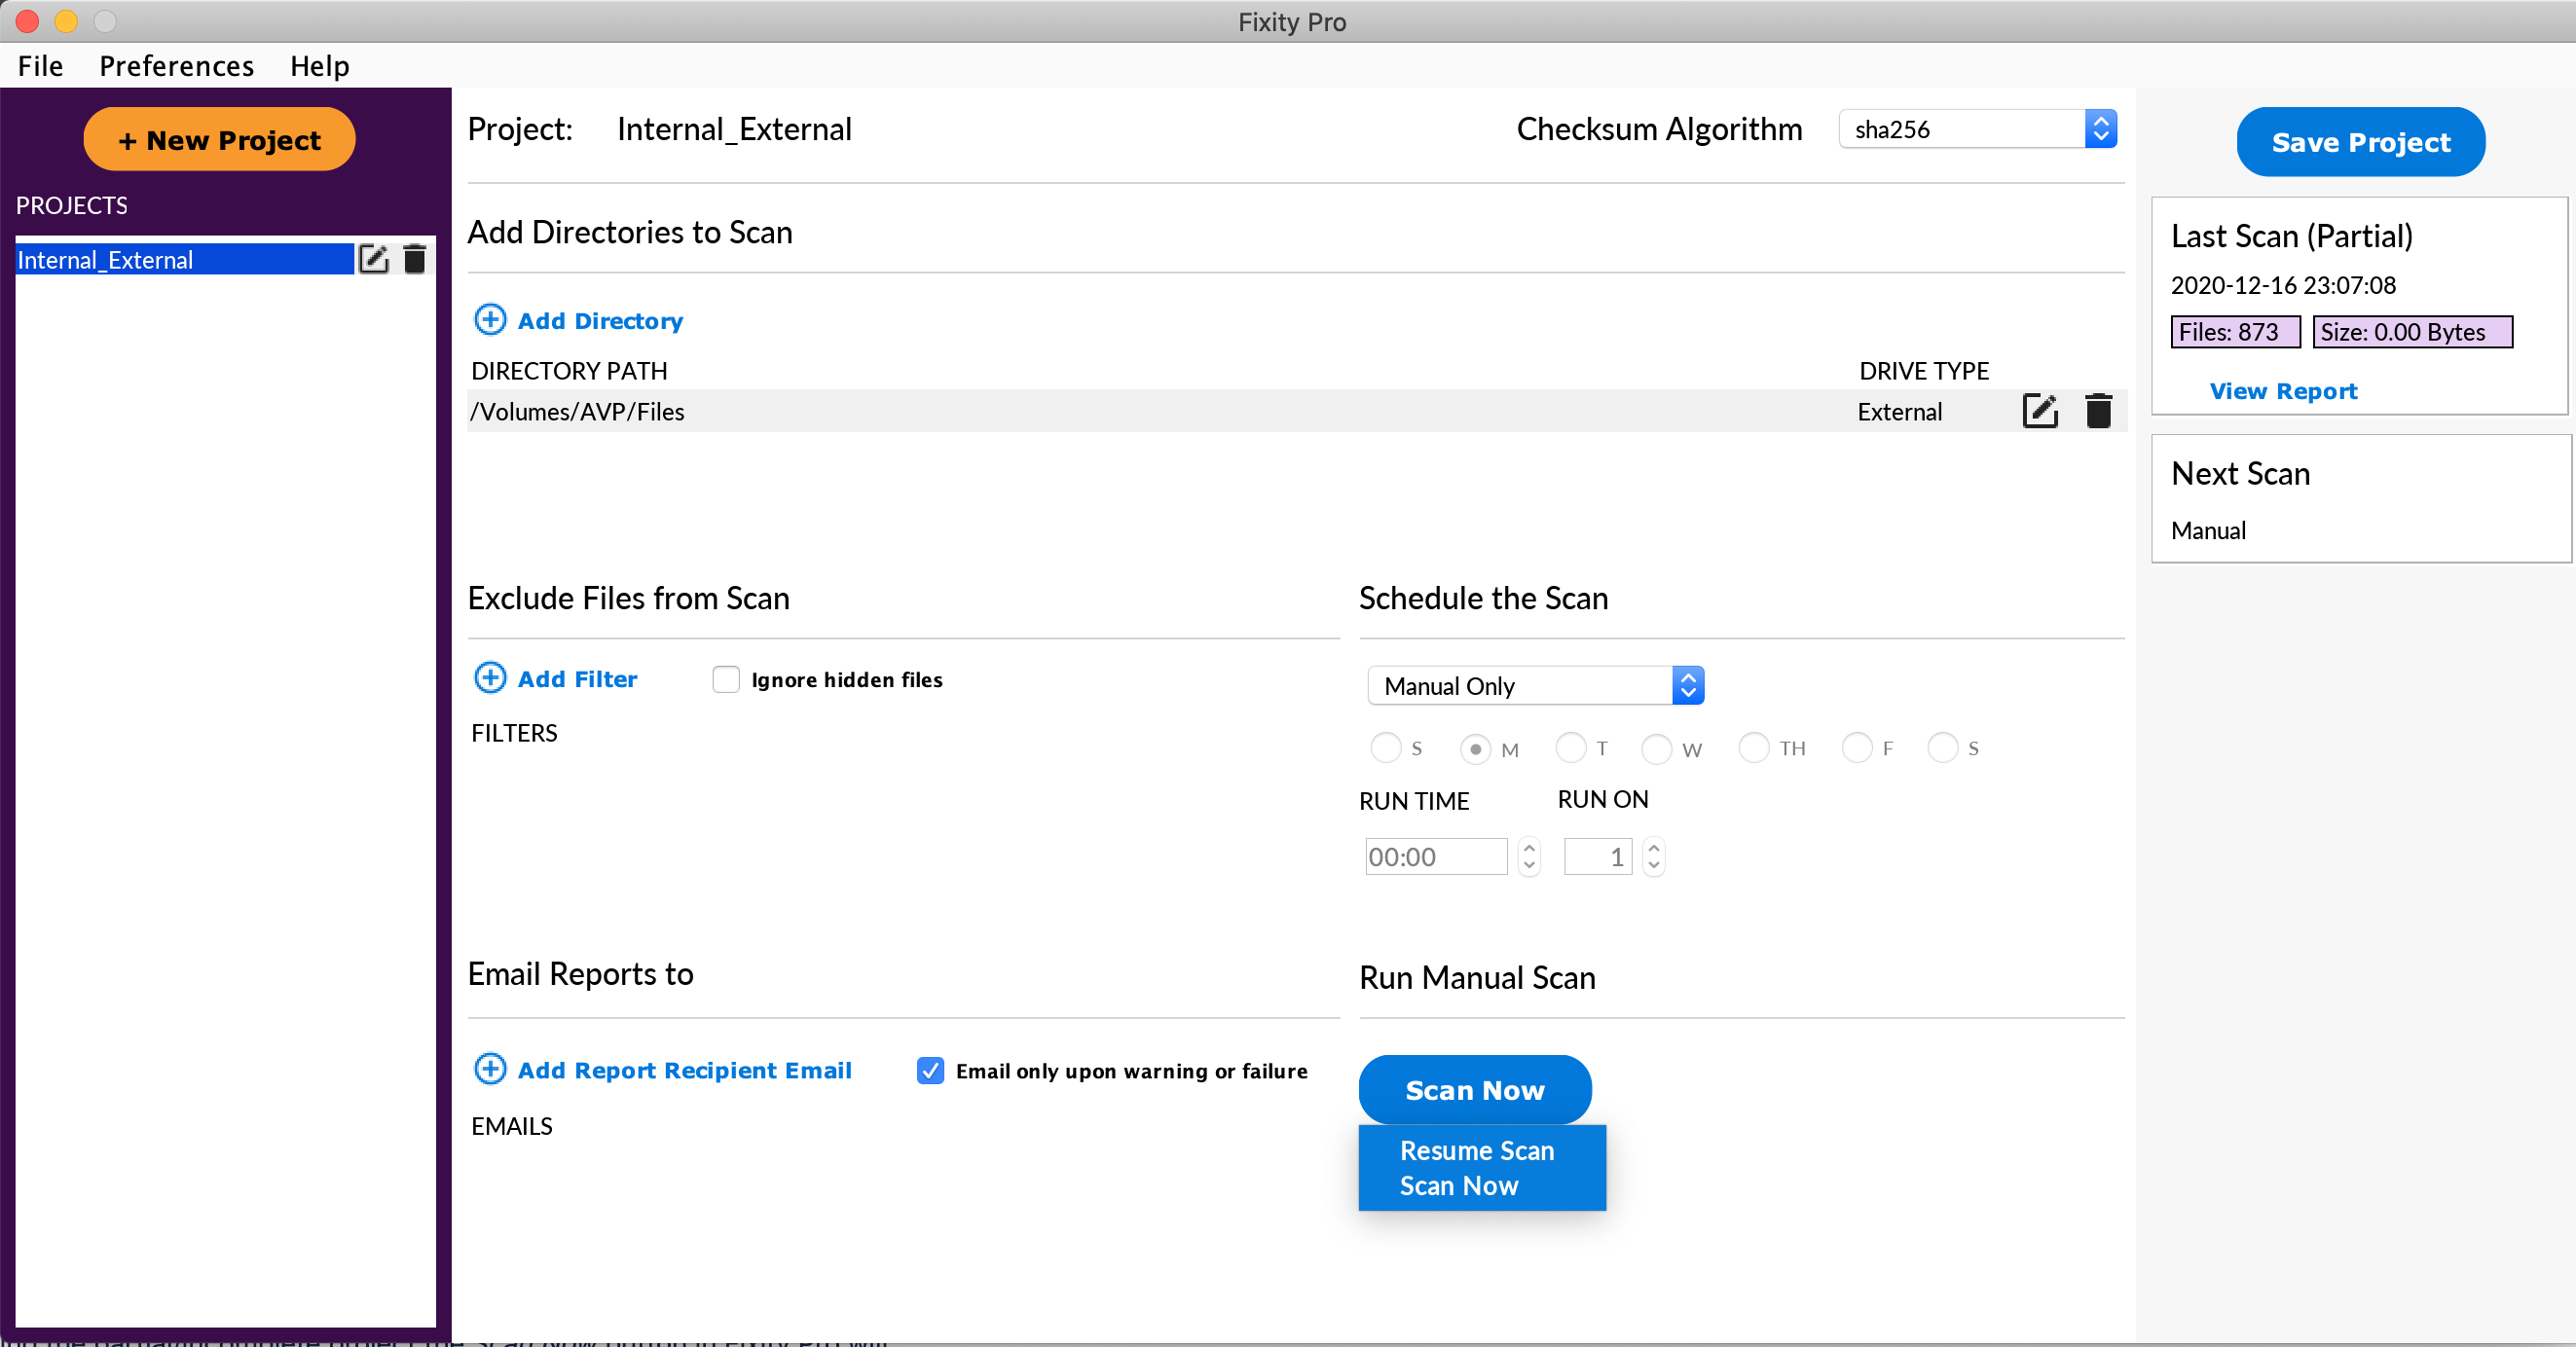
Selecting Resume Scan will only scan the files that were given the status of not scanned in the previous scan. Selecting Scan Now will start the entire scan over again from scratch, scanning all files in all directories.
When a scheduled scan takes place following a partial or incomplete scan it will start over from scratch, scanning all files in all directories.
Changing the Checksum Algorithm
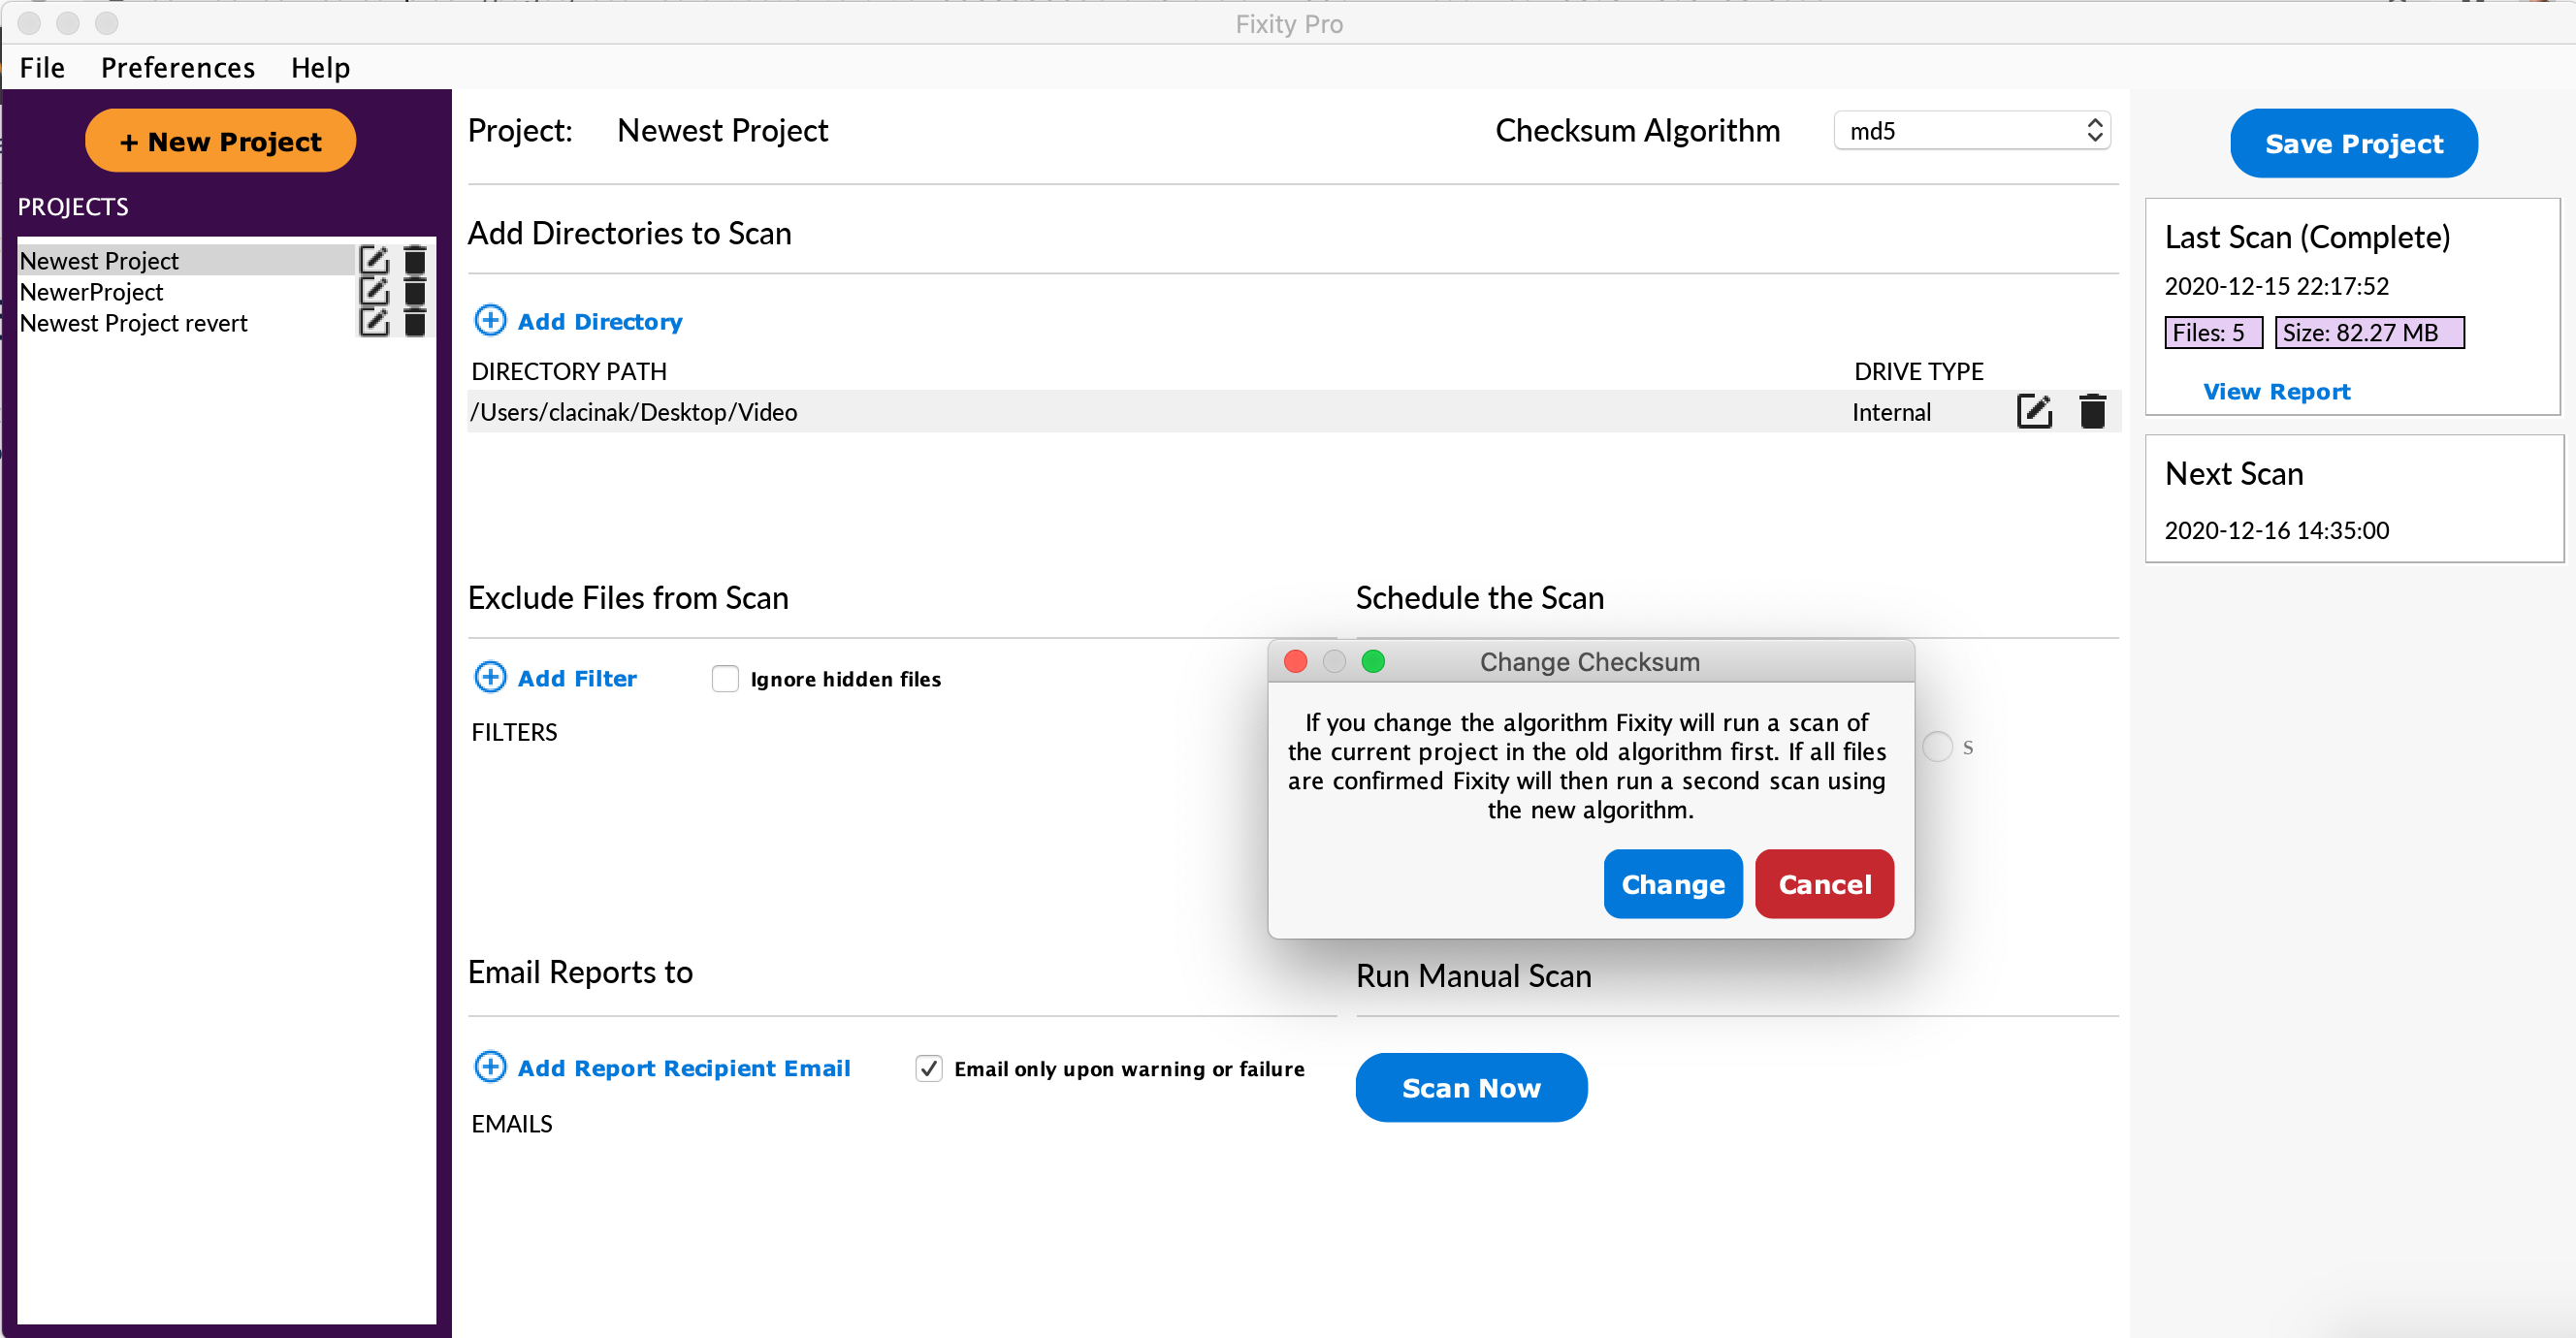
Fixity Pro provides two options for checksum algorithms: sha256 and md5. In certain scenarios users may wish to change the checksum algorithm for a given project from their original choice of checksum algorithm to the other choice. To do this, select the dropdown menu in the top right of the Fixity Pro user interface next to the text Checksum Algorithm and select the new checksum algorithm. See where this dropdown is located in the image below.

Once you select the new checksum algorithm you will be presented with the change checksum prompt seen in the image below. This prompt notifies you that Fixity Pro requires running two consecutive scans to complete the process successfully. The first scan will be run in the original algorithm. If the first scan results in all confirmed files then the second scan will be run in the new algorithm immediately. The scans are run consecutively to create the minimum amount of time gap possible when the file changes could occur without being identified and auditable. This process helps ensure a clean audit path and makes sure that any issues are identified and resolved before making the transition to the new algorithm.
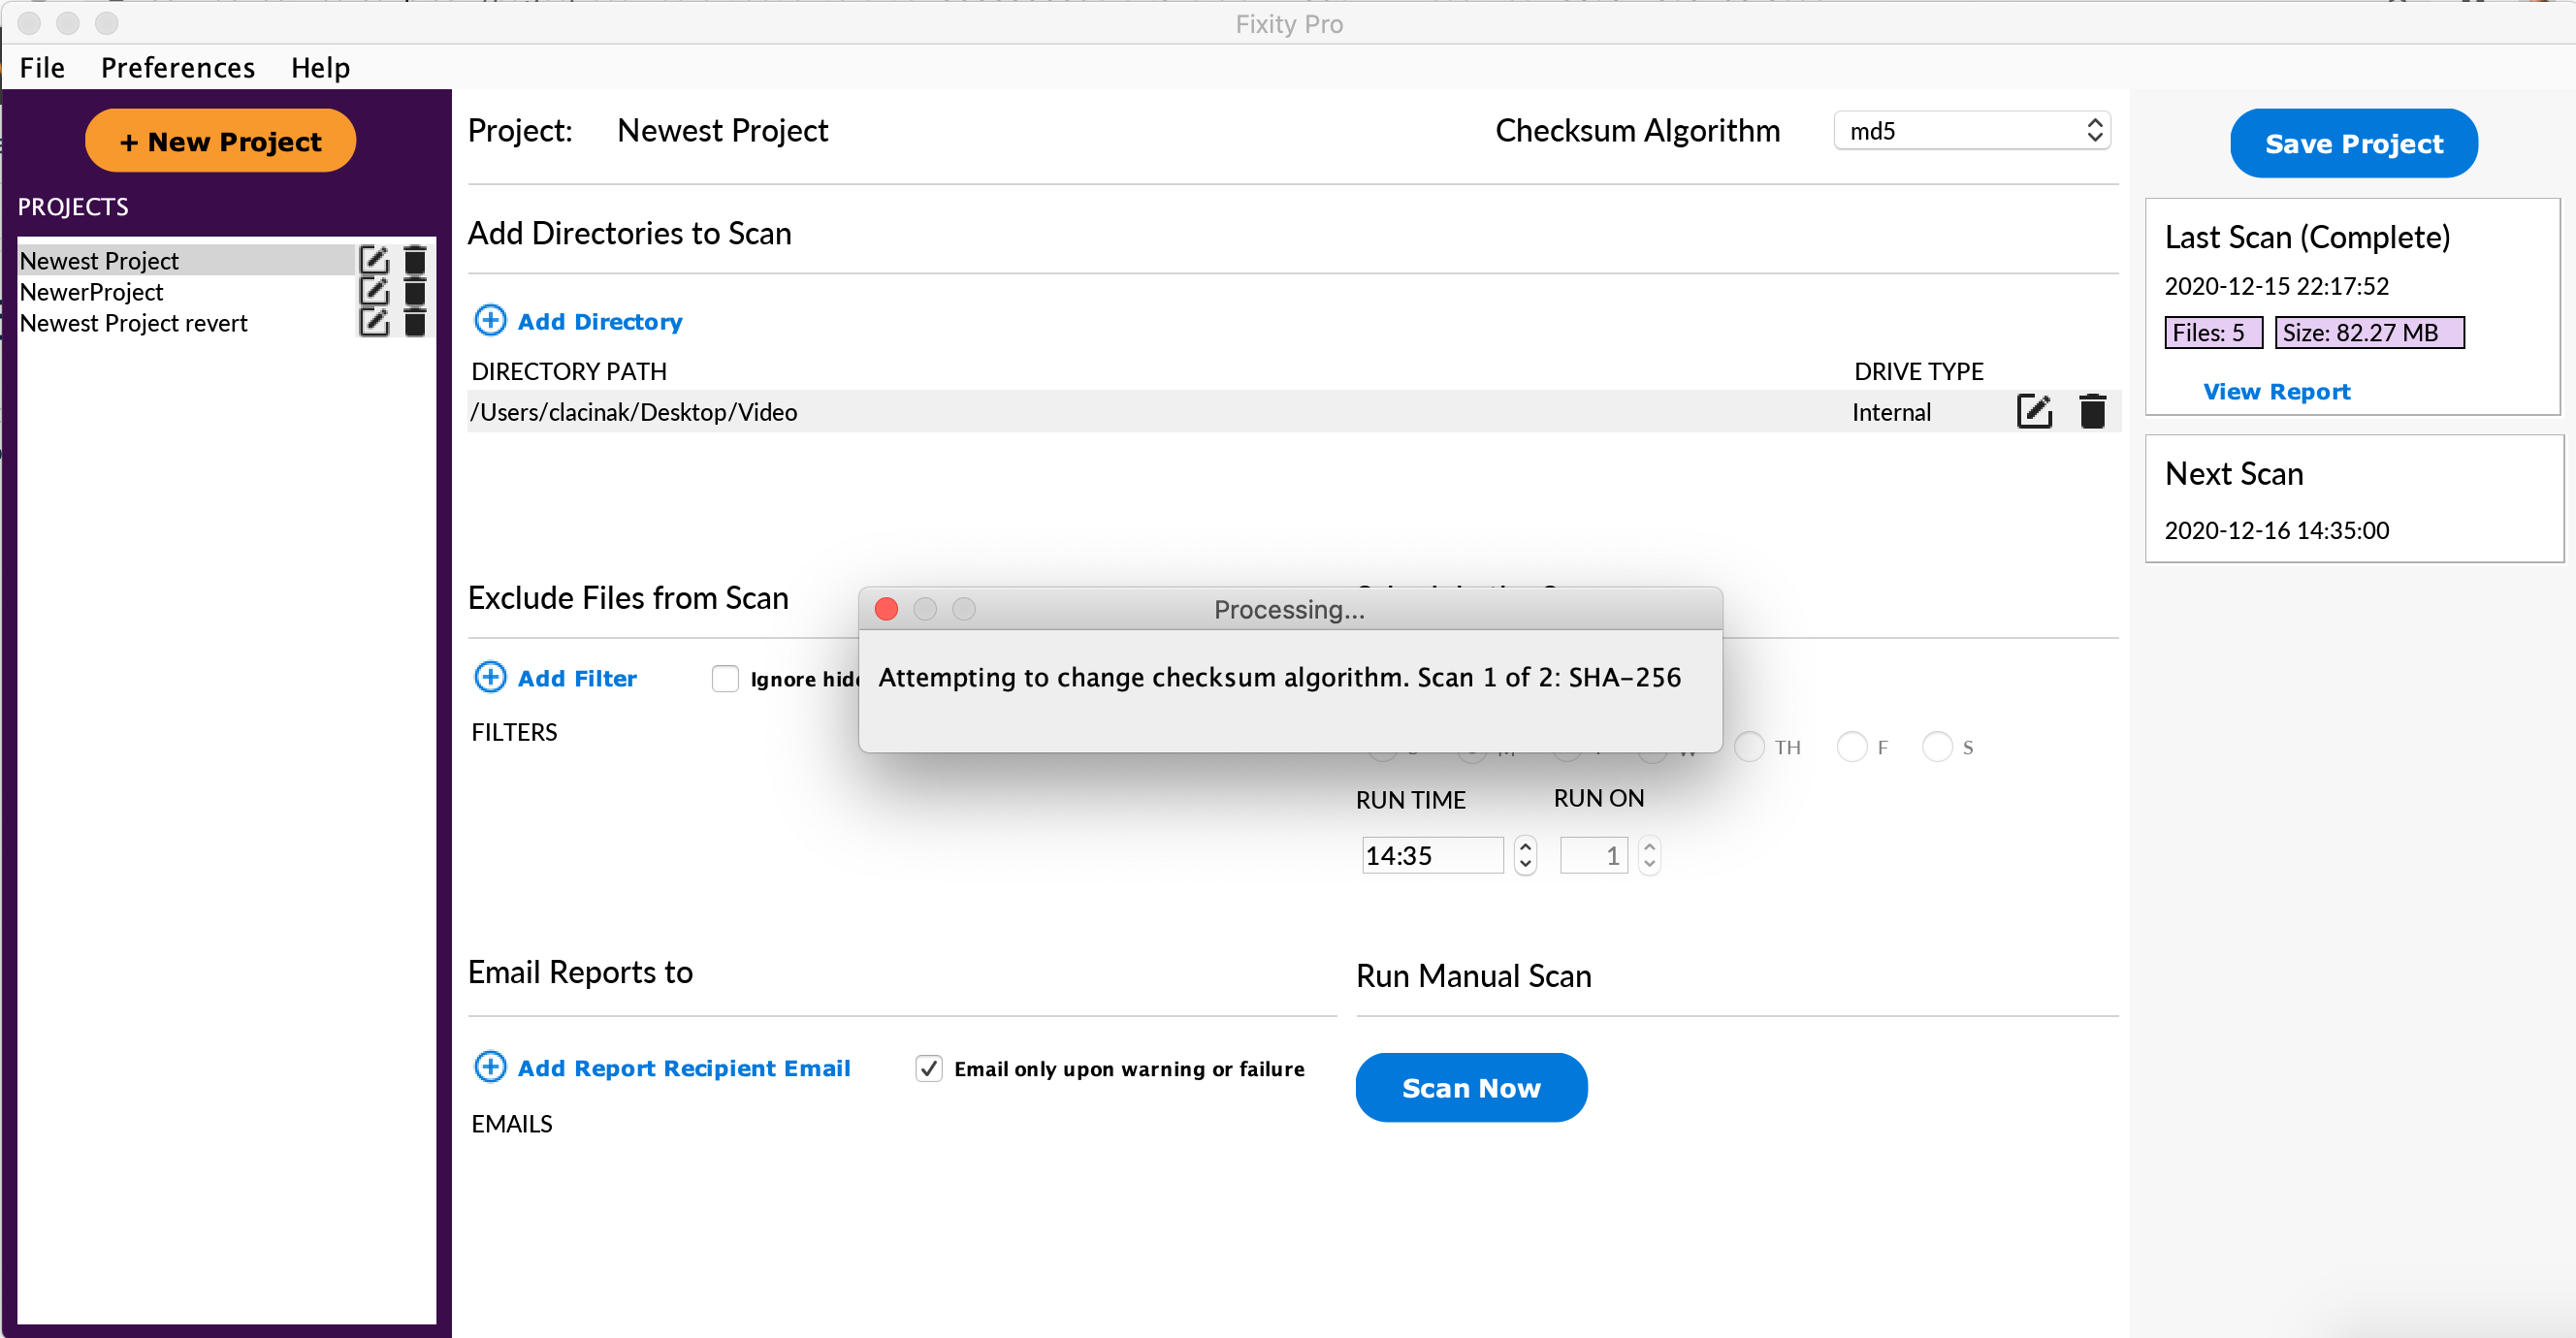
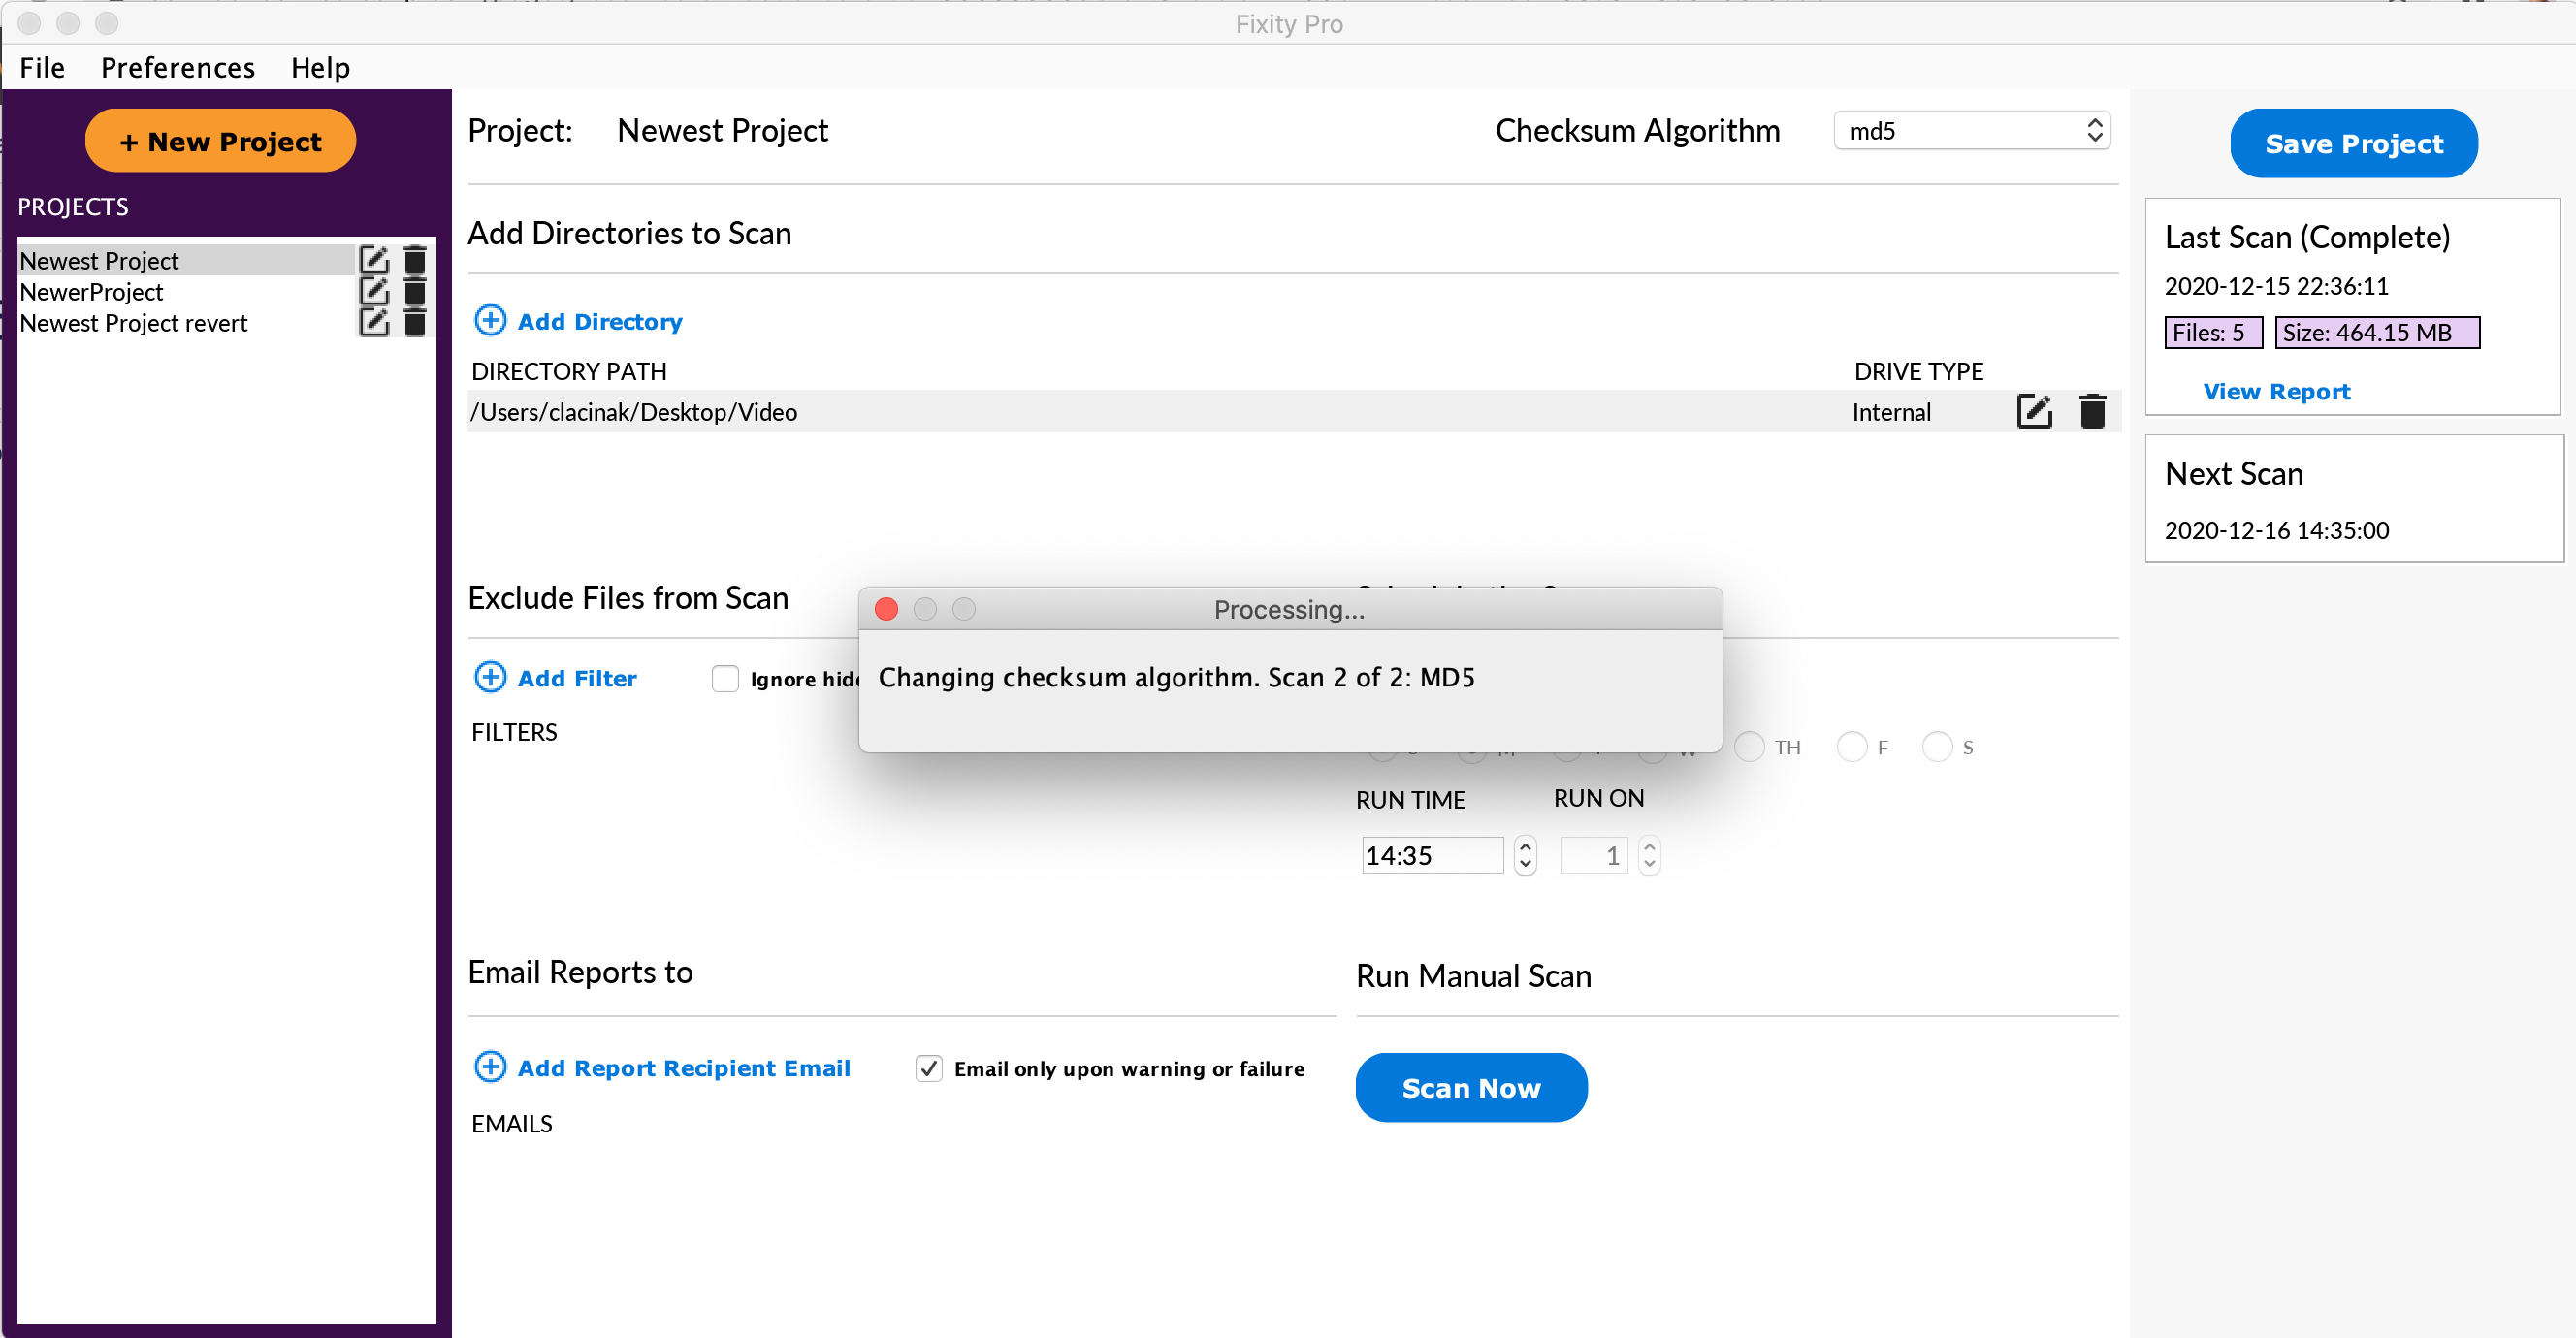
After Change is selected the first scan will begin and the user will be presented with the dialog seen in the image below.
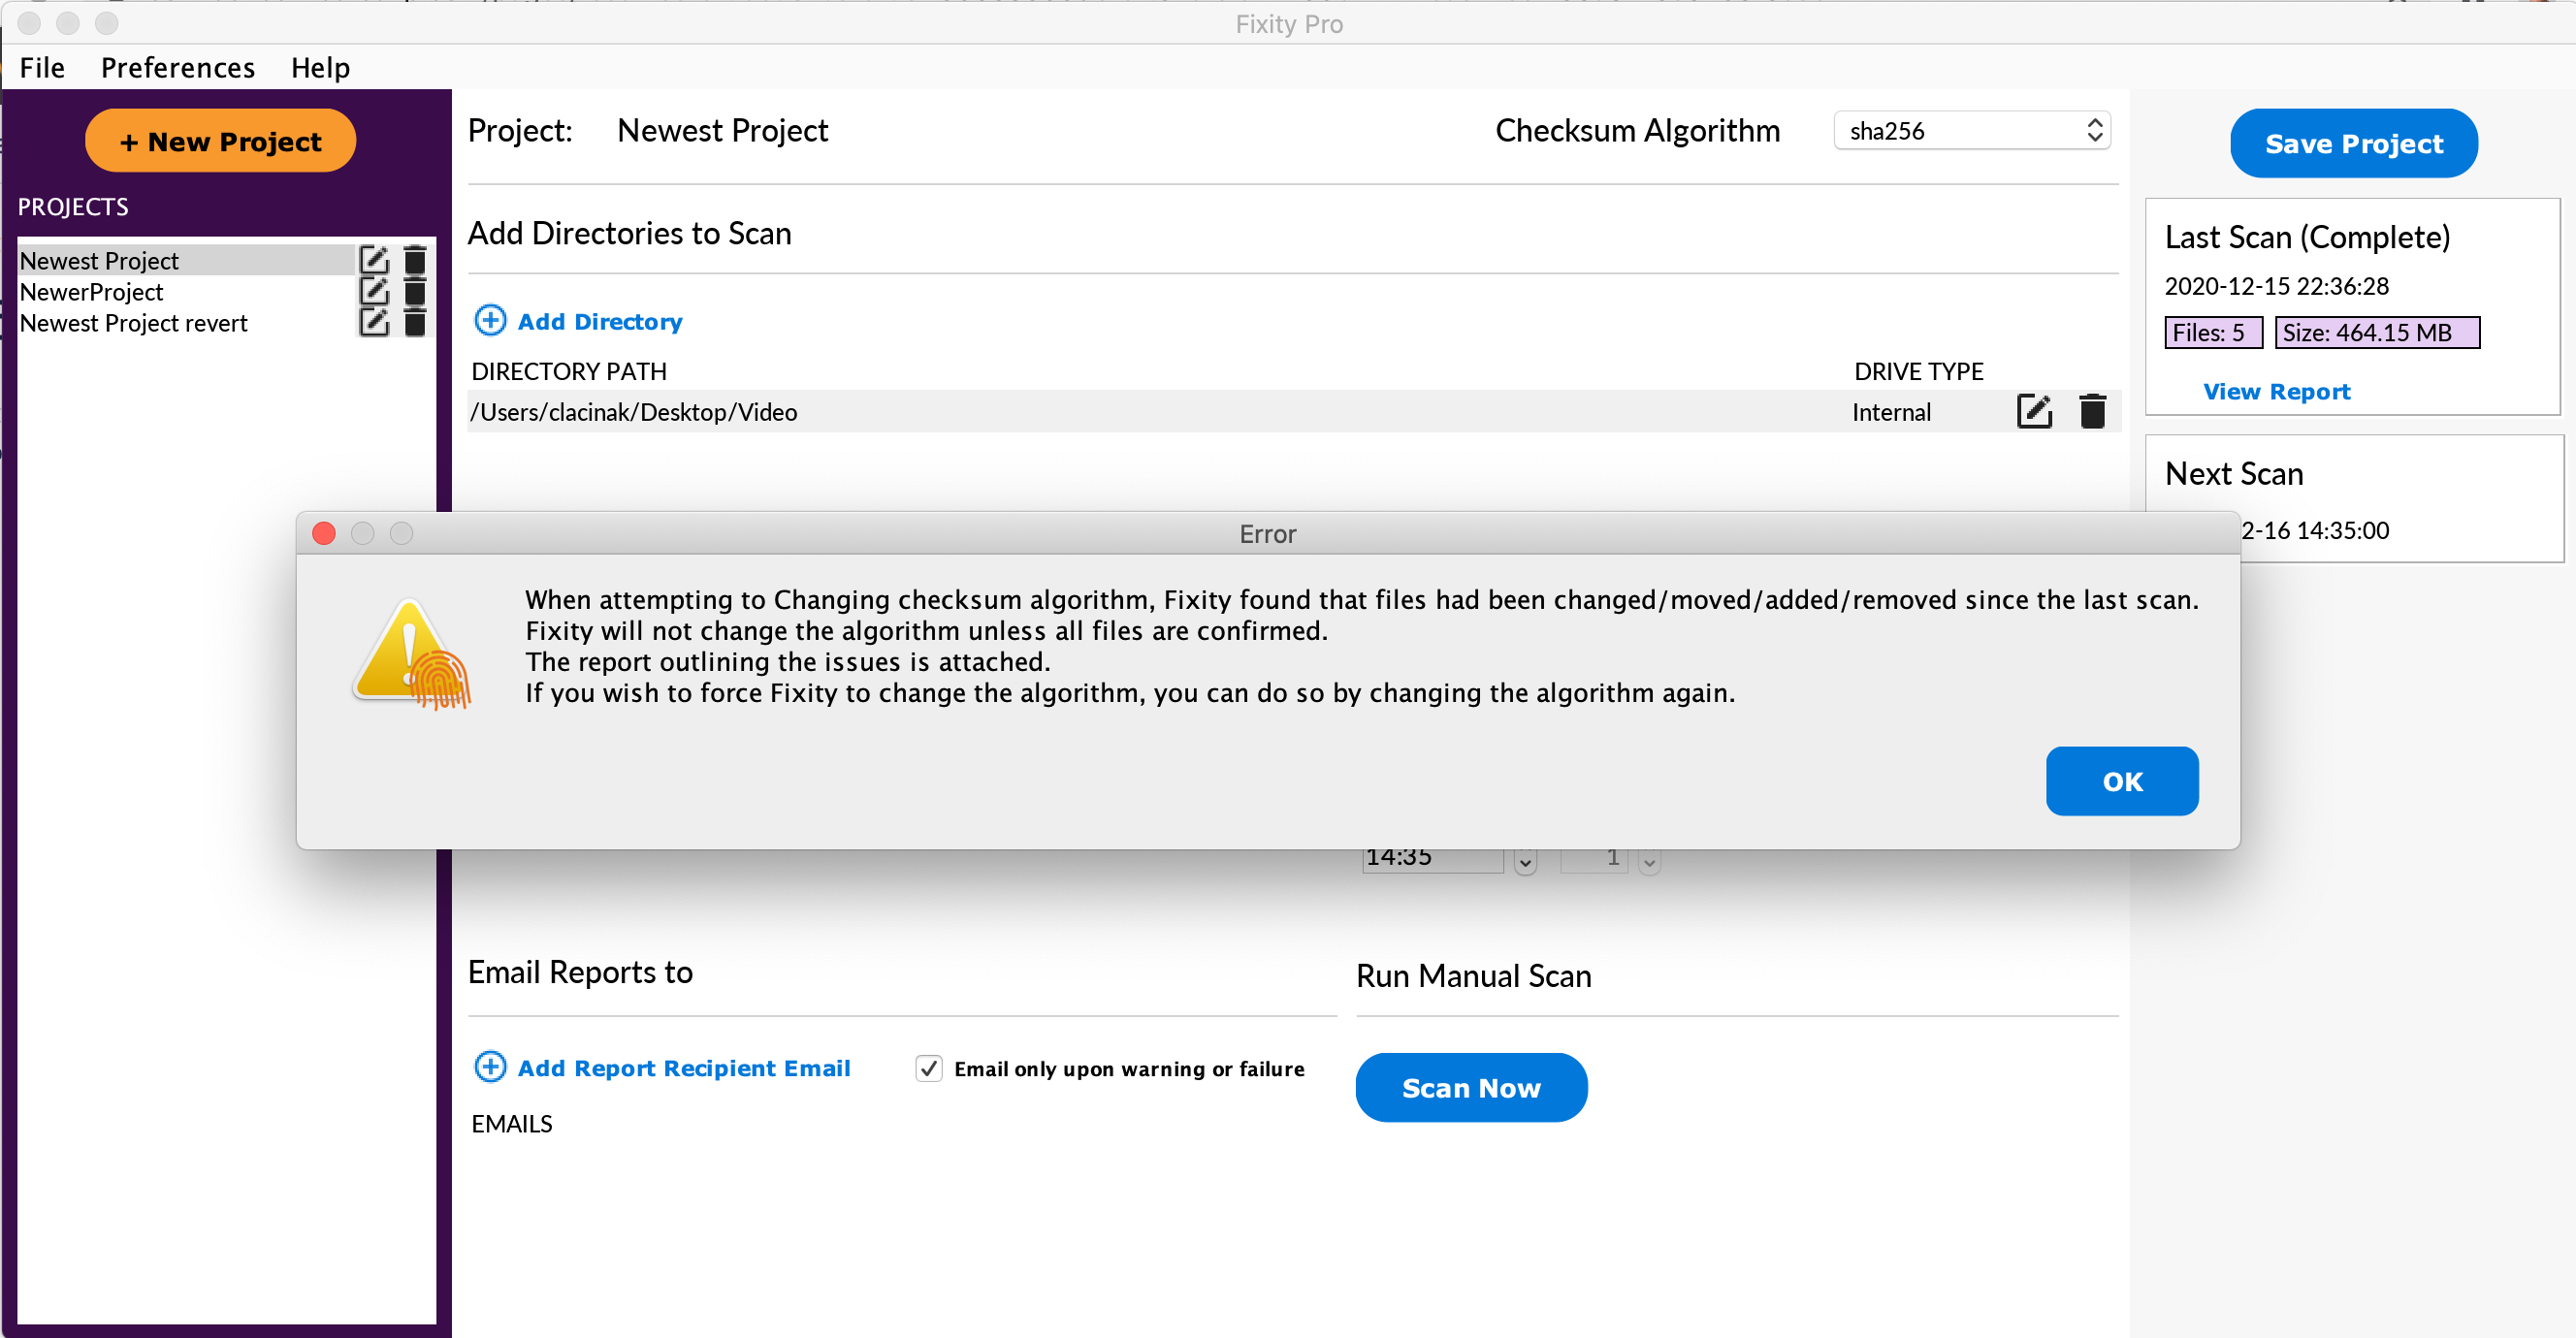
If the first scan is not successful (any files have a status other than confirmed), the user will be presented with the dialog below. The best thing to do at this point is to review the Fixity and History reports to determine which files had a status other than confirmed and determine whether or not this is problematic. If the findings are logical and non-problematic you can proceed by changing the checksum again and going through the process once more. Assuming nothing changes with the files in the project between the time of your previous attempt and the new attempt, all files should have the status of confirmed and the checksum algorithm change should be successful.
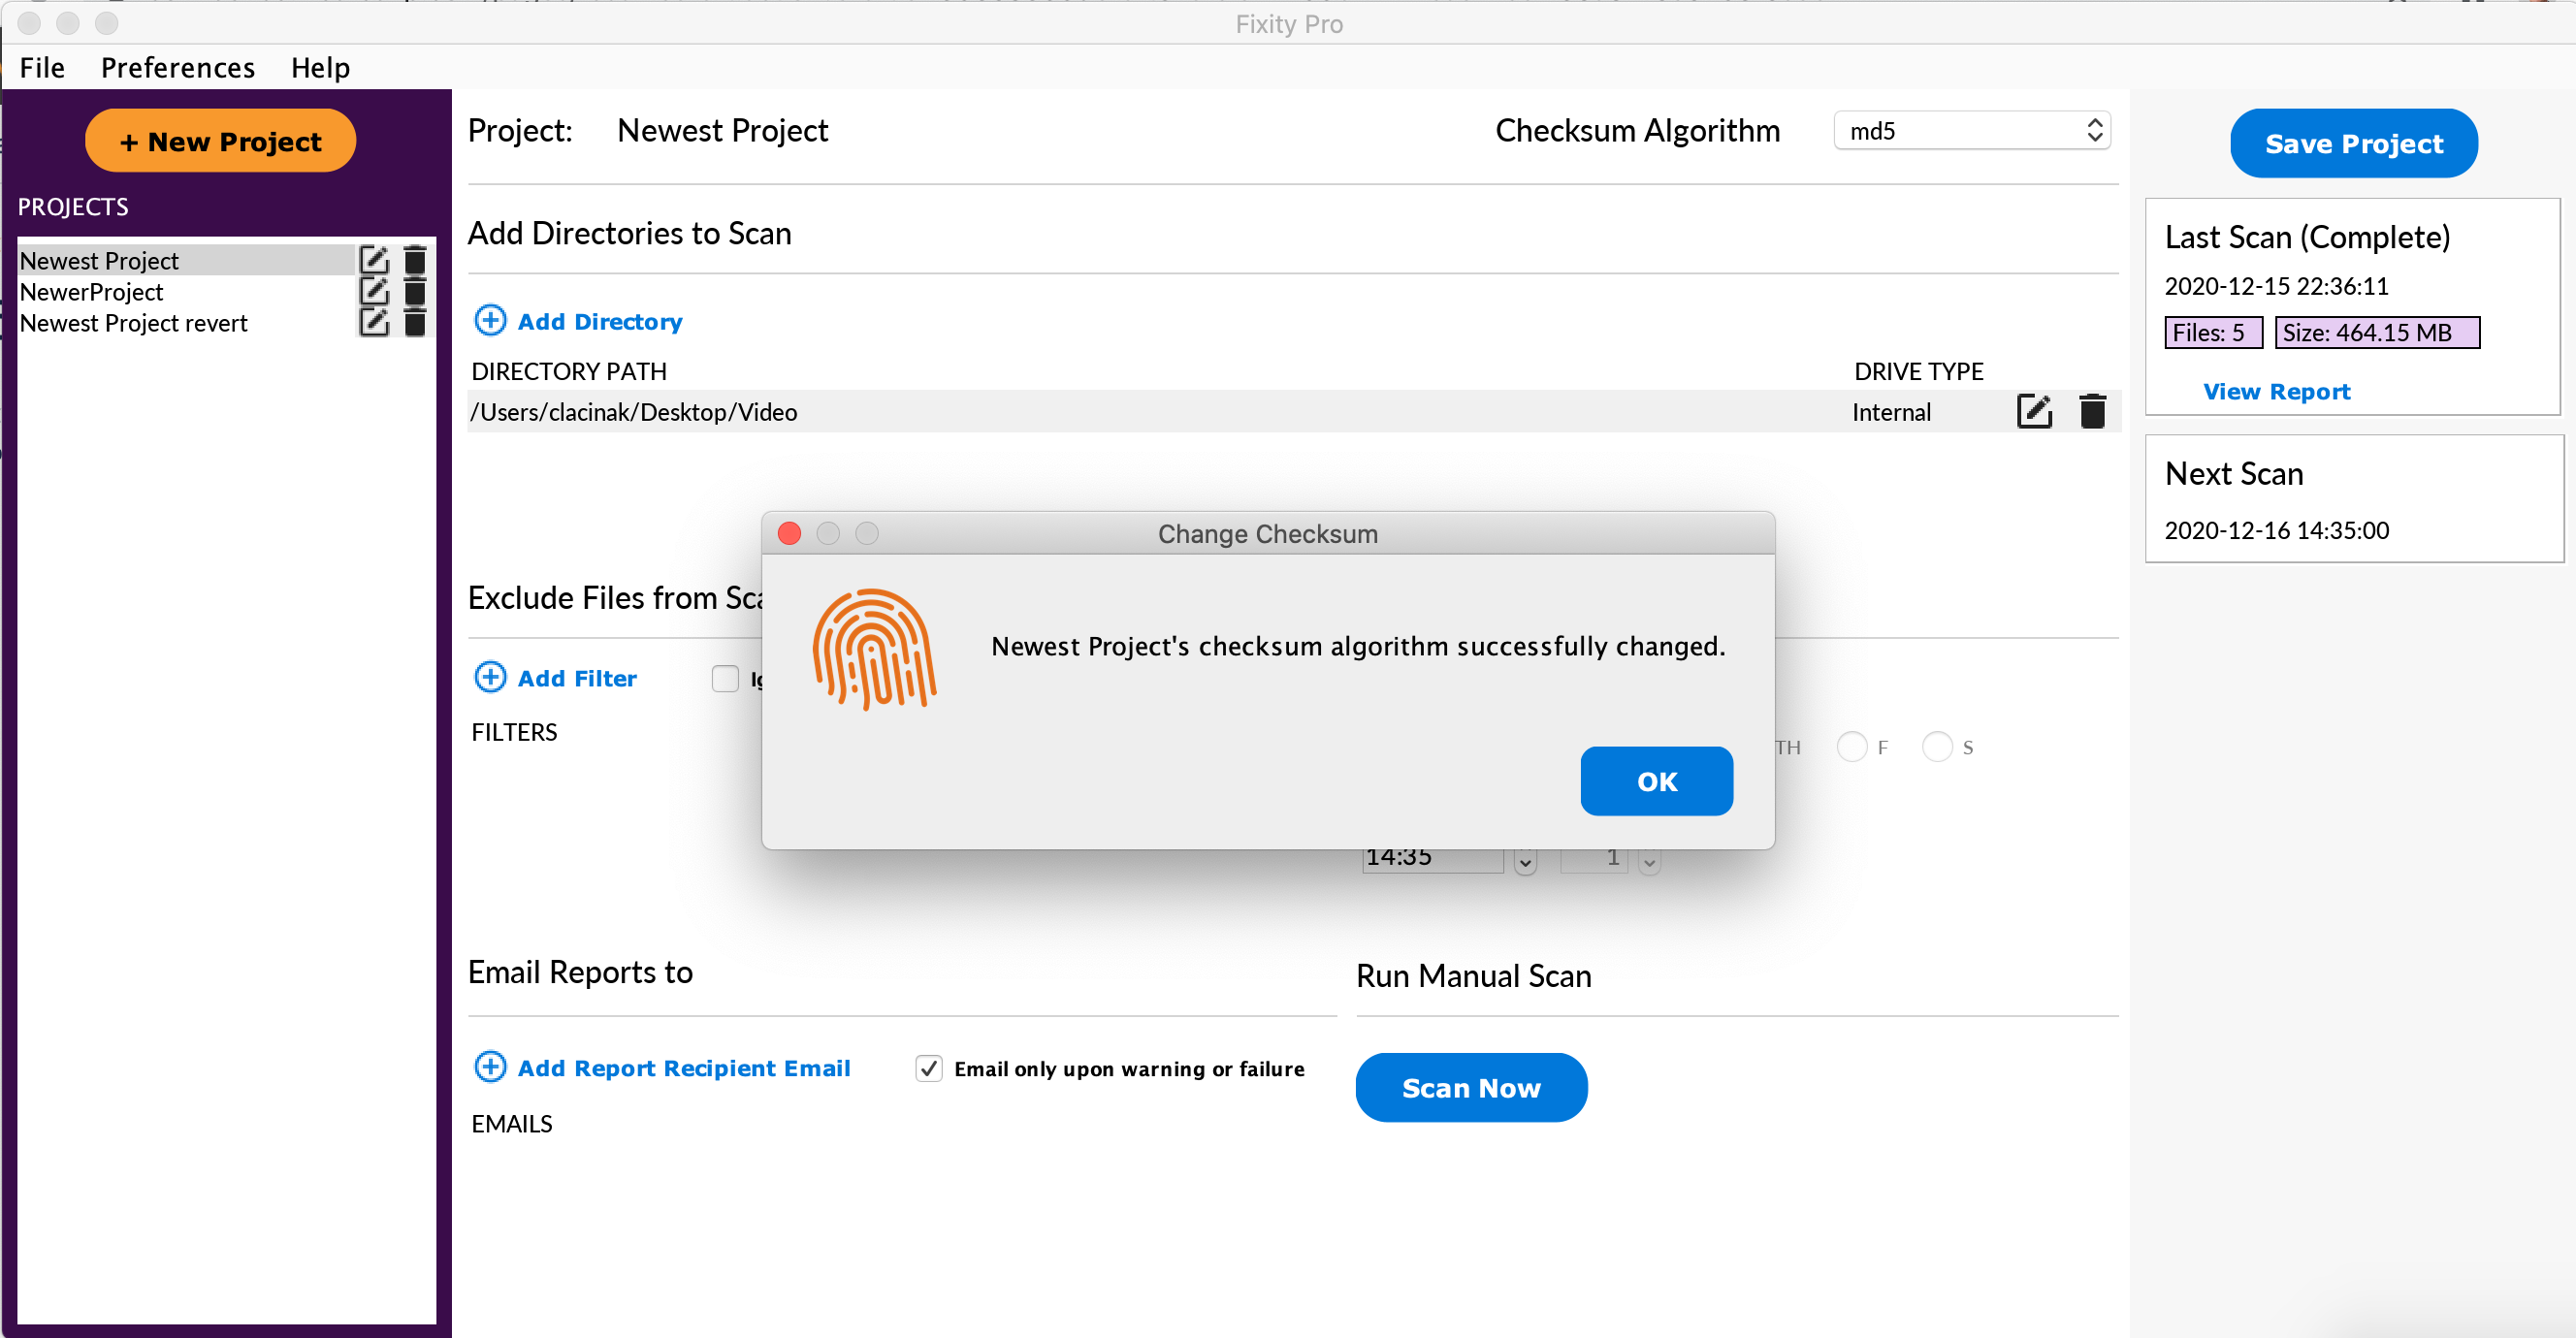
If the first scan is successful (all files are confirmed) Fixity Pro will move on to the second scan using the new algorithm. In this case the user will be presented with the dialog seen below, followed by the success message seen two images below.
Note that a report is generated (and emailed if the settings are configured accordingly) for each of the scans conducted in this process.
Changing Directory Locations
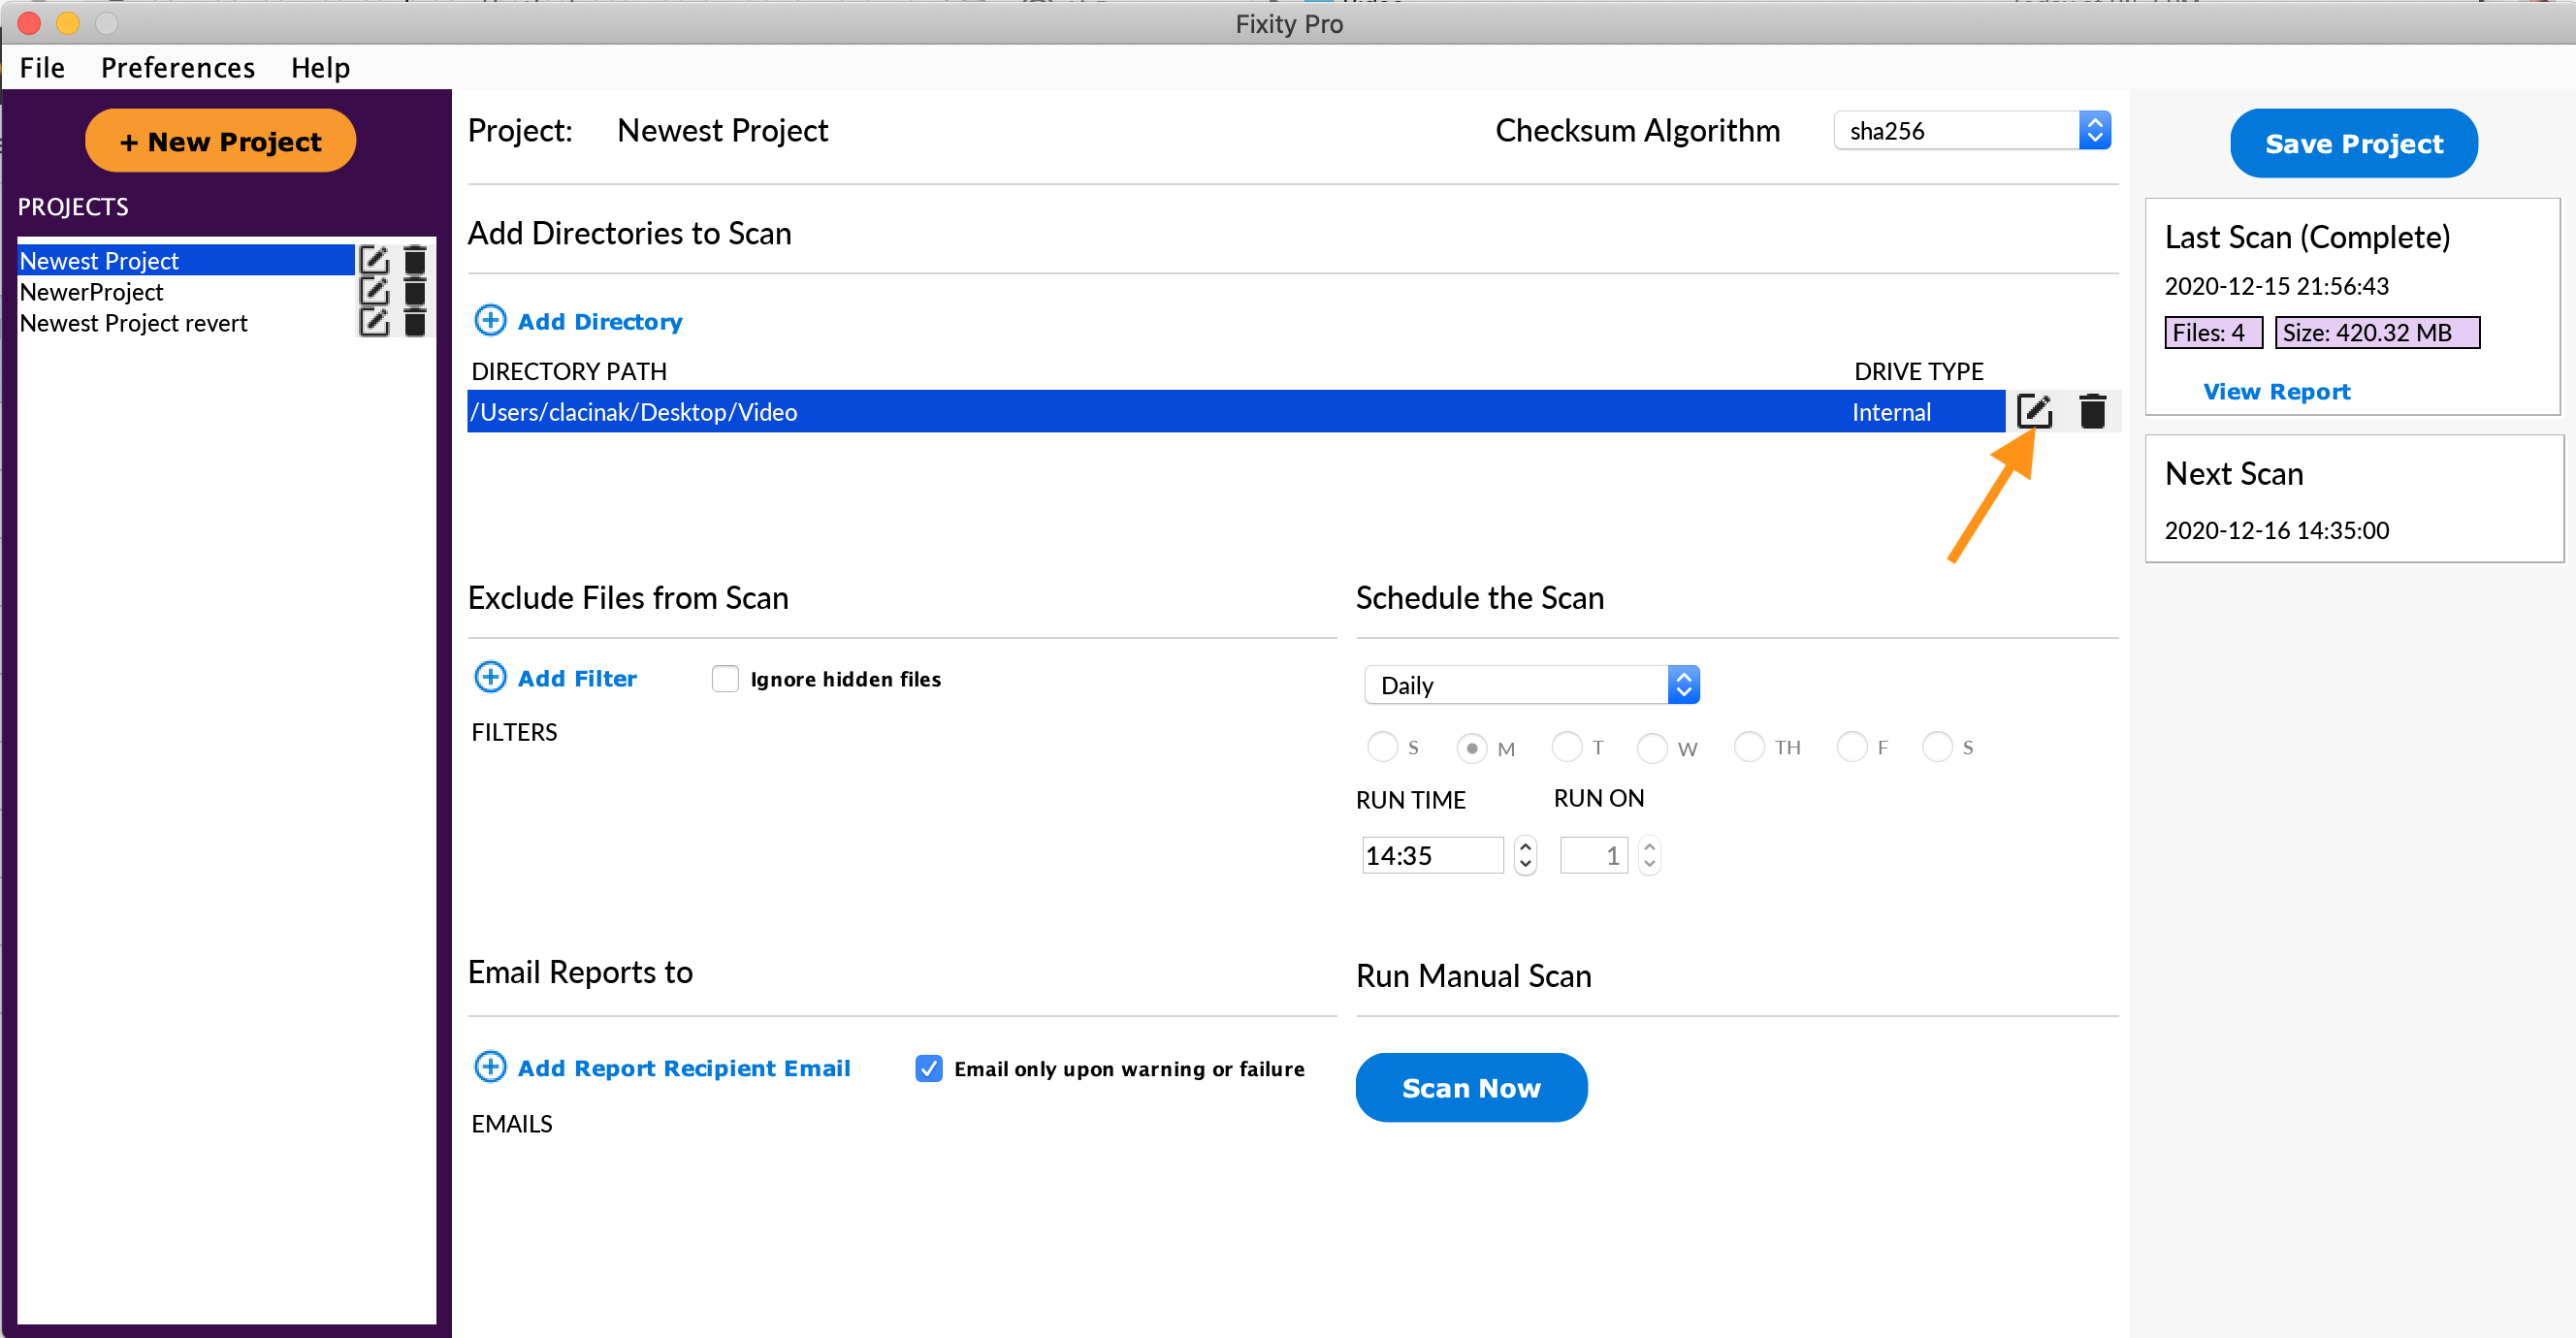
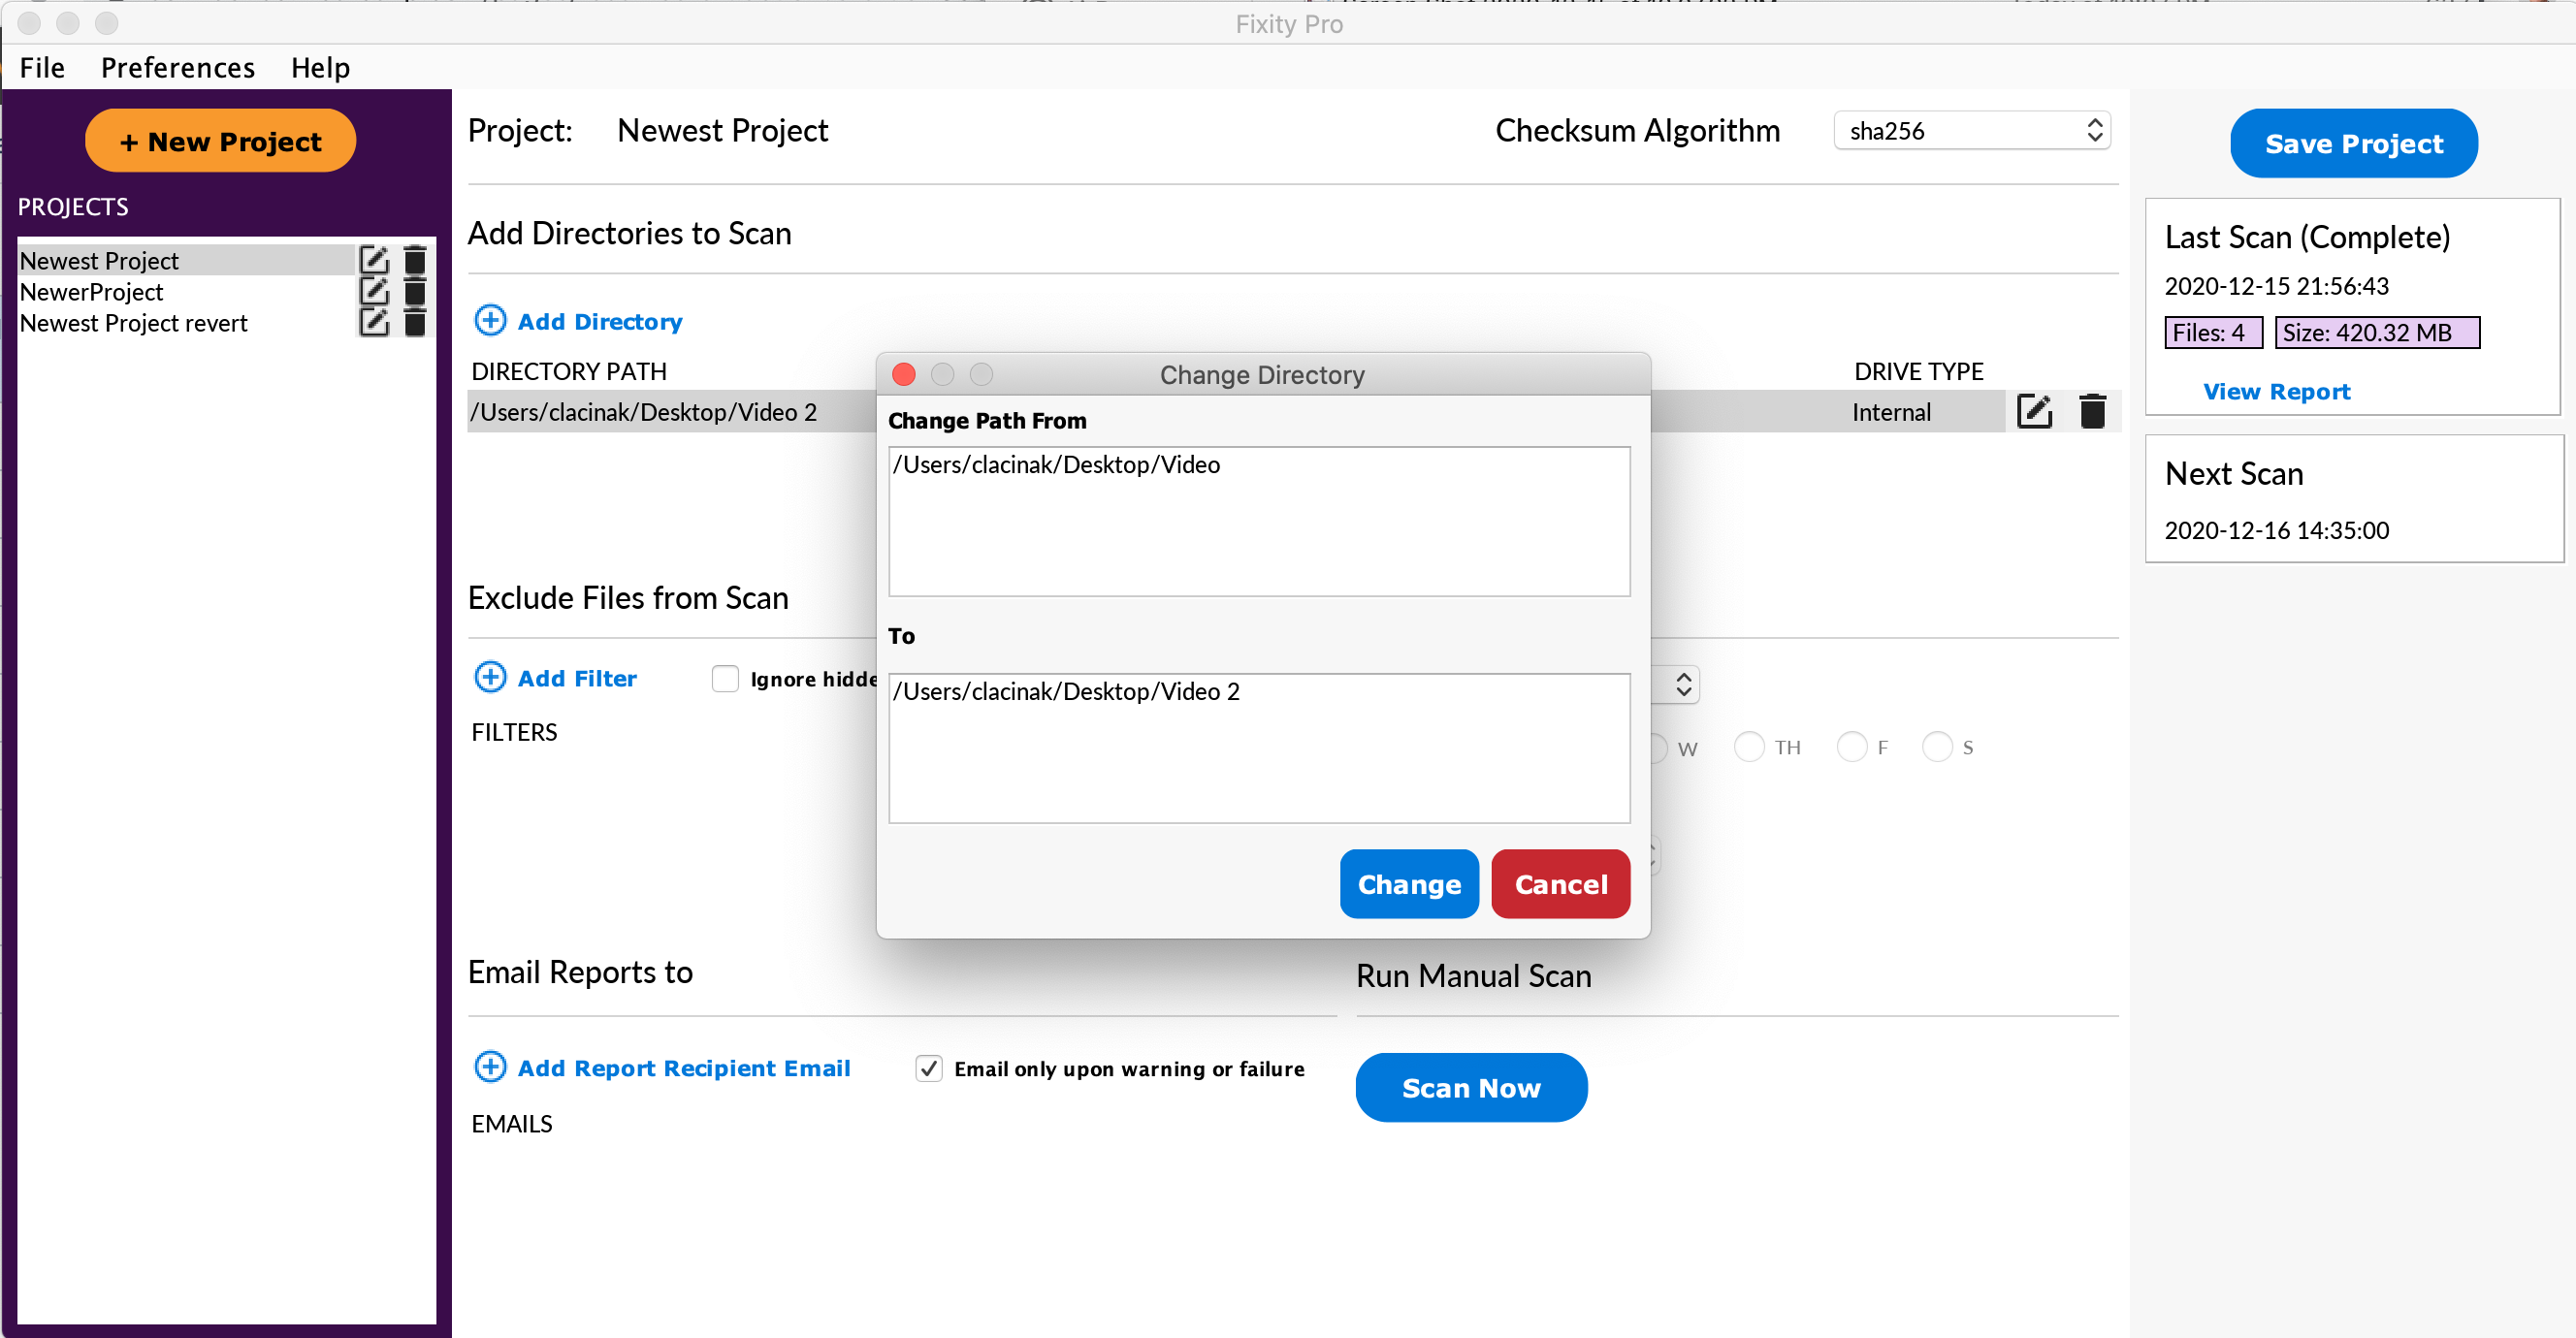
On occasion you may find that you want to move one or more directories that are part of a Fixity Pro project from one location to another. In this scenario, you do not want Fixity Pro to identify the files in their new location as moved files. You would like Fixity Pro to ignore the change of location and otherwise check to see if files have been changed, added, or removed. To do this, open the project that you would like to update and select the edit icon on the directory path that you would like to update as indicated by the orange arrow in the image below.
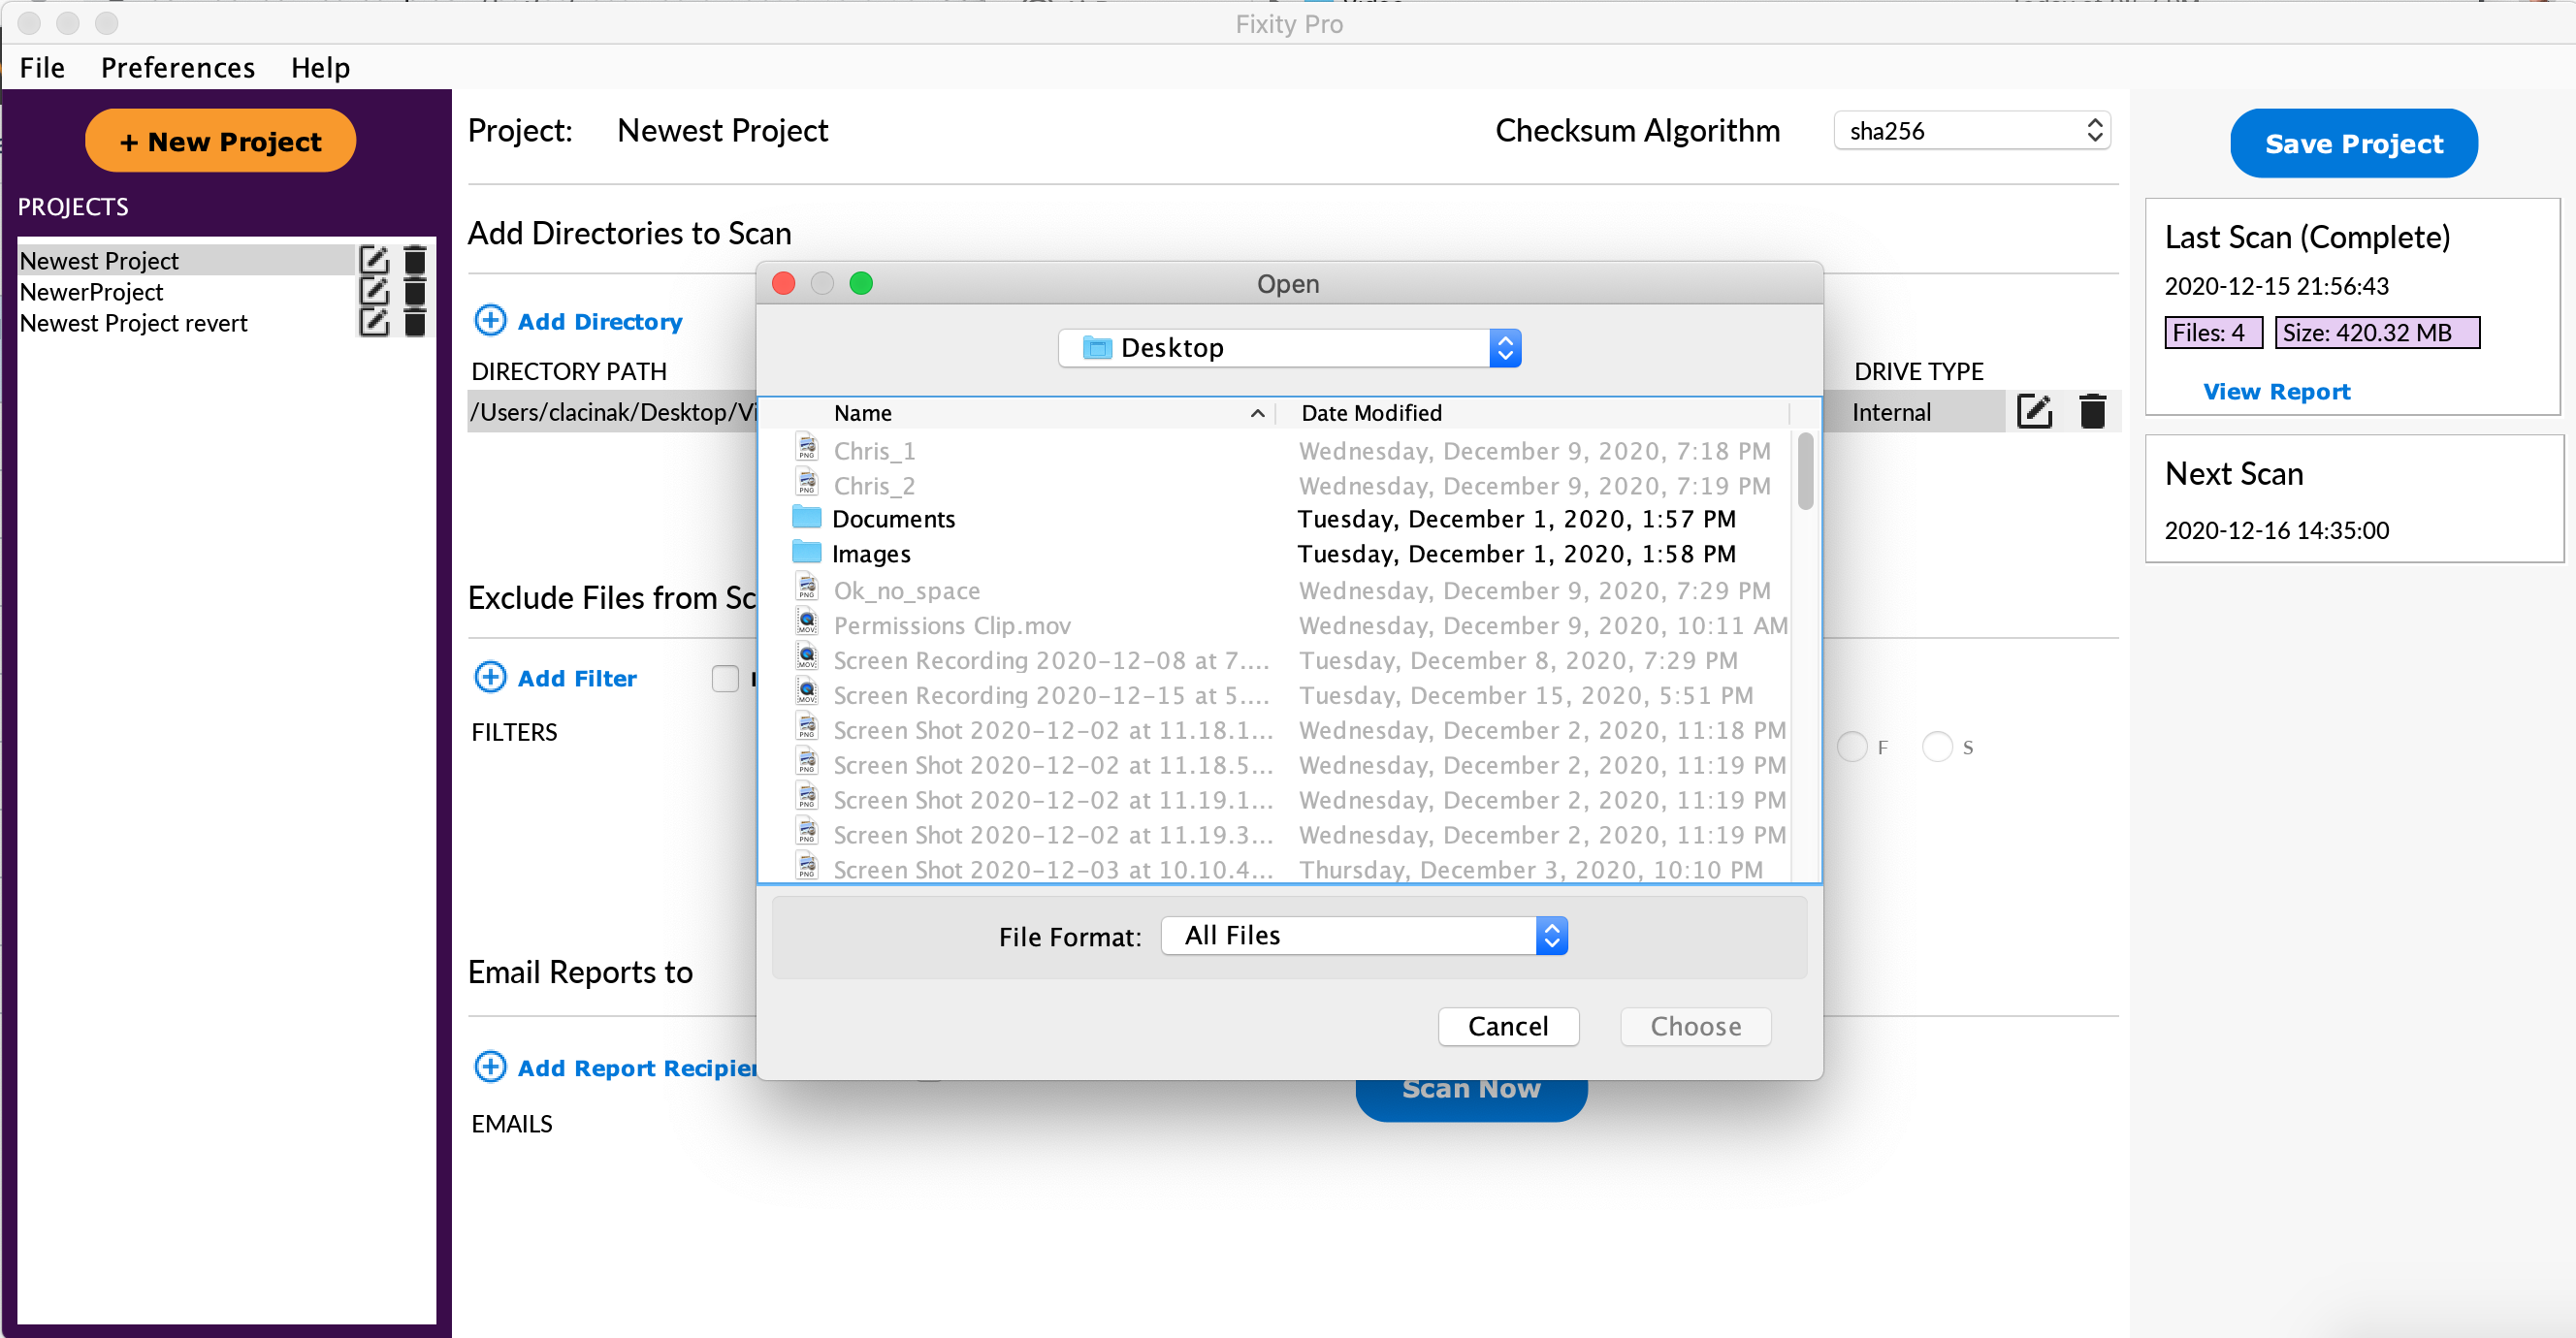
Selecting this will result in the open dialog seen below. Navigate to the new directory location, select the new directory, and select Choose.
The directory path will be updated in the user interface. Selecting Save Project will result in the following prompt, alerting you to the fact that you are changing the directory path. To confirm, select Change.
When you run your next scan for an updated directory path using this method, Fixity Pro updates the base directory path (the portion of the path that precedes the files themselves) and ignores the index location (because you know that it will in fact be different in most cases as a result of the new directory location. This can result in somewhat different than normal reporting results.
Importing Projects
Fixity Pro is capable of importing projects created by current and past versions of Fixity. To import Fixity projects from current and recent versions of Fixity you will use the History report that Fixity generates. For importing projects from earlier versions of Fixity you will use the .fxy files that the first few versions of Fixity generated.
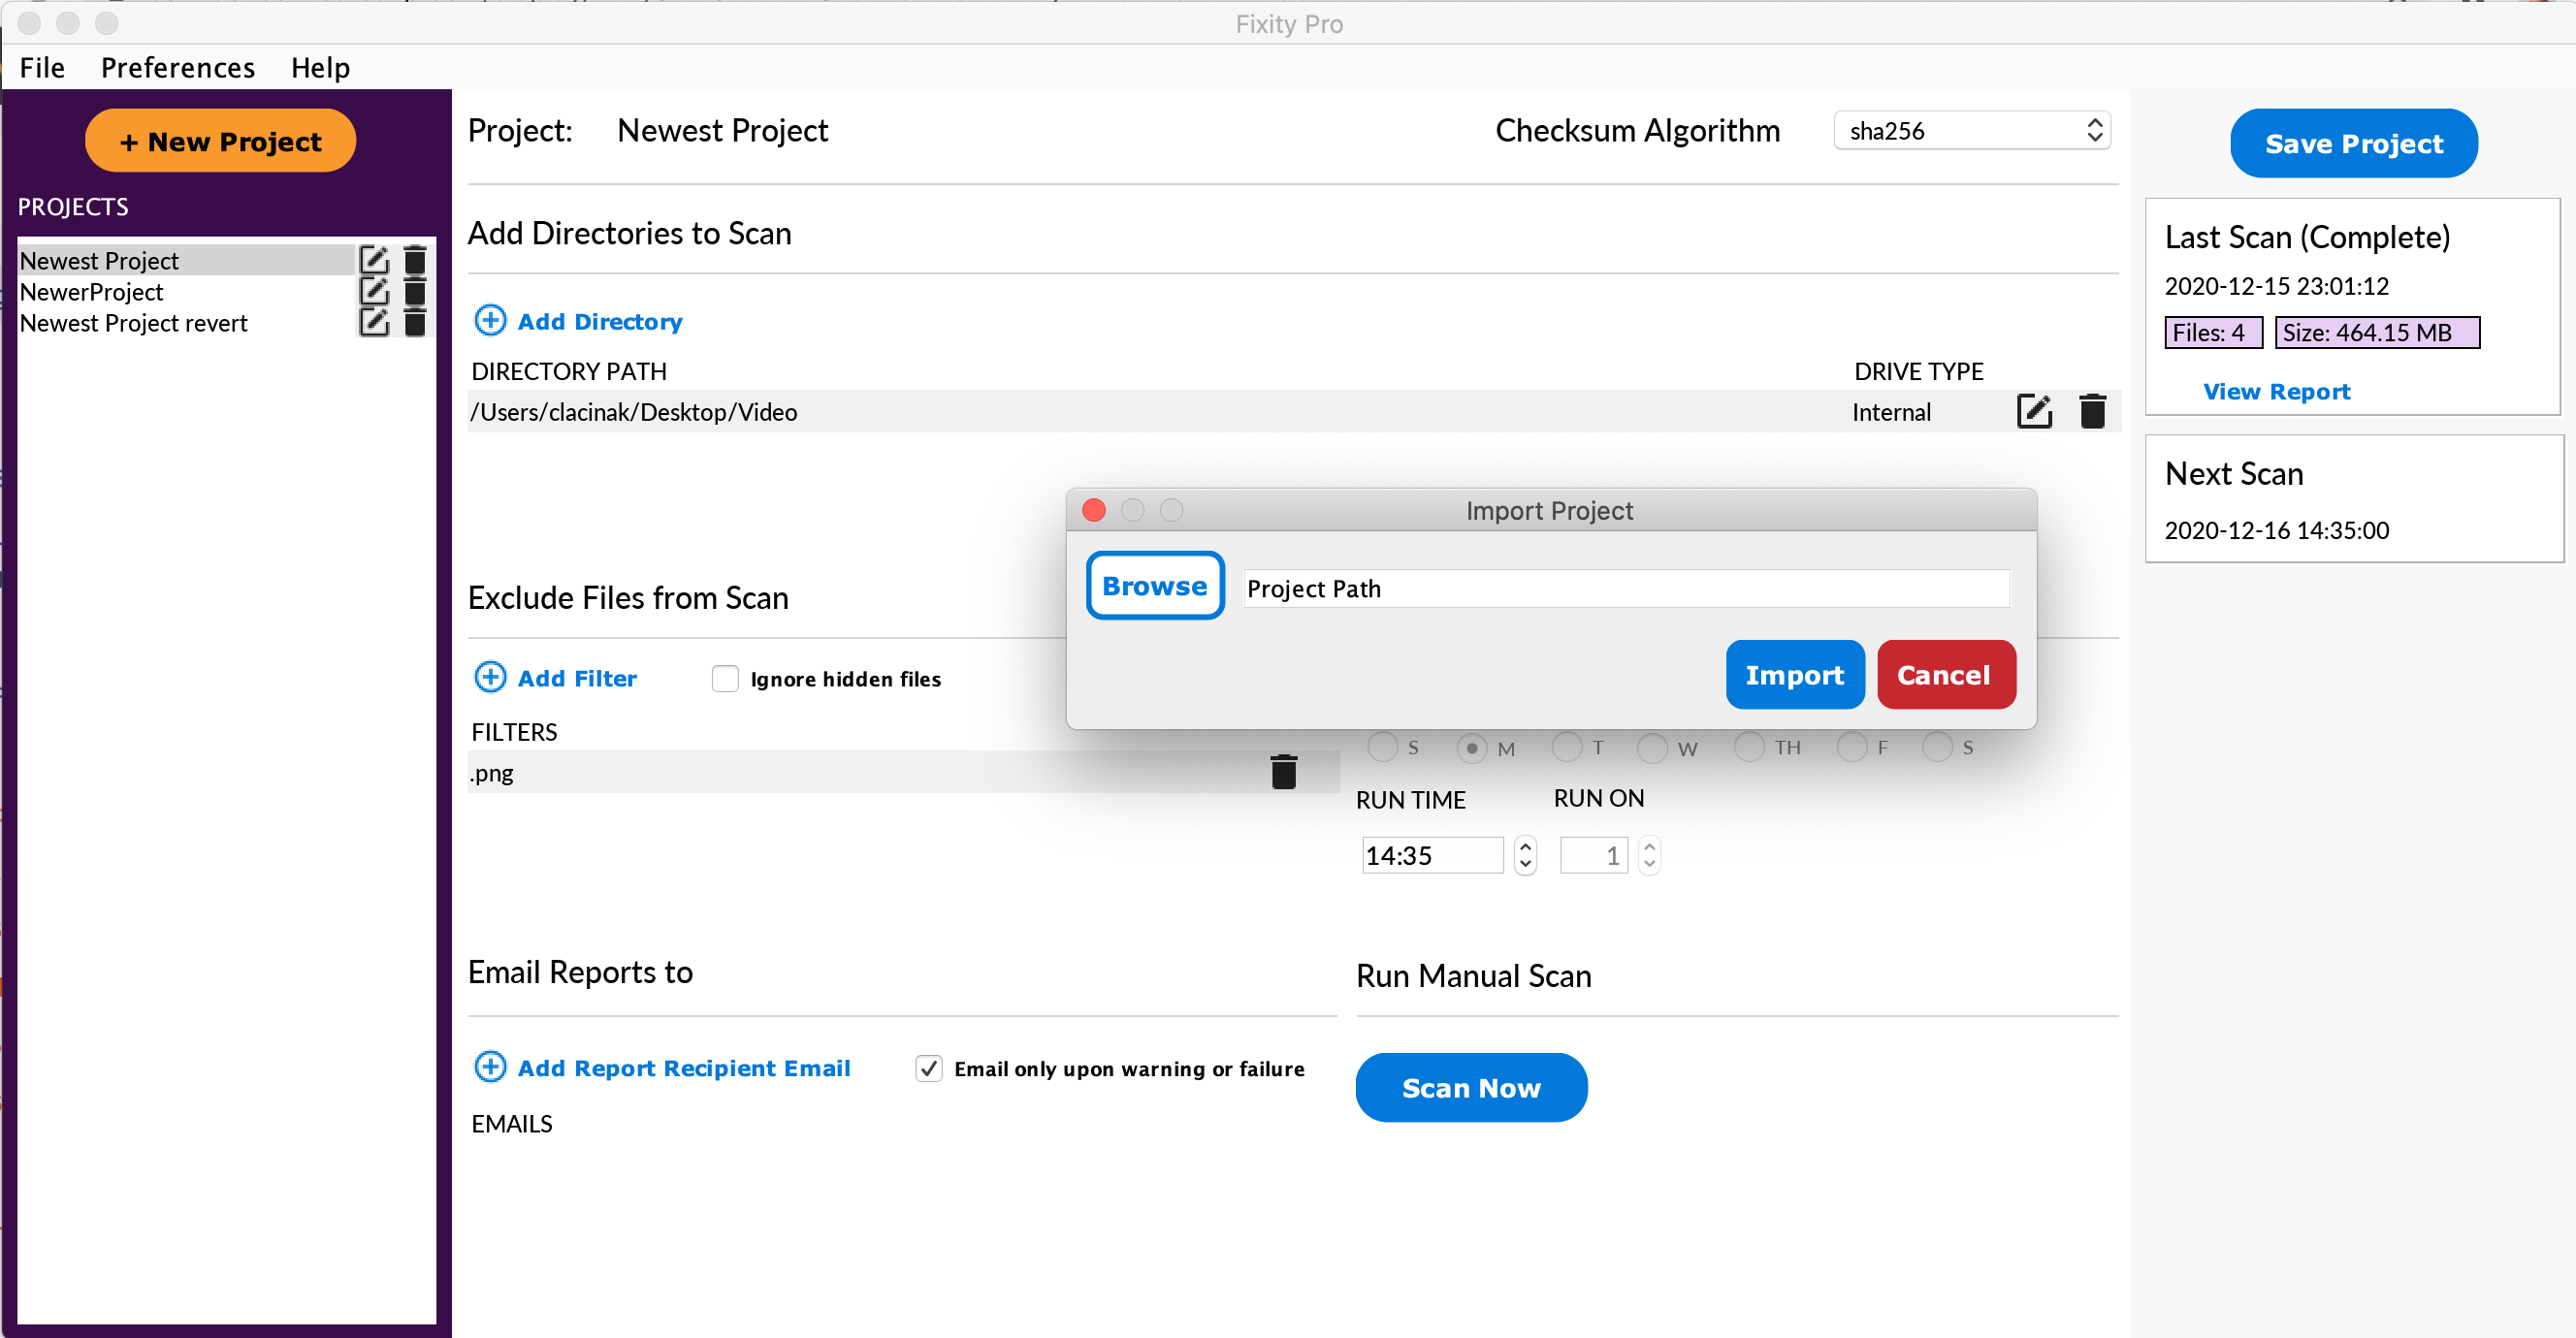
To do this, go to Import Project under the File menu as seen below.
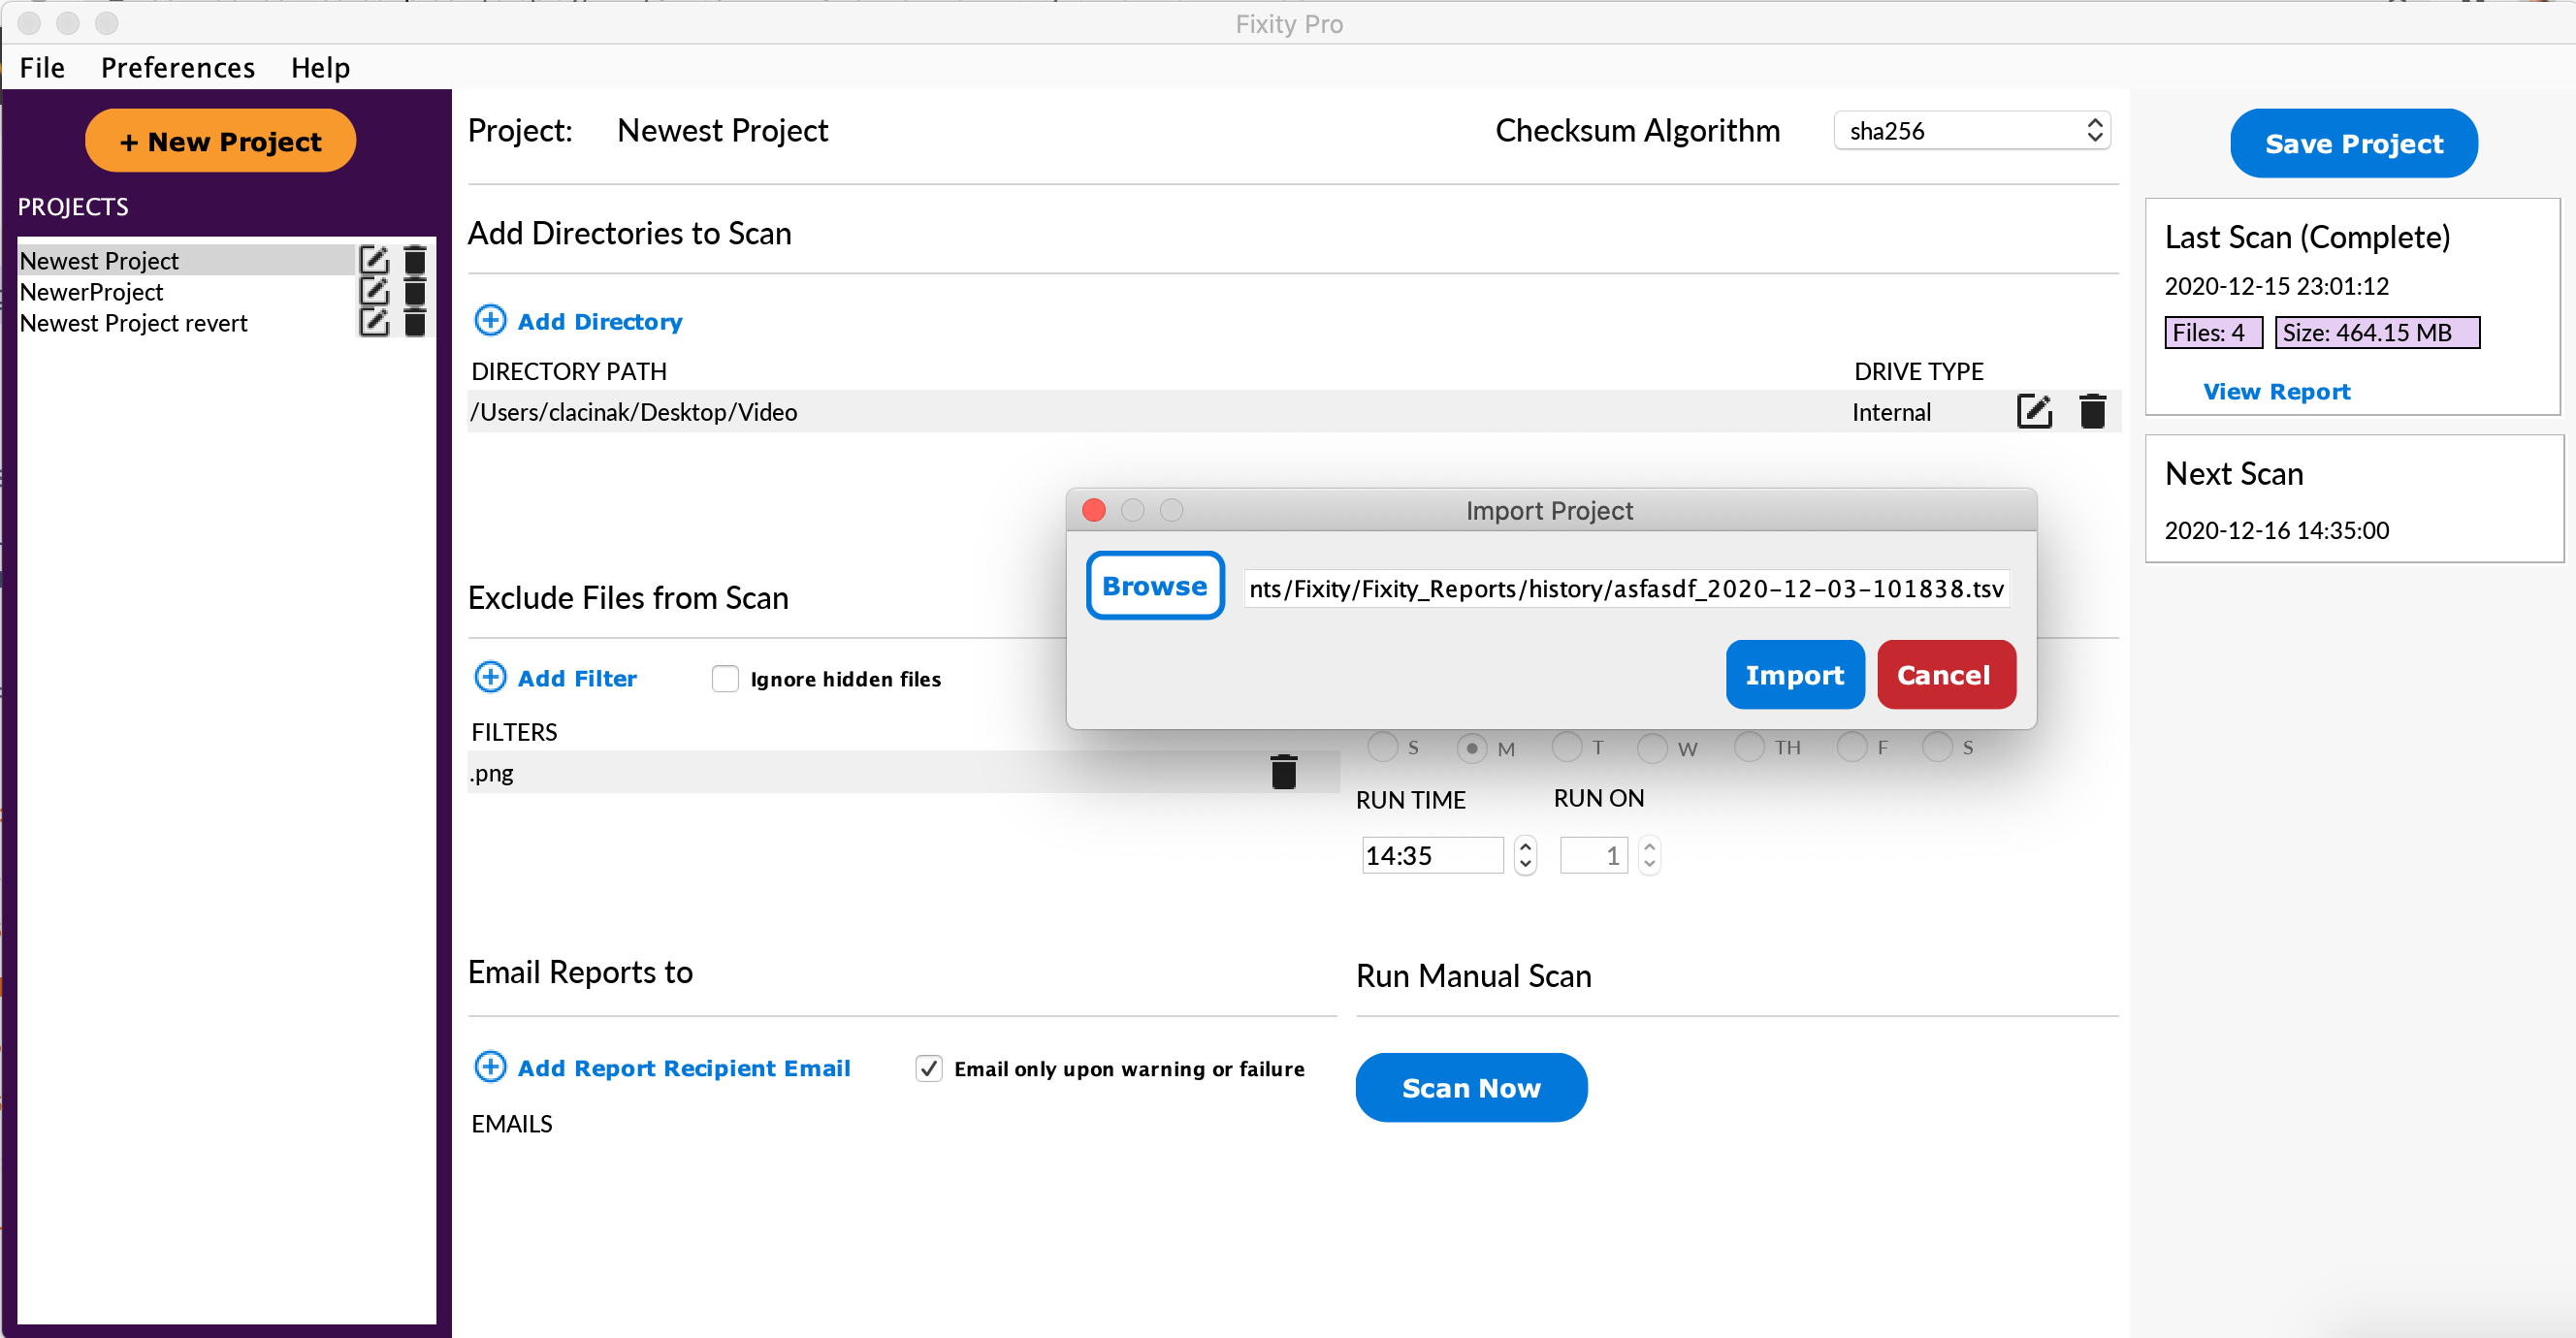
Selecting this will result in the following window.
Selecting Browse will result in the following Open dialog.
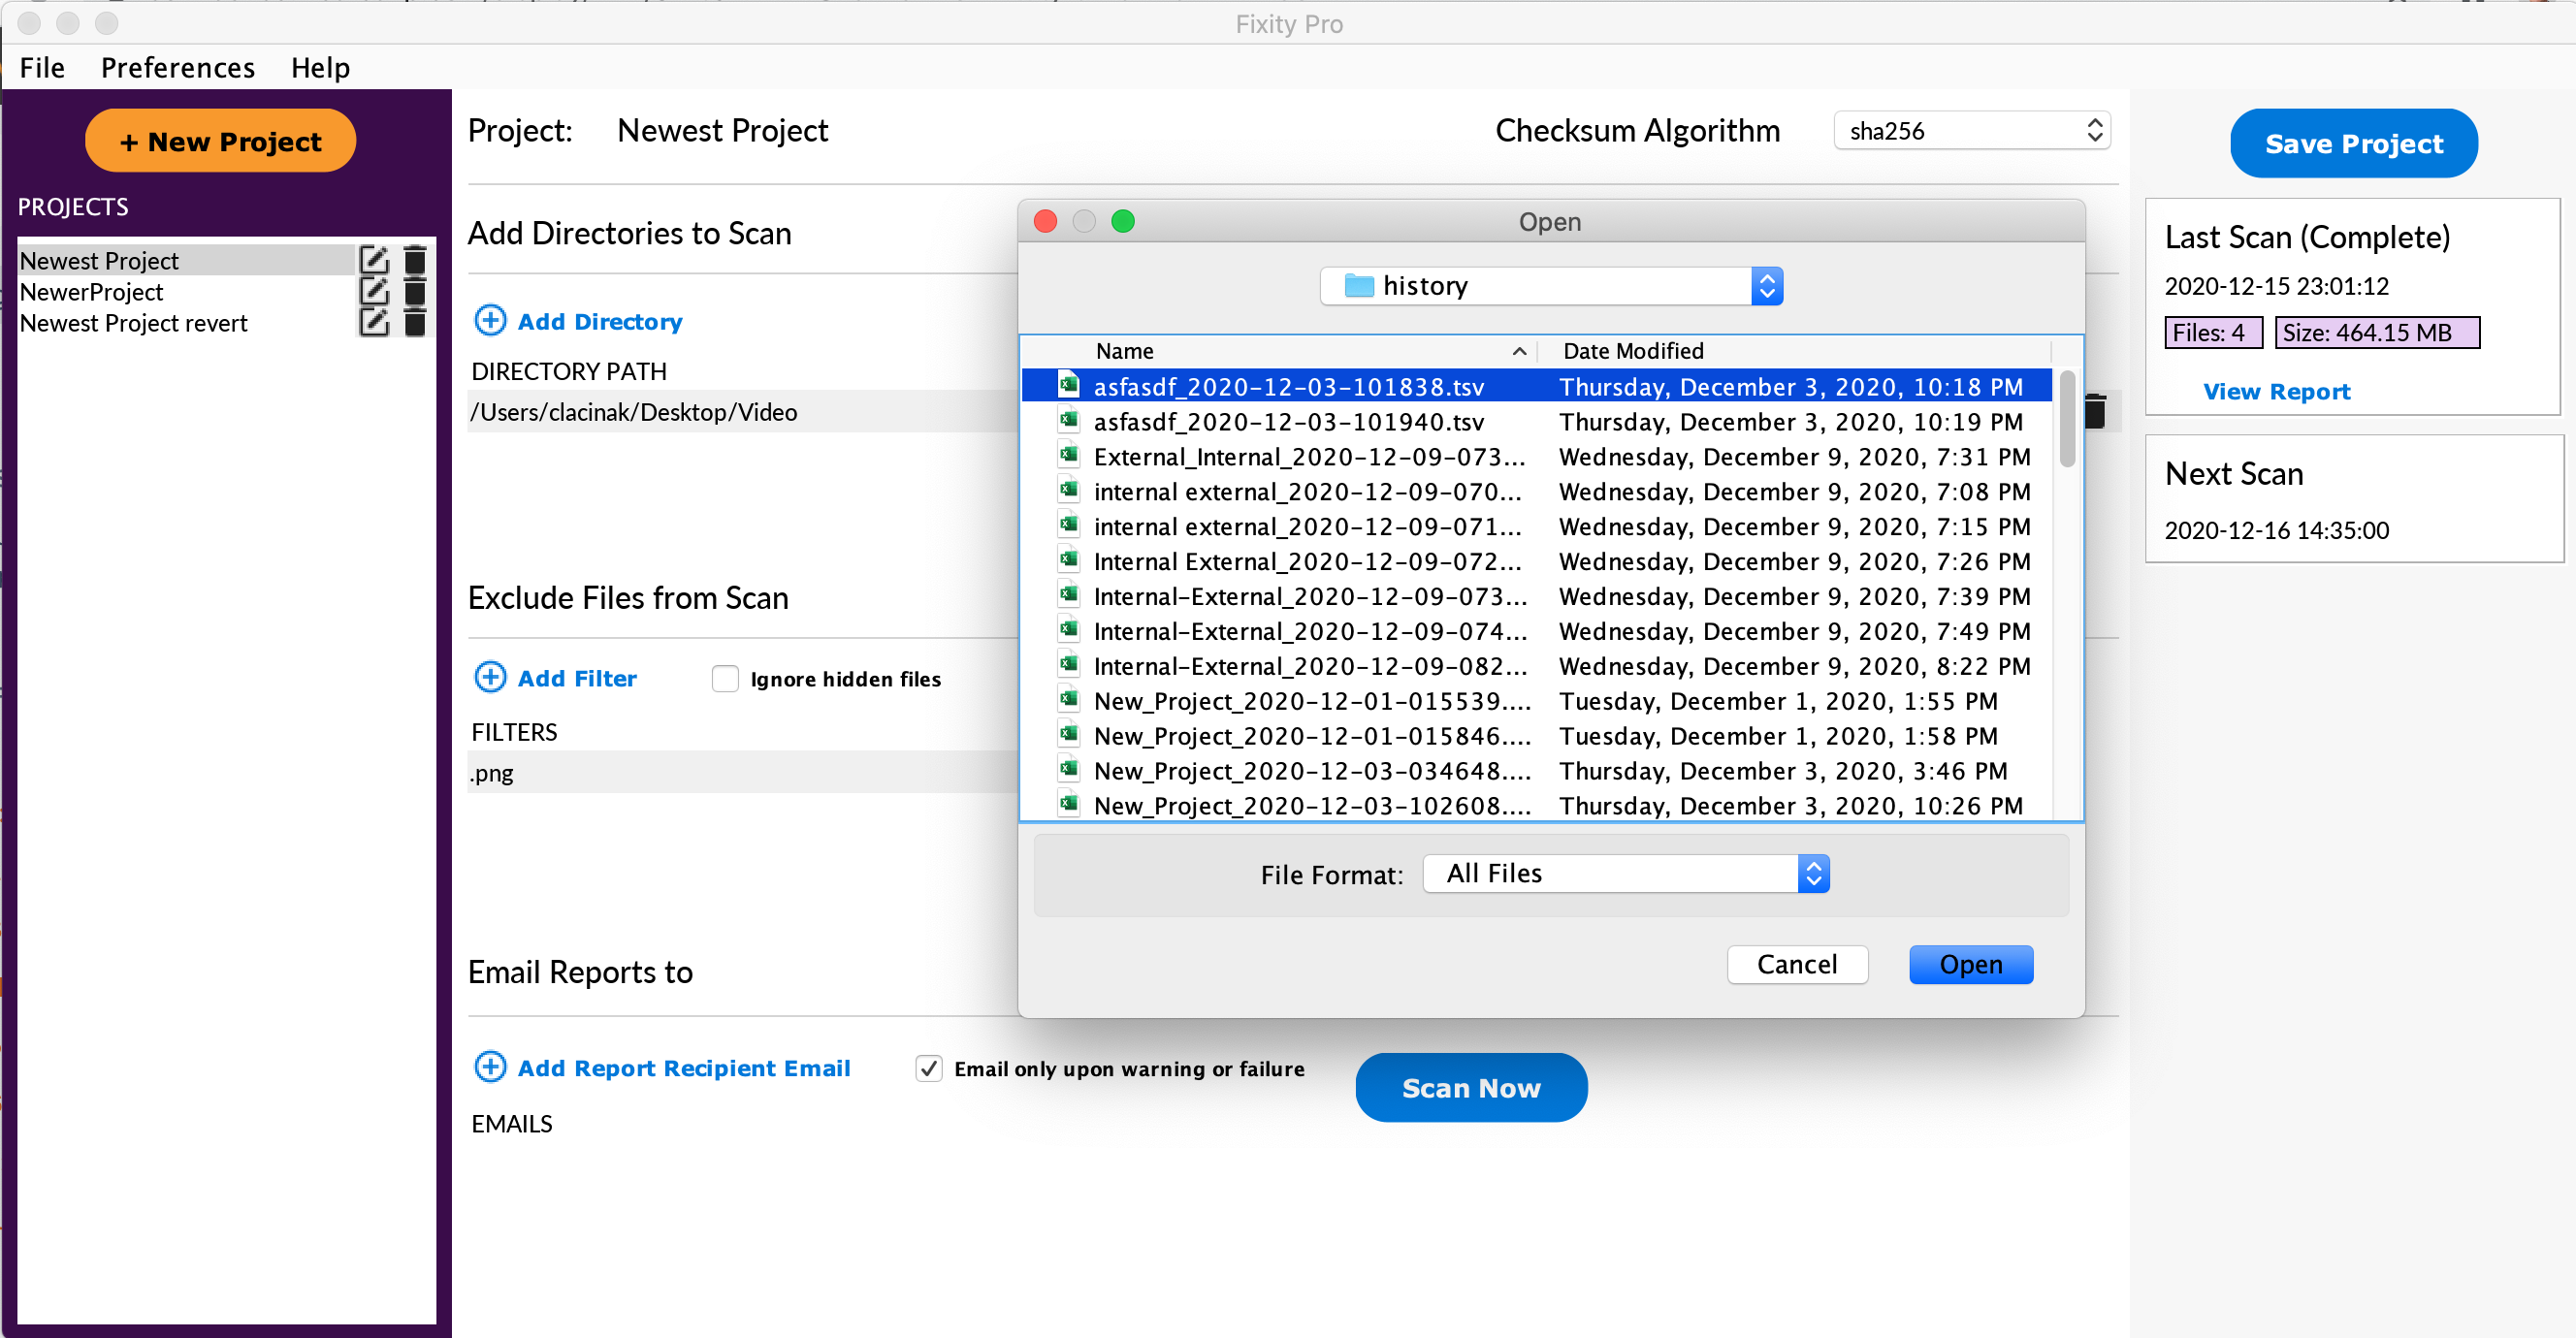
Navigating to the file you want to import and selecting Open will take you back to the Import Project dialog window.
Selecting Import will bring up a new dialog window prompting you to name the project.
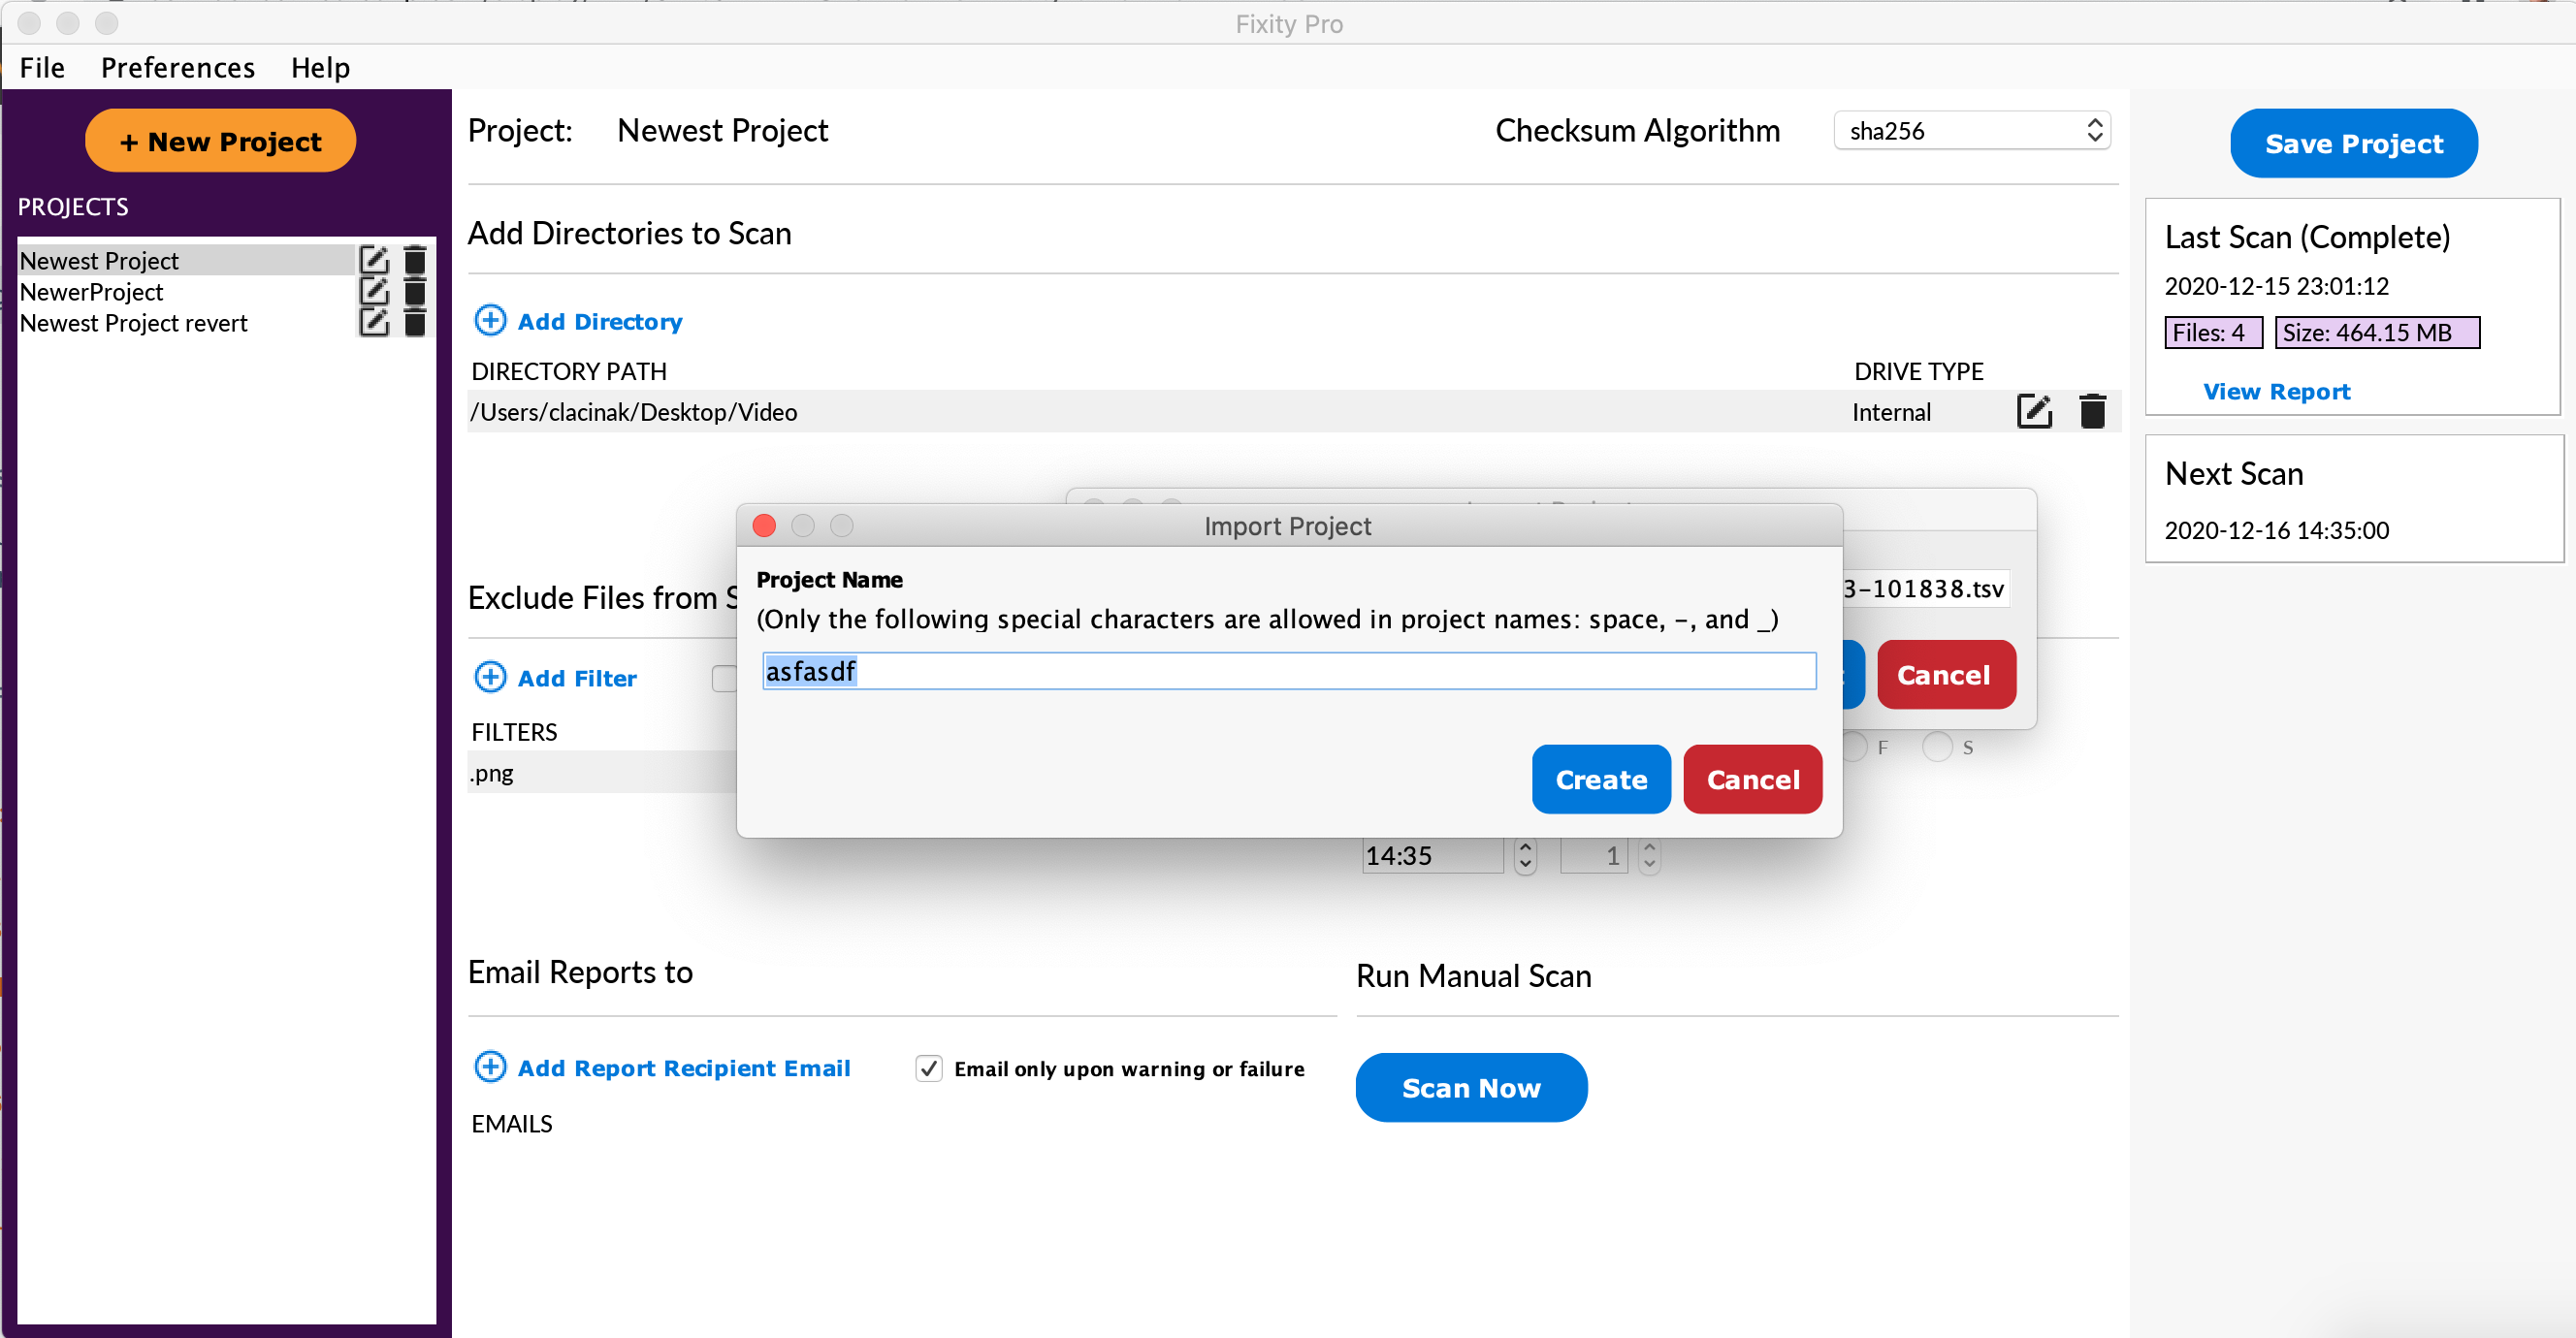
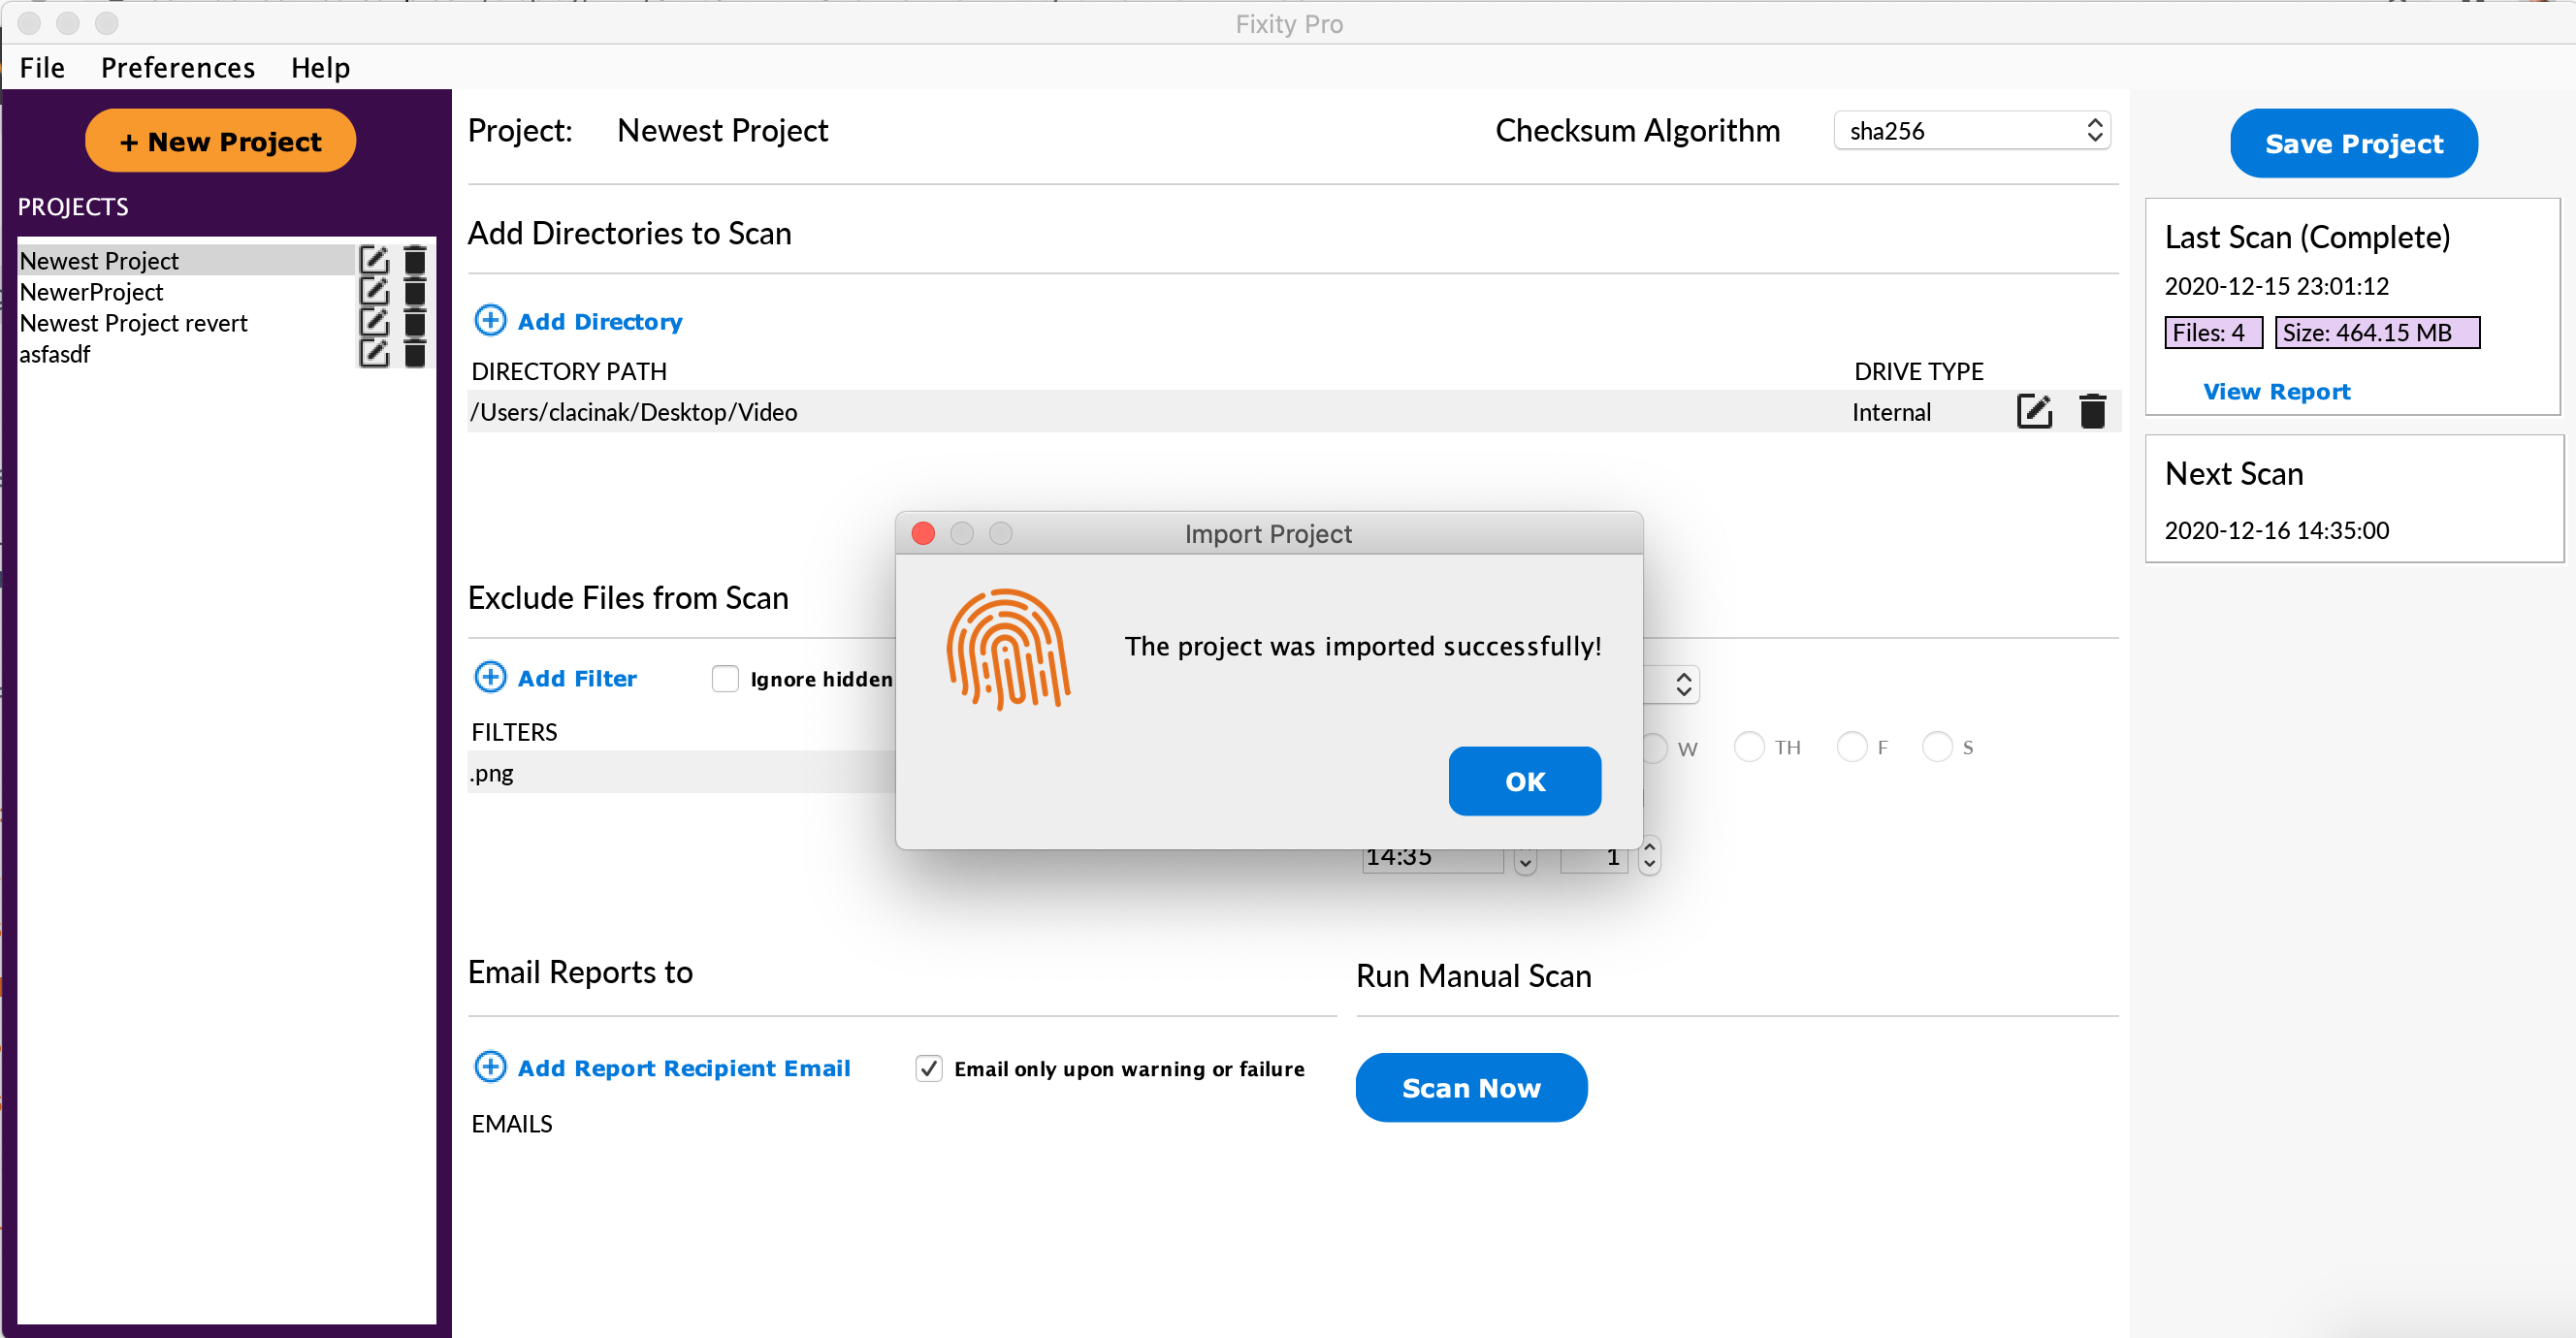
Selecting Create will cause the Project Name window to disappear. If the project is large and it takes a little while to load there may be a pause where it is unclear what is happening. Do not push any buttons or do anything during this period. Typically within 5 - 30 seconds the prompt below will appear indicating that the project was successfully imported and the project will appear under the list of projects.
Frequently Asked Questions
Q: Will Fixity Pro perform a scheduled scan if the application is not open?
A: Yes.
Q: Will Fixity Pro perform a scheduled scan if the computer is turned off?
A: Fixity Pro will not perform scheduled scans if the computer is turned off on Windows or Mac. On Windows, if the project is set to if missed run upon restart it will attempt to perform the scan after restarting. On a Mac, an automated scan will not occur until the next scheduled time.
Q: Will Fixity Pro perform a scheduled scan if the computer is logged off?
A: On Windows, if Fixity Pro is launched by selecting Run as Administrator and project schedules are created in this mode then they will run when the user is logged off. If the scheduled scans are created after opening Fixity Pro in the standard way then scheduled scans will only run when the user is logged on. On Mac, scheduled scans will only run when the user is logged on.
Q: What is a .tsv file?
A: The .tsv file found in the reports and history directories are text files that use tab as a delimiter for structured data.
Q: What is the best way to open a .tsv file for manual review?
A: The .tsv file can be opened with any text editor. However, for simple viewing of the data in the .tsv files using a spreadsheet application will be the easiest. The best way to open a .tsv (or .csv file for that matter) is by importing, instead of opening. Instructions on how to do this can be found here: https://www.weareavp.com/wp-content/uploads/2017/08/Spreadsheet_Workshop_Materials.zip
Q: How is scheduling performed within Windows?
A: Fixity Pro uses the Windows Task Scheduler.
Q: How is scheduling performed within a Mac OS?
A: Fixity Pro uses the Mac's launchd.
Q: Where can I find out more about filesystem index locations?
A: A free technical white paper on file system index locations, Fixity and File systems:
Enhanced System Monitoring via inodes, is available at https://www.weareavp.com/fixity-and-filesystems-enhanced-system-monitoring-via-inodes-2/
Q: What file types does fixity scan?
A: All files, including hidden files.
Q: Can Fixity run on networked environments?
A: Yes, Fixity will run on any files that can be mounted on your desktop.
Q: How deep in a hierarchical directory structure will Fixity work?
A: Fixity is recursive and can run on hierarchical directory structures as deep as the file system and networking protocols allow.
Q: How many files can Fixity scan in one project?
A: The number of files Fixity can scan in one project is only limited by network capabilities. As a point of reference, we scan an 18 TB NAS device - we break that scan into 10-12 projects.
Q: How large can directories and files be?
A: Fixity has been successfully tested on 10 TB directories and files that are 100s of GB. Any limitation will be based on file system, network, or bandwidth limitations.
Q: Can fixity access LTO tape?
A: Fixity can access files on LTO tape that utilizes LTFS.
Q: Can scheduled scans run simultaneously and/or overlap?
A: Yes, but multiple processes may impact performance/speed.
Q: Can I open the Fixity Application while a scheduled scan is running?
A: You can on Windows but not on Mac.